Make a super cute sewing mat caddy with a detachable pincushion that you can place in your belt or shirt to make sewing that much more enjoyable! This sewing caddy can be customized with any fabric you like to match your craft r sewing space.


When I am sewing, I hate to be reaching for a pincushion to place my pins, I am always stepping into my trashcan and searching all over for my small scissors. I am always losing my pincushion and my scissors have a magic blending power that makes them invisible to me, so I waste a bunch of time with all of that.


Well that was until this weekend, along with sewing a Cover for our bed Comfort and pillows (That I will be showing as soon as I finish the lamps I want to revamp to go with our bed) I sew this cute little Caddy:

The best part of the pincushion is that I designed it to be detachable, this way I can pin it to the seeing caddy mat, to my belt, my shirt, or just about anything. I am having so much fun with it :)


Now let's jump into the instruction so you can make one for yourself too!
Cutting the pieces
In my case, I just sued fabric that I already had lying around, but don't worry because this little caddy doesn't use too much material, and I know that you will love the end result! I used a tan color Osnaburg fabric as a turquoise plaid, so When I am putting them together, I will refer to them by color, but in your case, they might be different colors =]


- 2 pieces of 23×15 inches (raw color Osnaburg fabric)
- 1 piece of 20×14 inches that you will fold in half so it will measure 20×7 inches (Turquoise fabric)
- 4 long pieces that are 2 inches wide. (2 of 25inches and 2 of 17 inches long)
- 2 pieces of lightweight interfacing (I use Pellon 808) 1piece of 23×15 inches and 1 piece of 20×7 inches.
- Cutter and matching threat.
Making the sewing caddy
Iron the interfacing to the back of one of your big raw color pieces. and to the inside of the pocket (the Pellon piece will only cover half your piece because you will fold it in half)


After folding your pocket (the turquoise fabric) sew the top of the fold about 1/8″ from the edge.


Align the raw color piece that has the interfacing in the back with your pocket like in the picture and sew the left edge.


Once it's sewed measure 1-1/2″ from the edge and make a 1-inch fold, like in the picture.


Measure how big you want your pocket and make another 1-inch fold. (I measure 6-1/2 inches and then folded)


Pin the folds, cut the excess of material in the right side and sew the bottom and the right edge.


Sew the rest of the pockets you would like, I divided the rest of my space in 3 and sew from the bottom edge to the top of the pocket, then stitched to the side 1/4″ and sew back to the bottom to have a double stitch dividing my pockets.


and your pockets are ready, now we need to make the edges.


Place the other raw color piece in the back and pin both together. Place the 2 longer 2inch wide pieces in the back of your caddy.


Pin the edges.


Sew about 1/8: away from the edge.


1- Turn your piece facing up.
2- Make a small fold on the edge of your fabric.
3- Fold it again.
4- Pin it to your piece. Repeat that in both edges.


Sew the edge of your folds and cut the excess of fabric in the ends.


Now for the top and bottom edges is almost the same process. Place the strips of fabric in the back and sew.


Turn the fabric facing up.


1- First you need to fold the end of your fabric up covering the corner.
2- Then make a small fold.
3- Fold again.
4- and pin to secure it in place.


Repeat with the other edge making sure the end folds are tight because if not the edges will not be clean.


When sewing this edge make sure you secure the corner stitching back and forth.
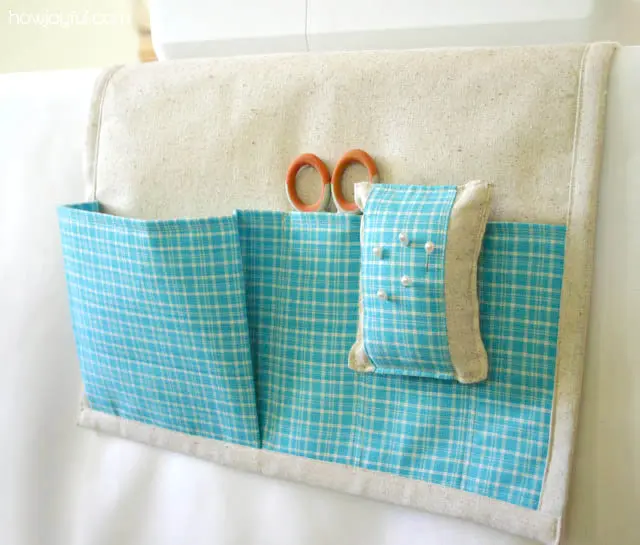
Your Caddy is ready!
Making the detachable pincushion


You will need:
- 1 piece of 6×8 inches folded to 6×4 inches. (Showed in the picture of the Caddy Materials too)
- 2 pieces of 2-1/2×6 inches (Turquoise fabric).
- 1 piece of 2-1/2×6 inches of lightweight interfacing (I use Pellon 808)
- A thick bobby pin.
- Glue gun.


Press the interfacing to 1 of the turquoise pieces of fabric and also make 1/4″ folds in both edges. (Both pieces have the folds at the ends)
Make a small cut in the center where you want the pin to be.


Place the bobby pin with the front side facing out to the back of your piece.


Apply a generous amount of hot glue in the back of your bobby pin.
Wait for the glue to get cold before continuing.


Sew the edges of your both pieces to your raw fabric.


Fold the fabric with the turquoise facing inside. and sew two edges to make a pocket. Leave the top side open to turn inside out.
Cut the excess of fabric in the corners.


Turn inside out.


Stuff your pincushion.


Fold the top edge.


Pin it, sew all the way around the pincushion. and you are DONE!


The caddy and pincushion together


* This tutorial is provided for personal, use only. If you wish to sell items made with this tutorial please purchase a limited production license.
Check the Site policy at the bottom for further information. Thank you!
yvonne
Friday 28th of November 2014
Thankyou I am looking for projects or my granddaughter to make I am sure she will love this. She hasn't her own sewing machine yet but if she is keen and keeps sewing we will get her one. She has made a few things a book holder for her bed, a heat pack for her mum and one for herself. The holidays are fast approaching so she will have more time to sew. :)
caroline
Wednesday 26th of March 2014
just made it - it's lovely and so easy to follow your instructions. it will be my sister's birthday pressie as my machine has it's own table with all the drawers, shelves and pockets for accessories to hand - but hers has to sit on a table so will be perfect. thank you!
Beruta Sunaklis
Wednesday 9th of January 2013
Just finished making your amazing sewing caddy thanks to a great tutorial. Can't wait to show my mum. She will be impressed. Now to make a matching sewing machine cover.
Leah
Tuesday 14th of August 2012
Hi I absolutely love this tutorial so I mentioned it on my website.Heres the link http://moostitch.wordpress.com/2012/08/14/sewing-caddy-by-how-joyful/
I will be making this caddy soon thanks
Shelly
Wednesday 18th of July 2012
I just made this caddy and absolutely love it! I even included a cell phone pocket in mine, hate when I get a text mid project and my phone is buried beneath piles of fabric :)
Thanks so much for a great tutorial!