21May | 2011
Felt Camelia tutorial and pattern
Posted under Crafting . Sewing . Tutorials | 60 Comments
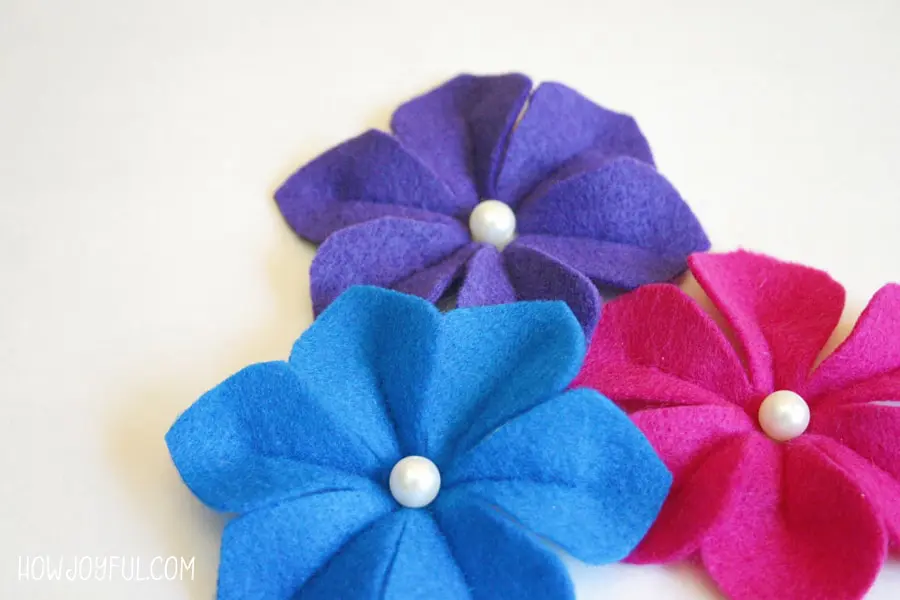
Remember when I shared that I wanted to celebrate spring? Well the celebration has begun =] First I am going to share flowers made out of felt. And these particular ones are very easy! I know I am kind of biased with the color combination but all the felt flowers I will be sharing are going to end up in projects for my office so you will see those colors a lot. One of my favorite flowers are Camelias (Spanish name) and even tho just with 2 layers they don’t look much like Camelias if you use 3 or more, it will begin to resemble them =]
MATERIALS
- Download the pattern (You will find 5 different sizes for you to play with! )
- Your color choice of felt (I used 3 9″x12″sheets for 3 layers in different sizes)
- Thread and needle
- Hot glue gun (in case you don’t want to sew it)
- Scissors
- A pearl or embellishment for the center of your flower
**The download on the left is a PDF format file, so you will need to have Abobe Reader installed on your PC or MAC. Without the program you will not be able to download or preview the file. If you have trouble please visit this link, because each browser works differently. If you are having trouble downloading the PDF file try the .ZIP file on the right, you will need Winzip or a program that can read .ZIP files to open it.
THE PROCESS
This is how I used the pattern. First I cut the paper pattern of the sizes I wanted to use (1, 2 and 3) then I placed them on top of the felt, pinned the pattern and I cut the felt shapes. To assemble the flower you simply have to sew or glue (I prefer sewing them) the center of the petals, after that your flower is ready!
Here you can see a close up of how I sewed the back of my flowers, I left the center open because when you add a lot of layers it’s easier to put the pearl or any other embellishment in the center.
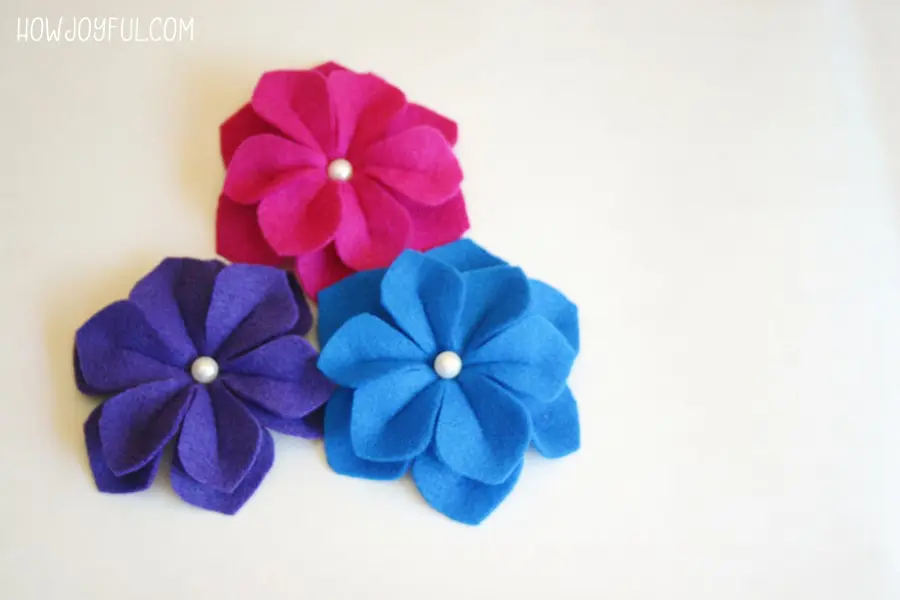
You can add as many layers as you want, or just play with the different sizes, below you can see some of the options I did with mine. Once I was happy with how they looked I hot glued around the edge of the center in the lowest layer and moved my way up finishing by hot gluing the pearl.
Or you can just use them as one layer, I think they look pretty either way =] See how easy it was?
Hope you enjoyed and stay tuned for some more flower tutorials!
* This tutorial is provided for personal, use only. If you wish to sell items made with this tutorial please purchase a limited production license.
Check the Site policy at the bottom for further information, Thank you!
Joy Kelley is a Chilean Designer. Wife. Crafter. IMac dependent. Pattern lover. Color obsessed. The girl behind the HowJoyful Design Studio. Mrs Poodle at Weddingbee.


Pinterest
Twitter
Facebook
Instagram
Vimeo
Burda Style
These are so cute!
I love those, you make it sound like it’s so easy! I will def give them a try, Thank you for sharing!
The are so lovely, and I’m gonna try to make one right now
Thank you for the pattern
lindas as flores vao enfeitar a sala beijos do Brasil
Is felt washable or will the dye run on to other fabrics? I was thinking of making these and attaching them to a top…. thanks!
Felt is washable and usually keeps the shape better than other fabrics, you might double check the label, but the one I get (from Joann) holds the colors really good. so they work fine for tops =] I’m excited to see what you come up with!
It was very easy to make I will post my result this week and a link to your blog so if someone else wants to make it they can click to youre blog
Adorable! Thanks for sharing, Joy. I’m excited to see what type of flower is next. Spring is in bloom.
thanks for sharing Joy!
I would definitely make this for my next project, oh, I won’t forget to link this useful tutorial
Oh wow – what a lovely tutorial – thanks so much for sharing this with us all…I will definately be trying this one out!
Thank you for shareig such lovely tutorial!
Thanks a lot for this so cute tute. Be sure that I will try it soon.
It looks so simple and beautiful! Thank you for sharing
Olá!
Obrigada pelos moldes.Linda camélia.
Um beijo,Nena
Amei!!!!!!!!!!
Muito Obrigada!!!!!!
Vou fazer e colocara foto no meu blog com link para o seu.
Bjs
lindas,lindas,muito charmozinha,gostaria de saber se pode ser feita e EVA,aguardo resposta,bjks.
These are lovely, thank you for sharing!
I will be making these today. Found this on ‘one pretty thing’. I was planning on putting a few fake flowers on a clip but this will be soooooo much better! thank you.
This is charming and I want to tkae an old leather purse to make my blue dimensional flower, but when I clicked and right clicked on the pdf. download and I come up with a blank page. Can you forward me another way to get the pattern, so I don’t have to make my own? Thanx, Kathy
Hi Kathy, it all depend on the browser you are using to download, they all work different so I am not sure why is this happening to you. but if you use firefox, by clicking on the download it should open a new window with the PDF file, and if you have adobe in your computer a top bar will show you a save file option. If you are on a mac, you can right click and view on Preview, you can also save it there. Hope that helps – have a good day!
I’ve made all of your felt flowers for my niece’s birthday gift. She loves ‘em!
I’ve post all the fun over at my blog http://www.sculptedlight.ca. Thanks, Joanne.
They urn out so cute! you did a great job Joanne!
Looking at the pictures I’m sure it will be possible to create such a nice thing. Thank you for a great idea!
hermosas flores y el tutorial muy bien explicado. saludos desde puerto rico
Thanks for a lovely tutorial and pattern.
I just had to make one.
I used mine on a card you can see it here
http://little-stamper.blogspot.com/2011/06/felt-flower-card.html
I really loved making it
hugs,
Oshrat
I loved how your card look =] soo pretty!! great job Oshrat
These are sooo cute! I’d love to make one…but can’t download the pattern. Help, please.
Hi sara, I just checked and there is no problem with the file at all. it always depends on the browser you are using, sometimes the download it to your computer and you need to go to your download folder to see it – everything is good in this end tho =] have a good day!
These are so cute. Thanks for the template! I made these flowers and just posted about it. Mine definitely did not turn out as well as yours but they are still cute.
Great! Thank you for pattern.
queria felicitarte por tu pagina exelente!! me encanto… ya hoy fui de compras y consegui todo o casi todo uno con lo de las manualidades nunca tien final..me encantaron las flores uqe haces en fieltro, bellisimas y justo tengo una nieta que es la primera aun no la conozco pero si la veo por skype ellos vivien en venezuela mi pais de origen, y yp aqui voy de visita pero en estos tiempos no he podido ya hace dos anos y la nina solo tiene 6 meses peor es una belleza y me encantaria hacerle cositas para el pel, ya que estoy todo el dia en casa recuperandome de accidente vehicular y no puedo trabajar aun o quien sabe si volvere a trabajar, ando en todas esas cosas ahora mismo terapias y esas cosas asi que me queda mucho tiempo y quiero sentirme util en algo y gastando poco ya que paso el dia aqui en casa, peor no he podido bajar los patrones para hacer las florecitas, no se si es que tengo que pagar o que no lo estoy haciendo bien ..o que me falte algo en la computadora para poder bajarlos ..si me puedes ayudar te lo agradecere siempre y claro me encantara despues uqe haga algunas enviarte fotos antes de empacarlas ya que quieor hacer una cajita con cositas para Isabella y le llegue antes de navidad ropita ylos lazos que le combinen y esas cositas ya te mandare una foto cuando ellos me manden a micon lazos puestos y todo para que la veas tambien es blanca blanca con cabello negro y ojos azules es lindisima..que abuela tan creida soy jeje pero ya la veras..bueno en espera de tu ayuda por aqui en florida en Orlando para ser exactos es donde vivo hace ya 8 anos ..y Diva es mi nombre real aunque no lo parezca jeje… gracias por todo y Dios te cuide tus manos y cerebro ya que tienes ideas geniales y lo mas importante saludame a tus perritos, yo tambien tengo peor shit-zu una belleza ya te enviare fotos de mis amores bellisimos tambien …bye gracias
Hola Diva, que alegria que mis patrones te sirvan para hacer cositas para tus nietas, lo que necesitas es tener Adobe Acrobat http://get.adobe.com/reader/ instalado en tu PC o MAC. porque los archivos son PDF. Asi que cuando instales el programa los vas a poder ver. Espero ver tus fotos, un beso grande!
Wao gracias al fin los tengoooo.. no lo pudo creer..ya confeccione la primera camelia en orange .. solo me falta el centro.. si me das un email te la envio para que veas que tal me quedo… hoy amanecere ..a ver que tal me van quedando..poniendo toques personales …un abrazo grande.. me has hecho el dia mil gracias de nuevo ….
Diva
I wanted to let you know that I just linked to your tutorial in this post. For YOU – A bunch of flowers – one dozen flower tutorials – http://creatingthehive.com/blog-post/174849/for-you-a-bunch-of-flowers
It’s so beautiful … We’re going to give the daughter made a hairpin.
Thank you.
Very pretty!! I also posted a link to this on my blog
Thanks!
Jennifer
LOVE these!! Just made one for my little girl to wear on Sunday. When I blog about it I’ll add it to the comments. The flower turned out so pretty! I used grey felt with a white pearl.
Thanks so much for offering the pattern!!
Another beautiful tutorial–and project! Thanks!
They are really pretty. I was searching for flower felt patterns and saw yours. I think they will be great as I’m thinking of making a hair clip using these patterns for my bestie. Thanks for the tutorial.
You are welcome Michelle
thanks so cute i love love felt and projects with felt thanks!
Seu trabalho é maravilhoso! Parabéns!
Adorei tudo que vi por aqui!
Visite meu cantinho também, o endereço é:
http://divinamenina.blogspot.com
Beijos e sucesso!
Elaine Ferreira
hello,
just want to ask how you where able to cut the felt with the space in the middle like the very first one in this picture.
thanks.
If you fold the piece of felt you can start with the center
omg thanks these flowers will look great with da tutus i made 4 da girls luv it cant wait to try this!!!
Your pattern is just lovely, so I made some flowers basing on it. I posted a link to your site on my blog: lubieczasem.blogspot.com. Thank you for sharing
Your flowers turn out lovely!! =]
Joy thanks so much 4 this tutorial I started making them yesterday and all my friends already ask me for some and I’ve only made 3 lol luv wearing flowers so puttin a clip on them and using it for my hair next is da roses one thanks again! Ur just lovely
So happy you are having such a success with the flowers =]
This is very sweet.Your flowers are beautiful.I made this and i got an idea to make it into a head band.Thanks for the great tutorial!
Hi Joy your flowers are so beautiful. I have tried to make the rose, the daisy and the camelia, but I think I am using a poor quality felt, bought here in the U.k. the petals have turned out rather ragged. Is there a good quality felt I can get from anywhere. Thank you. Gwen Paxton.
These look brilliant and really easy to do and they would be graet for decorating items. Thanks I will be making some.
hi joy, thank you for sharing this wonderful pattern. i’ve used this to create the flower wands for the little girls for my wedding this december.
http://diyinday.blogspot.com/2012/09/wand-erful-or-not.html
i linked your page in my other entry.
http://diyinday.blogspot.com/2012/08/felt-flowers-experimental-stage.html
thank you so much!
im from belgium so maybe its not quid right yesterday i made the flowers and i stay late at night to see the results it was easely and beautifull thank you for scharing it whit us
thank you, dats nice
I was looking for simple felt flowers for a hat my daughter has — these are so cute! I also love that I can take needle and thread to them; I’m not such a fan of hot glue. Unique and adorable!
Very nice tutorial. When I find a pattern like this that I want to use over and over I make my pattern from adhesive vinyl (Like Mactac). Then it sticks in place without pins and I can cut very accurately. When it gets too fuzzy to stick well I can stick it to another scrap of adhesive vinyl to make a new pattern.
Ok, I made these too!
I used cheap felt, silicon liquid glue and glued a gem on the front. To top it off I’m putting and Led light behind the gem and the green wire from the light will stick out like a stem. I’m putting about 5 together and they’ll be battery operated. Small batteries from like little kids toys. The Leds i’ve cut off of a string of Christmas lights. I’ve almost got it together. These will be soo pretty!
Thanks for the Tut!
Saludos de gringo en Mexico
Soo Good.
soo cute! perfect =)