6Oct | 2012

Nursery: Ikea poang chair recover

As I shared on my last post, I have a lot of projects I finish before going to bed rest that I never got to share here, so I am going to start with one I wish I would have taken pictures of the process. I know not a lot of people would not go the DIY route specially when it’s just an Ikea chair, but as you all know I love renovating them!

For the nursery I knew I wanted the poang chair, at first I wanted the rocking chair version, but in one visit to Ikea I tried both and found the rocking version uncomfortable for me (I’m pretty tall) to get up easily.

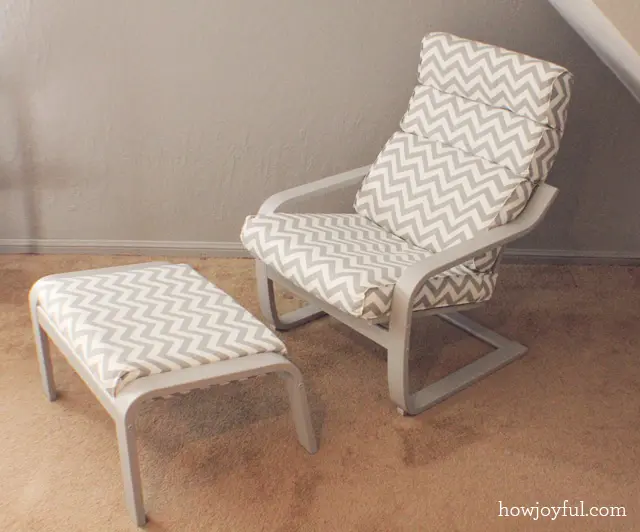
Ofcourse on that trip to Ikea I did not get the chair, since I had months before I was actually going to start with the nursery, I hunted on Craiglist until I found the chair and the footstool for $20, but with no covers. That was actually perfect because I wanted to make my own cushions and covers anyways. I wanted a thinker foam because I figured I’ll be on that chair a lot, the price of the chair and covers I wanted at Ikea would have been $198 ($129 for the chair and $69 for the footstool) but I actually spent only $60 on mine making the cushions from scratch thanks to holiday sale coupons =] I say pretty good!

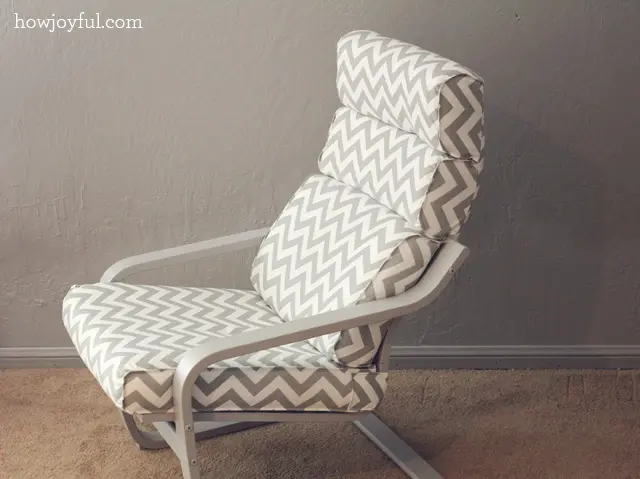
I also decided to paint the structure and made all the covers very easy to remove because I figured I’ll be washing it very often, I decided to attach it to the chair in a different way, so that the back will be covered with fabric, it seemed a lot cleaner to me than the original Ikea covers.

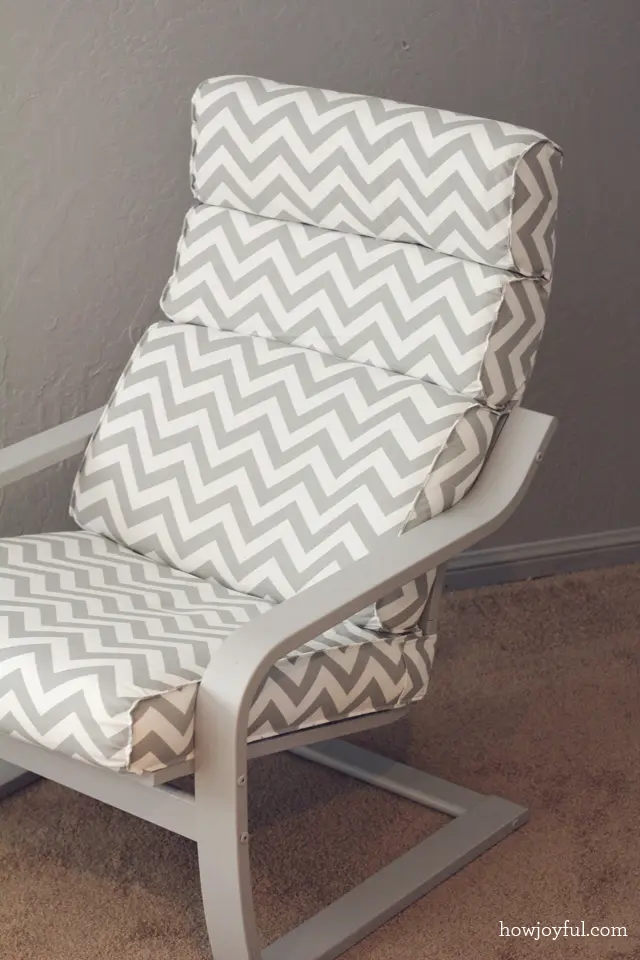
Below you can see both the footstool and chair together, I used the ZigZag twill storm print from Premier prints (you will see a lot of that fabric in the nursery) I used a 3″ thick foam for the cushions and them I wrap it on lots of batting. I made plain white covers for the cushions and then the cover in the fancy fabric.

For the back I actually made 3 separate cushions that are “tied together”by the cover, 2 small ones for the top that are in the slip portion of the cover, they have back snaps so that the cushions don’t end up all over the place, and a bottom one that goes in the pocket of the front. To close the back I also added snaps so that the look would be more uniform.

The bottom piece has a zipper that secures the cushion inside the cover and has side straps that overlap to secure the bottom piece to the chair, I also secured them with snaps.

I really liked the way it turn out and even tho the fabric is pretty light, the fact that the covers are easy to take and wash makes it a lot better. I’ve been sitting there a lot to “test” it out just holding Curly and so far I am loving it! Ken also loves it but for some reason he likes to lay on the center rug of the nursery more than the chair hehe.

I hope this inspire someone else to also try the DIY route, it’s so much cheaper and of course I love the fact that you can customize the shape of the covers.

I hope everyone is having a lovely weekend!!
XOXO

ps. I’m having lots of contractions but no baby yet! Tomorrow is my due date so we’ll see if this little peanut wants to come soon =]

Joy
Facebook Twitter Stumble Pinterest

Joy Kelley is a Chilean Designer. Wife. Crafter. IMac dependent. Pattern lover. Color obsessed. The girl behind the HowJoyful Design Studio. Mrs Poodle at Weddingbee.

  1. I love it! I never realised you can make such a pretty one from the Ikea chair! I have to think about it, as this is the favorite chair of my husband. Now we need to find our own way of renovation :D Thank you for sharing the photos of your work, they are great! :)
    P.S. I keep my fingers crossed for tomorrow! ;)

  2. 2

    • lily
    • October 6th, 12

    an amazing project.I have the same chair and love the idea.

    Cant wait to see the DIY PEANUT <3 wish you a safe birth :)

  3. 3

    You are so talented!!!! Great blog. Good luck on Peanut’s arrival!

  4. 4

    • Tracy @ The UnCoordinated Mommy
    • October 7th, 12

    This looks amazing!! I still have to recover two of my old gliders but I have been too intimidated by the process. :) You have inspired me to get my butt in gear!!! :)

  5. 5

    Hi Joy,
    Good luck on the birth of your baby!
    Thank you for the inspiration on renovating your Ikea chair. I have two of them plus a love seat from Ikea, and have been wanting to make new covers for them. I never thought to use thicker foam. Your chair is lovely and I know you will love it. This chair was my favorite chair when my children (now 6 yrs and almost 3 yrs) were born. It worked really well with a Boppy.

    Good luck!

  6. 6

    Great job Joy! I don’t know if I would have had the guts to do a DIY on that chair…yours turned out fantastic!

    Good luck with the birth of your little one…hope everything goes smoothly.

  7. 7

    I don’t know if I would have had the guts to do a DIY on that chair…yours turned out fantastic! Great job!

    Good luck with the birth of your little one…hope everything goes smoothly.

  8. 8

    This is beautiful! Really love this fabric! I can’t wait to see the whole room.

  9. 9

    • Sheryl
    • October 7th, 12

    You did an awesome job!!!

  10. 10

    • Jody
    • October 7th, 12

    First, I looved that chair! You are so clever :) second, I hope you have a smooth delivery! I can’t wait to see the full room and your little Peanut. Good luck!

  11. 11

    Your sewing skills are amazing! That turned out beautifully.

  12. 12

    Love the chair!!! You did an awesome job with the cover and I love all of the snap details!

  13. 13

    You are insanely talented and I am constantly amazed by you! Love it!

  14. 14

    I love Poang chairs…we have 3 at home and all my family has one. You did an amazing job with the cover. You’re so talented!. Good luck…can’t wait to see you on the chair with the baby!

  15. 15

    This looks awesome!

  16. 16

    • Emily
    • January 20th, 13

    This looks amazing! What kind of paint did you use on the frame?

    • 16.1

      Hi Emily, I actually used the same paint that we got for the walls, I just sanded the surfaces very well, primed and applied the paint with a roller =]

  17. 17

    • Jen
    • January 26th, 13

    Hello, I love the chair! Congrats on your son, I actually had a boy a few days after you on 10/16 also over 9 pounds – big boys :) .

    I know you are super busy, but I was wondering if you could give some additional details about this project. If you are too busy, I completely understand.

    About how many yards of fabric did you use?

    What were your cushion measurements (including the footstool)?

    Can you show where you slide the cushions into the covers?

    Did you do anything special when painting the fram aside from sanding and priming?

    Did you use oil or latex paint on the frame?

    Thanks so much for the inspiration. Enjoy your little fellow!

    • 17.1

      Hi Jen, congrats on your boy too!! =]

      Actually I have no idea how much fabric I used for this project, I purchased 7 yards of the chevron fabric and made the crib bumper, this chair cover, added pieces to the dresser panels and cover the inside of the diaper storage, that left me with a 3/4 extra yard.

      I didn’t made templates for this and pretty much measured as a sewed, the top cushion is divided in two and the slide from the bottom and the seat has a zipper and slided from behind.

      I didn’t do anything else besides sanding, priming and painting the frame and my paint was water based (not the best option) but i figure it would be safer for me since i painted this while pregnant (with proper protection)

      I’m sorry I can’t be of more help!

  18. 18

    • Eils
    • February 2nd, 13

    Love the whole concept, my Ikea cushion is constantly sinking into the back gap really annoying, also love the thicker cushions… A job to add to my moms list when she comes to visit… hands too full to do myself with a 3mth and 2 year old

    • 18.1

      That is awesome that you can have your Mom do this for you! I wish mine would have been here sooner so she could help me with this =]

  19. 19

    • Nikki
    • February 23rd, 13

    Same comment as Jen earlier–can you post a pattern or give more details of exactly how you did this?? I am in absolute awe of the finished product and would love a step-by-step with instructions to help guide me through it!

    • 19.1

      Hi Nikki,

      I’m sorry but this was kind of a long process and lots of measuring-cutting-error because it all depends on the thickness of your foam and how many layers of batting you have, so that was the reason why I decided not to make a tutorial, it would have been way too many steps and complicated. I was a lot of fun though and since I only worked on it a couple of hours a day it didn’t feel like it was so long.

  20. 20

    • Trish
    • March 15th, 13

    Congrats on baby!

    Love that you painted you chair. I am thinking of doing the same. Has the paint held up so far? Any cracking?

    • 20.1

      Hi Trish,

      Thank you! So far the paint is holding super good, I think the more you sand the better it will hold ;)

  21. 21

    • Lisa
    • April 10th, 13

    Hi! Thanks for the idea! I went and bought that same chair for my nursery. We wanted to keep it modern. I’m starting mine this week but I won’t be able to do it as fancy as you did. I bought the thick cushion at IKEA so it’s a different cushion that you had but I’m not sure how I’m going to do this! Wish me luck!

  22. By far the BEST I’ve seen! I love the idea of re-making the cushions.
    Fantastic job :o )

  23. 23

    • Karina
    • April 18th, 13

    Hey!! Do you think I can use the same concept for the Ikea Pello Chair? How many yards of fabric did you used for this project!! Im dying to try this it looks beautiful!

  24. 24

    • Aislinn
    • May 10th, 13

    How has the paint held up after months of use? I think I’m going to get the rocker version for my nursery, but I’d love to paint it.

Do you want your picture with your comment? Get a Gravatar! (Globally Recognized Avatar)

Hola there! I'm Joy Kelley, Chilean Designer, sewing fanatic, obsessive crafter, upcycle passionate. Welcome to my blog!
Read more »

  • Subscribe via RSS
  • Subscribe via Email
  • Follow with bloglovin
  • Follow with Hellocotton

HowJoyful

more designs

  • categories
  • categories
  • Credit properly