


Check out all my tips for setting up an effective and organized shipping station to pack orders when you have a small online business. A behind-the-scenes look at how and where I set up my home shipping station for my online shops!


Well, hello! Welcome to my home-based shipping station area. My name is Joy Kelley, and I am addicted to organizing! Before we go into the details of my shipping station, I wanted to share how I got to the space you see today.
I have been running my small online business with physical products since 2013, and after many successes and failed processes, I've learned a thing or two about my process and how to streamline it. So if you are searching for help setting up and just improving your shipping workflow, this is the post for you!
The evolution of the Studio
First, I have to share that, just like my office, my shipping (and product storage) situation has evolved and changed so much since when I started back in 2013.
You can actually see in this post how I had things set up when I started. Since back then, I only had about three different kinds of products, shipping was not very complicated, and most of them were just paper goods. They all fit in a drawer. It was so cute!
As my product line evolved, so did my need for a more organized shipping station. At one point, we had my shipping station on the second floor of my physical storefront. And while this was probably the best one yet because I had just about all my products and shipping supplies all in one place, it only lasted about a year and a half.
After we closed the storefront (because I was pregnant with our 3rd baby boy and sooooo sick all the time), we moved the shipping station to Ken's home office (his office is on the second floor down under our garage in a detached building) because it was closer to the outside. We had external help that came to my house and got all the shipping done for me. So having the shipping station outside our home was what we required during that time of the business.
Now, over time, I worked things out so that most of my products are shipped directly from my manufacturers. And that step alone freed so much space in product storage and also in my supply storage.
Because of this, when I started planning to return to my old studio space (this is how it looked before we moved to the storefront), I also planned to get a small portion of the shipping station back so that I could ship the remainder of the products myself.

So today, I will share my current shipping space along with most of the items I use, and all the tips that I would have loved to read before I set mine up!
I will go over everything you should have in mind when setting up a shipping station at home.
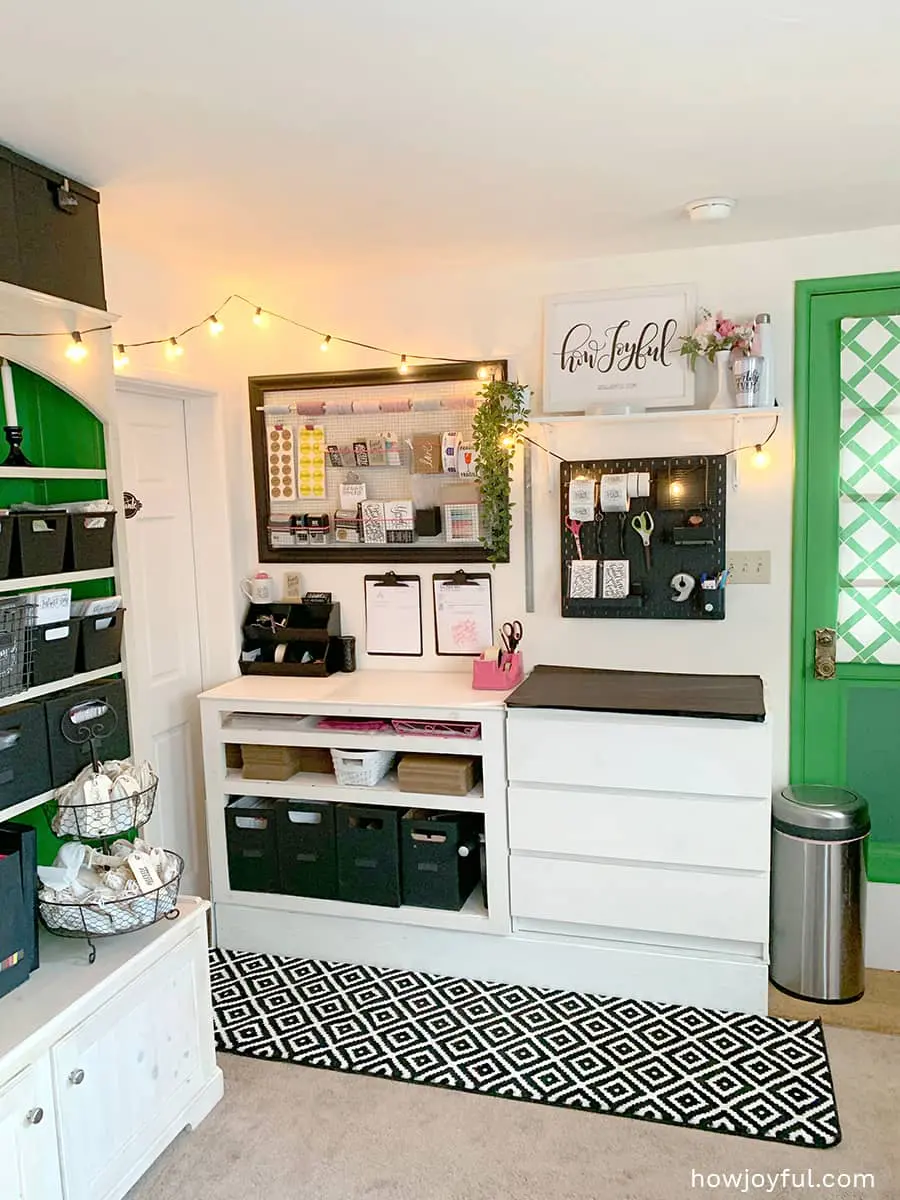
Below you can see my current shipping station and my small inventory storage. I will share some pictures of where I keep most of my products, but to keep the office as clean as possible, I only bring down supplies and products as I need them =]
PS. My home office is on the 3rd floor down in my house (we live in the mountains, and our house is on a pretty steep hill, so it goes down instead of up, as most houses do)

Now let's get into the fun part, everything you should consider when setting up a home shipping station!
Setting up a desk or table
Just like you would when you work at a stand-up desk when you plan to work standing all the time (I used to have a stool there, but I found out that I never really used it), you need to check on the height of the table.
To fix this, you could easily just use a mechanical desk, like this one. Or if you are working with what you have like I was, you can build a platform. Because I am lucky to have a pretty handy husband, I asked him to build me a small platform; this way I could raise the table he built me to store shipping supplies and my old Ikea dresser. So it looks like one thing, but it's actually 3 pieces put together, and they are at the perfect height for me (I'm 5′ 11″ so my back needed the extra height to not crouch like crazy).


Above you can see a picture of me with the table; it's about as high as my waistline. And for me, that is the most comfortable height, so I can still be able to grab everything from my pegboard and mesh without having to overextend my arms.
I was using a brace because the day before I fell down our stairs while going to the office, two flights of stairs, ouch!
You will need designated areas to work; I streamlined my process, so now I have one area, above my dresser, where I keep my black tissue paper (30″ x 20″). So that I can wrap as fast as possible, skipping the spot of pulling the sheet of paper out of my drawer. This simple step saved me so much space in storage, so now I store supplies in that drawer and make sure I have the tissue paper always ready.

Since all 3 parts of my station were different colors, all I did was give them a coat of paint (the dresser was actually black!), and TADA! Now they *kind of* look like they were meant to be there, he-he.
Basic Printing Supplies
When I started my shop, I wanted to be as eco-friendly as possible, BUT over time, and because of my customer's feedback. I realized that there are some things that they really like to have that I was not delivering when I started, like printed gift receipts.
I dragged my feet, but eventually, we need to make our customers happy.
So I started printing things; a gift receipt was one of them. I also started adding a personal note from the very beginning. So I decided that the best way to not have to add each separately was to set both on the same sheet of paper. And while personal notes are not a must, they do bring the shopping experience to another level.
Over time, I switched from writing notes all the time to making a lettered stamp that I put in hot-pink ink for my customers. It brings the same “feel” I wanted them to have but saves me SO MUCH TIME!


Because I print so many receipts and labels, I also switched from a regular printer to a laser printer for the receipts. And I switched from printing my shipping labels on these sheets to actually purchasing a DYMO printer and using it with these rolls instead.
My favorite


The best thermal label printer
It took me about 2 years to finally convince myself to get a DYMO printer, and OMG, I don't understand why I waited so long; if you plan or are still printing labels with your regular printer, stop! Do the math and check how much ink this little wonder can save you! Because it's thermal, it uses heat to print the label rolls that are compatible with it.
Also, a shipping scale is a must! As you can see in my pictures, I no longer have my scale in my shipping station. But that is good news!
Because now I know exactly how much each of my items weighs alone and fully wrapped. I no longer need the scale right next to me all the time.
The only time I use it is when someone orders a bunch of different things that I know will weigh a lot less when their packing is combined. So I keep the scale as well as my DYMO printer under my desk.
I also used to have a full people weight in the office for when I shipped wholesale orders that were heavier than 5 lb (2.27 kg) (the limit of my desk scale). I would just hold the box and check the weight, then weigh myself alone, subtract my weight, and TADA! Cheaper than getting the “better scale” but I am not sure if that was time-saving lol


Another super important aspect is the software because once you start selling in different marketplaces, monitoring where you have to go for each marketplace to print labels, this can easily turn into a nightmare, not to mention super time-consuming!
So as soon as I hit 5 different marketplaces, I started paying for ShipStation. Getting labels with ShipStation is a breeze, and if you set profiles for your items so that you have the exact weight of your packages, it is even faster.
With ShipStation, you can also ship orders in batches from all your marketplaces (I sell on Shopify, Etsy, WooCommerce, and sometimes on other flash sale sites). ShipStation sends automatic emails with the tracking codes to your customers AND notifies the marketplace as well. It's SO WORTH IT!
So to sum up, if you print big quantities, you will need:
- A laser printer: I've had this Brother printer since 2015; it's a workhorse! I use it SO much, and it's still going; at some point, I bought a second one for the storefront, and now my husband has it in his office. We both love them!
- A DYMO label printer: It took me about 2 years to finally convince myself to get this printer, and OMG, I don't understand why I waited so long; this little machine is AMAZING! And if you plan or are still printing labels with your regular printer, stop! Do the math and check how much ink this little wonder can save you!
- DYMO-compatible labels: I use these same ones, and I have for years; they are wonderful, and I have never had an issue. I also like the pink ones to add an extra touch to the outside of my boxes.
- A shipping scale: I actually have the printer that came in my stamps.com kit; it has lasted me so long! I used to have this one, but I lost it during our move. I love the sleek profile of this one as well.
- Shipping Software: Ship Station is an online-based shipping software, so you can use it on Mac and PC. It has simplified the way I ship, and I swear by it. You can set shipping profiles and send automatic emails to your customers; it's just wonderful! Especially if you sell on multiple marketplaces or different websites.
Basic Shipping Supplies
Streamlining your product line so you can use as few different shipping boxes or mailers as possible is something I wish I had considered when I started.
Of course, every time you plan a product, you have to plan for how you will ship, how much that will cost you, and test if those shipping supplies will protect the product as best as possible.
Because it doesn't matter how cute a package is if it doesn't protect the product and things break on the way.
Now that I don't ship all my products, I've discontinued most of the ones that needed special packaging, like my cake toppers, some of my tumblers, and also the rubber stamps.
Having a small selection of shipping products that work with many products not only saves you space, but it also saves you money. Because you can buy in big bulks (you should see us picking up orders at Uline; it's madness!), but a bulk pickup can last me a few months and save me so much money in the long run!
The Mailers


- White bubble mailer: I use the 8 1⁄2 x 12″ mailer for anything that is soft and will not break, like fabric products. I like the white instead of the regular yellow because it's more in brand with my shop; I like to add a bright pink stamp at the top with my shop name. When you buy them at Uline, you can get them for as low as $0.3 each when you buy in bulk.
- Easy-Fold box mailer: For anything that could bend, like calendars, notepads, and notebooks. I love that these are so forgiving, so no matter if you are shipping 1 or 15 calendars, you can still fit them there and have them perfectly secured! If you buy them at Uline, you can get them for as low as $0.56 each.
- Tab-locking kraft mailer: For all smaller things that could get bent, like cards, stickers, etc. I do have these in two sizes, the small 6″x8″ that I linked for all the small things and bigger ones for prints, but since I discontinued the prints, once I ran out of the big mailers, I am not getting more. At Uline, you can get the smaller ones as low as $0.19 each when you buy them in bulk.
Of course, if you ship things like mugs or bigger items, you would have to find bubble wrap or shipping boxes that fit your items and that allow a secure trip of the items from you to your costumers.
I recommend that before you send your first paid order, you should send a test packing to someone as far as possible. And then have them send it back so you can make sure that the packing can withstand the handling (or mishandling) of it.
Packing tape
If there is one thing that you will need, and that I go over like crazy, it is packing tape. I used to get the Uline brand of tape, but after some math, I realized that this one that I get on Amazon is actually cheaper, and it lasts me longer than the thicker one that I used to get from Uline.
And while the thickness might not be the same since I don't ship giant boxes anymore, I don't need box-taping-strength tape anymore.
And if all you are doing is smaller packages, don't bother with a super thick packing tape =]


My favorite double tape holder, it comes in black, but I've painted them in every possible color.


And of course, when we had the Storefront, I liked to have a tape dispenser on each table. So I purchased more of this double tape holder, I ended up with four total, but these two are the ones that I now have in my studio. One for the sewing room and one for the shipping station. I like having washi tape in one and regular Scotch tape in the other. I painted them in different colors (actually, one of my friends made the glitter one for me! It's my favorite!) using spray paint, and then I added a clear coat on top.
Branded Supplies
Of course, when you ship your orders, you want your customers to get as excited about their goodies as possible. Having cute details doesn't cost as much as you think and can make your customers experience with your shop an unforgettable one!
Remember how I said that I loved adding handwritten notes? Well, that was not the only thing I used to do that I no longer do. I used to have so many little cards, washi tapes, and twine in every order! I seem to have gone from minimalistic to extra super elaborate to a minimalist with impact, as I like to call it.
So what does this mean? It means that every piece that I put on a package has been deeply developed and thought out, from the wrapping to the thank-you postcard to my “stamp” note.


I have two different postcards, one that is a general thank you for all my products and one that has wash instructions and folding instructions for organic swaddled.


I also have custom-designed stickers, one that I add to seal all my packages after wrapping them in black tissue paper. And others that I add to the packaging if needed.
For postcards, I use SmartPress and for stickers, I use StikerGiant.


Storage for supplies
As I mentioned before, I do have a room next to Ken's office, where I store the bulk of my supplies and some overflow of products. So I try to keep the small number of supplies organized so I can fit in my space as tidily as possible, either in front of me or in the drawer right next to me. So I can have easy access to the tools and supplies I use the most.
I have mailers in the bottom black boxes, along with the supplies I require in case one of my clients upgrades their shipping from First Class to Priority Shipping. All of those mailers and small boxes are inside my black boxes.
I also have clear bags that I use to wrap anything that has fabric so that it adds a layer of protection in case the package were to get wet or ripped during transit.


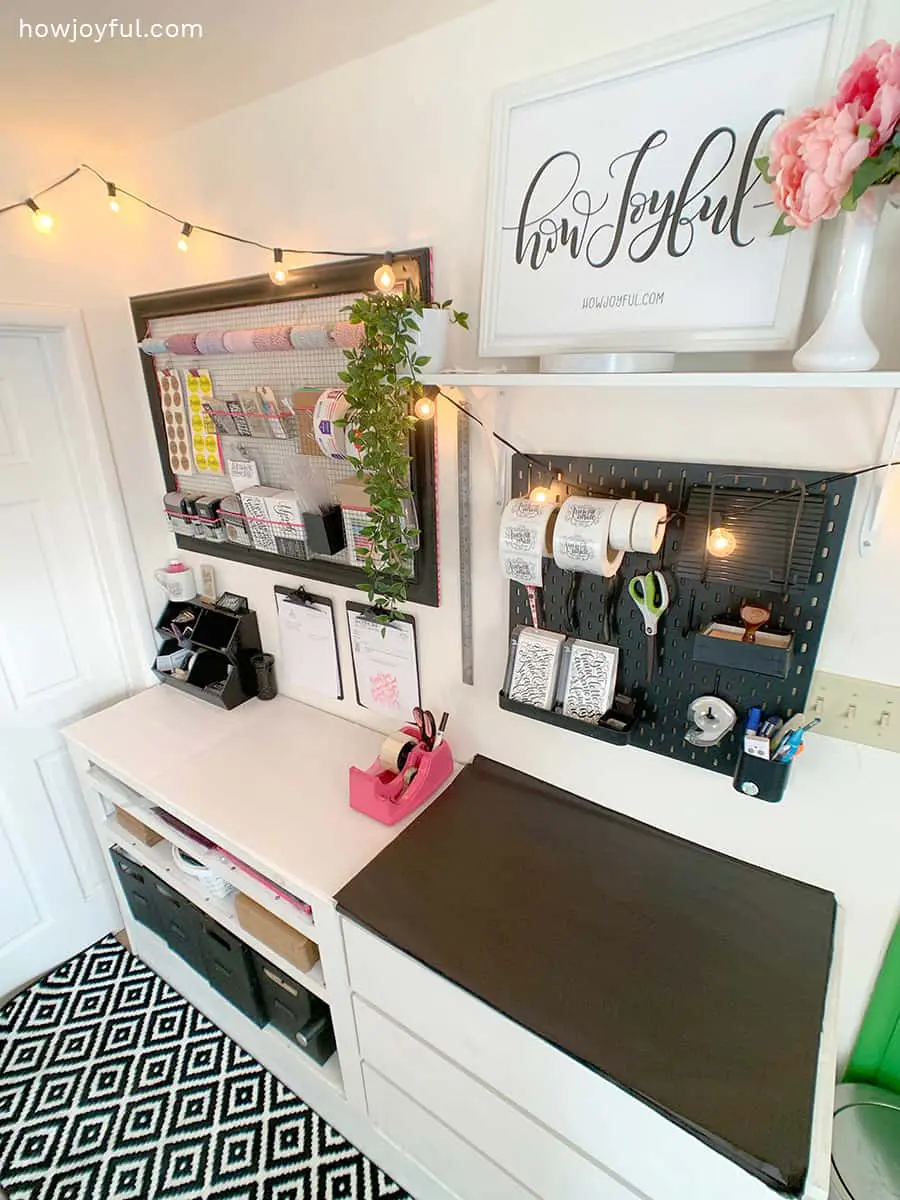
I like keeping the tools I use the most as close to me as possible. So my “thank you” stamp, postcards, and stickers are right in front of me in my black Ikea pegboard.
To make it black, I just spray-painted a wood-looking pegboard with a flat black spray paint. But now Ikea actually has black ones that you can buy. I also painted all the hardware, making sure to give them a clear matte layer on top to prevent scratching.


I actually shared a closer look at the mesh frame where I keep labels, stamps, and twine in my original post here.
I also have two clipboards, where I organize my orders. I used to have the clipboard in the frame, but I like having them out, so I have more space to organize supplies. I also painted the frame, my clipboards, and my cardboard “catch-all” cardboard cubby. So that everything looked a little more tied together.


Storage for products
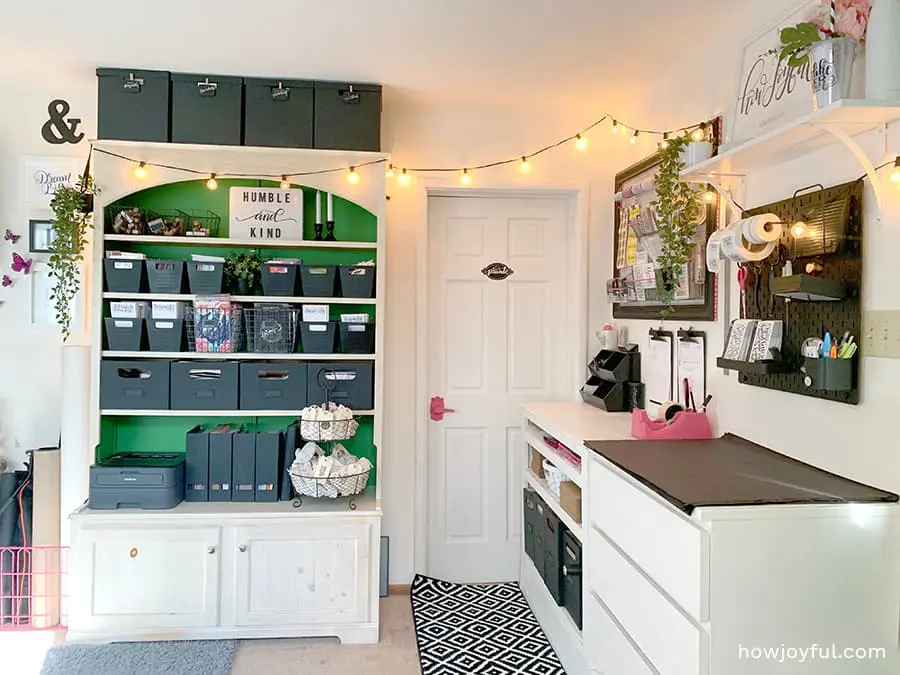
Since now, I don't have as many products in my studio. The drawers in the dresser below my shipping station have most of them, and this bookcase (below) stores all the rest.
I painted my boxes and used black cardboard boxes from Ikea to organize everything so that it looks a little less of a mess because, with so many little things, it gets messy SO FAST!


Now, I am going to share the “real” look of part of my storage in the extra room of Ken's office because I love these bookshelves and cardboard boxes; they are from Uline. I just painted them white so that they would look better in my storefront. I also used these cardboard boxes, cards, recipe cards, and my mugs fit perfectly inside them.


I also have big metal racks (they were far too messy to take a full picture, he-he) and I store everything in plastic totes to avoid dust or anything messing up the product.
Since I am no longer making the rubber stamps, I used the same display I had in my craft shows to store them in my office. A vintage countertop fruit basket, similar to this one =]


Important Ergonomic tips
When setting your shipping station, besides the obvious supplies, there are aspects that we should not take lightly, especially if you will be packing for several hours in a day.
- Have a comfortable standing mat: In my case, since I already have carpet on the floor, I just added another rug, a small runner, to add more padding. But if I'm working for a long period of time, I make sure to push this ergonomic footrest that I use under my desk so I can move my feet over.
- Set up a comfortable table height: As I mentioned before, having the correct height is SO important! This, of course, depends on your height. An easy way to do this is with an electric height-adjustable table. But you can always do as I did, and get a box so that you can lift your table.
- Get your most-used supplies right in front: When you are doing repetitive motions, it is essential to do them with as little muscle stress as possible. This is why having your most-used tools or materials as close to you as possible is so essential. If you are working in front of a wall, consider a pegboard or another storage solution to hold things at arm's reach.
- Have enough light: One thing I had to change in my station as the weather changed (because during winter, our house is extremely dark) is to add additional task lights. To achieve this, I painted the top of these inexpensive clip lights with heat-resistant paint and added them to the shelves I already had there. As you can see below, this is what my work area looks like at night with the lights completely off and only those two lights on.


The before
And just for fun, let me show you how my shipping station looked when I had just opened my shop, so let's take it back to 2013 =]
What a change, right?


If you want to see how the rest of the room looks like, you can now see it here. Along with how I organized the rest of the room.

More home office & craft room posts
I hope these points help you with your shipping station, and if you need any clarification, just contact me! I am always happy to help!
Happy shipping!


Cheryl Werst
Monday 24th of May 2021
Hi!! I’m obsessed with your shipping station!!! I’ve been eyeing the Ikea peg board and was wondering what you used on it for your rolls of stickers. I have not seen anything at Ikea for something like that unless I’ve totally missed it!! Thank you for any and all help!!! 🤗
Joy Kelley
Tuesday 1st of June 2021
Yes, those were from IKEA, they are meant to hold paper rolls. I just went to the website to see if I could link it for you, but it seems like they don't have them online anymore. I wonder if they are just out of stock, I have a few of them for tape and I love them!
I hope you can find them! Maybe ask in your local store?
Sorry I could not be of more help!
Shayna M Johnson
Wednesday 6th of January 2021
Thank you so much for all the details I am just starting and I am hoping to have a organization from the start! Thank you for sharing this information has been hard to find!
Joy Kelley
Sunday 10th of January 2021
You are very welcome Shayna! I am so happy you found it useful! Don't hesitate to contact me if you have extra questions, I'm always happy to help! Joy -
Larissa
Wednesday 16th of December 2020
Ok, this post makes me want to start some sort of mail order company just so I can set up and organize a shipping area like this 😆
Joy Kelley
Tuesday 22nd of December 2020
He he, that's so funny! I am so glad that you liked it!