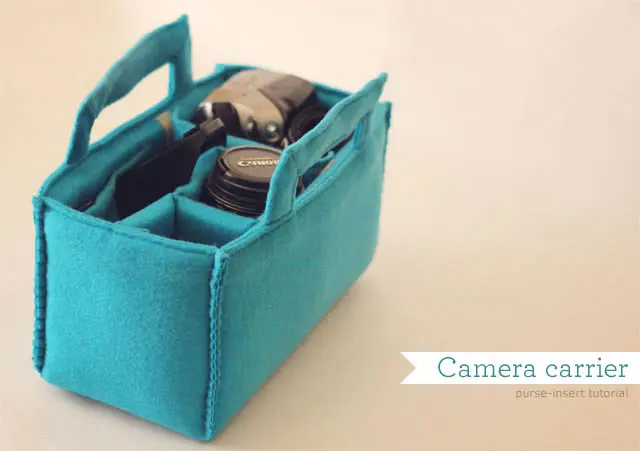
In this tutorial, I will share a step by step of how I made a camera carrier so I could move my camera from purse to purse. A few months ago I showed you a preview of the camera carrier insert I sewed and many of you wanted a tutorial right away, but I decided to wait a little bit.

I didn't hold on to the tutorial by accident, I actually wanted to give my honest review (and changes I would make to improve) along with a tutorial, so now that I've been using this insert for about 6 months.
I want to share the tutorial along with some of the things I would do different, so you can apply what I learned to yours =]


I've been using the carrier inside 2 of my regular purses and it works great with the exception of some details I will describe so you can improve your own version (if you decide to make one for yourself)
I have to say that I completely love my camera carrier, and changing purses is super easy! My carrier fits in all my purses, in some tighter than others, so when I need to carry more than just my camera I simply choose a bigger handbag, works beautifully!

The only problems I've had so far with my carrier are the following:
- The outside felt is getting a little worn, from getting contact with a lot of different liners from my bags (If I were to make it again, I would use cotton or outdoor canvas on top of the outside felt piece)
- The handles, even though they are very pretty, they are not very resistant, so if I were to make it again, I would reinforce the traps and stay with an old fashion strap instead of trying the “prettier” version I did for mine. but if you like them I will explain how to reinforce them too =]
So now to the materials and instructions, because you should make one for you too!

CAMERA CARRIER INSERT MATERIALS
In order to make your very own camera insert, you will need just a few items:
- 2 pieces of 24″ by 18″ piece of your choice of color felt or fleece
- Add 1 piece of 24″ by 18″ canvas/outside fabric if you decide to reinforce yours (recommended)
- 1/2″ foam – high density is best, read my note below!
- About 20″ long piece of Velcro, cut in pieces of 4″ long.
- Needle, Embroidery floss and scissors
IMPORTANT
As one of my readers pointed out in the comments, depending on your bag, you might need to use a more dense foam than the one that you find at craft stores. (The purse I use is firm enough and has enough protection for falls)
She found the perfect high-density foam at the camping section, the ones that are intended for sleeping mat. So I’ve updated the foam link to take you to an option for that kind of foam, this would protect your gear better =]
MAKING THE CAMERA COVER
I will be sharing how to make each part of the camera, but if you need to change either the measurements for the body, handles, or pockets, you are more than welcome to do so, this is more of a guided tutorial of how I made mine =]
THE BODY

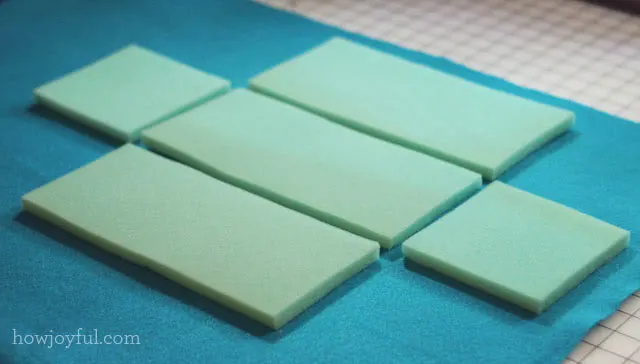
A– First you need to cut your 1/2″ foam pieces for the container (I will describe the dividers later on)
- 2 pieces of 10 1/2″ by 4 1/2″ (front and back)
- 2 pieces of 4 1/2″ by 4 1/2″ (sides)
- 1 piece of 10 1/2″ by 4 1/2″ (bottom)

B– After that, you will need to cut 2 layers of felt (the outside and the inside of your carrier) plus the outside fabric if you decide to reinforce the outside. To do so I placed all my foam pieces 1/2 an inch apart and traced, then added 1 inch on the outside like shown in the picture.
THE HANDLES

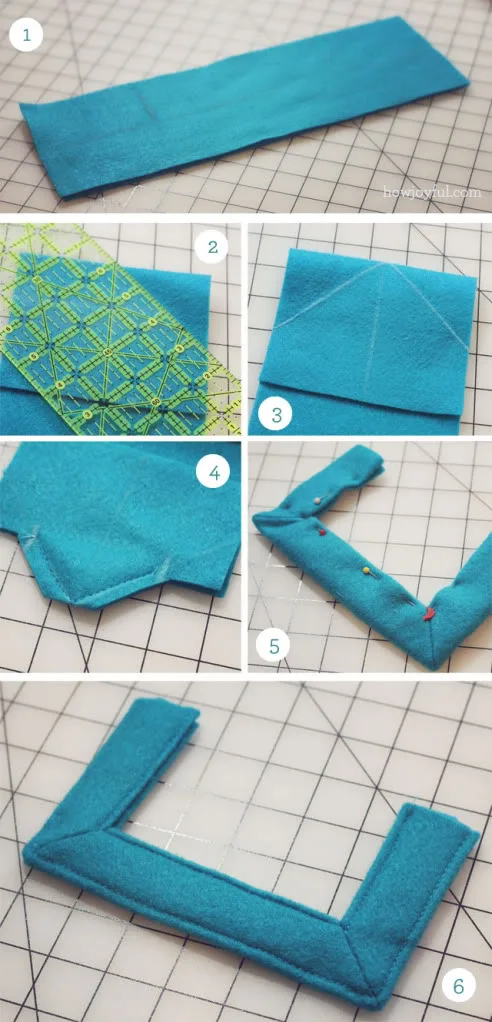
C– For the handles, I would recommend you just make plain reinforced ones with fabric and using rope for the inside because the handles are what carries all the weight when you exchange purses. But if you like this shape of the handle I will describe how to make them, just add rope to the inside before you close it (that will reinforce it enough)
- You will need to cut 2 pieces of 5×12″ of felt.
- The fold it 3 inches from the bottom.
- Mark the center and also mark a 45-degree angle like the picture shows.
- Sew 1 1/8″ wide to each side (I measure straight not the angle)
- Repeat that on all 4 corners, turn inside out, place rope inside and pin to topstitch.
- Topstitch both sides and your handle is ready!

D– after the handles are ready is time to add the loop side velcro to the inside part of the body piece. I used 4 pieces of 4″ long. I sewed them in the center of the right side, on the front (the one that has 2) I sewed them at 7″ and 3 1/2″ from the right side, and for the back, I sewed it at 7″ from the right side (notice that the first front and the back match)

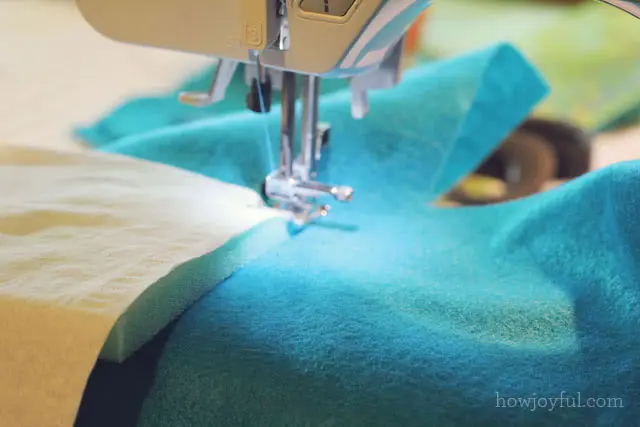
E– Now it's time to sew the foam to the inside felt piece (because we like a clean outside) so pin it in the center, remember that you will be placing the foam on the wrong side of your inside piece, and in order to sew on top of the foam I used tissues that I pin on top of the foam, that way your feet will not get caught by the foam.

F– After you are done sewing you will have to carefully rip the tissues off, I had some little pieces stay, but I didn't care because that will be covered by the outside fabric anyways.

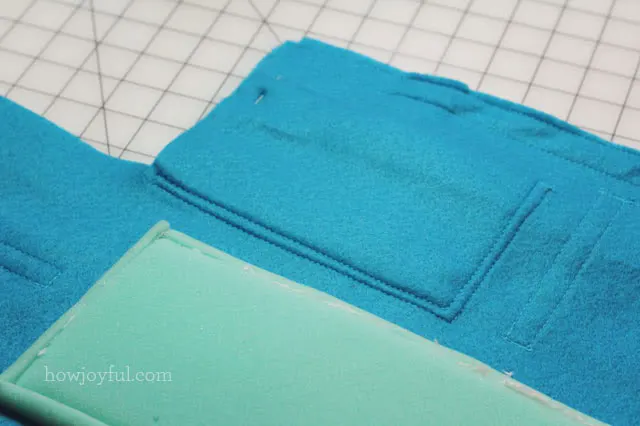
G– As a last step before closing up, I added 2 pockets that are optional, I do use them for extra cards and my camera's remote control, so I would recommend them. For the left pocket, I just added a 6″ wide piece to the side, and for the back pocket I use a leftover piece that fit perfectly right after the velcro (about 7″ wide)


H– Now we need to make a sandwich with our pieces to start closing up. First, we need to place our inside body piece and on top of it the handles, make sure you pin them right in the center and leave about 1/4″ to the outside.


I– Next up is our outside body piece, in the case you are planning on adding an outside canvas piece for the outside you need to place it before the felt with the wrong side facing up. after that place the felt piece and shown in the picture.


J– Sew along the 4 top parts, where the handles stick up and the other 2 opposite sides (you will end up with holes on the sides, and that's good)


K– Turn inside out your body main piece and it should look like mine =] topstitch all the top edges and reinforce the handles by passing over more than once with the sewing machine.


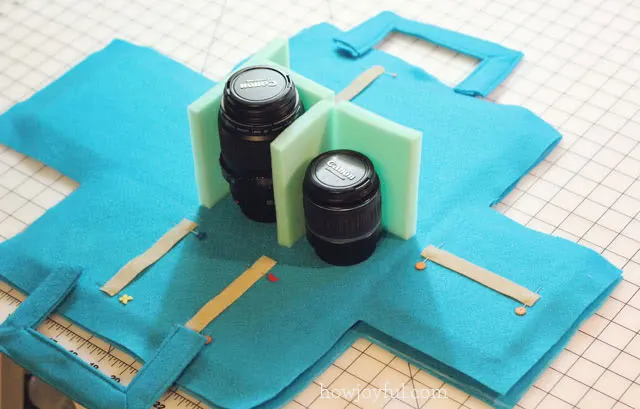
L– Now we can insert the 4 pieces of foam where they are supposed to be and pin really close to the foam so that you can put the sides together more comfortably.


M– Pin the sides together and sew as close as you can to the foam. This part can get a little tricky because it's super thick and the foam on the side does not help but go slow and with a lot of patience =]


N– Once you have the 4 sides you can trim it, but leave at least 1/4″ after the seam to avoid any stability issues. After that I hand-stitched the edges with matching embroidery floss, you can get as fancy as you want with the edge =]


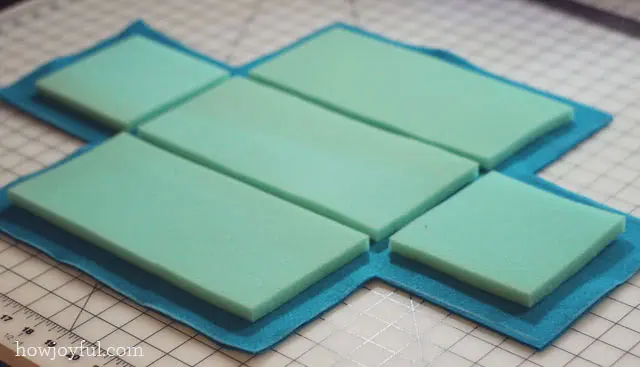
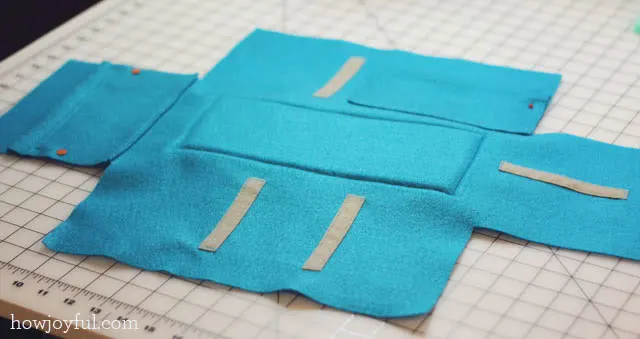
O- Silly me, I forgot to take pictures of the insert, but below you will see a graphic of the pieces you will need and I will describe the process below.
MAKING THE INSERTS
The pieces for your insert are:
- 3 pieces of 3×6″ foam (center divider)
- 1 piece of 6×6″ foam (full divider)
- 1 pieces of 7 1/2″ by 10 1/2″ felt (center divider A) fold it to make a 7 1/2″ by 5 1/4″ piece
- 1 pieces of 4″ by 10 1/2″ felt (center divider B) fold it to make a 4″ by 5 1/4″ piece
- 1 piece of 7″ by 10 1/2″ felt (full divider) fold it to make a 7″ by 5 1/4″ piece
For the insert you are going to start by making 3 tubes, simply fold your pieces as instructed in the material list and sew along the bottom parts of the 5 1/4″ tall, like in this illustration:


I would recommend you to check on your inside pieces before closing and adding the velcro just in case, if your felt or fleece is thicker or thinner than mine there can be a little adjustment that you should make (but they should be minimal)
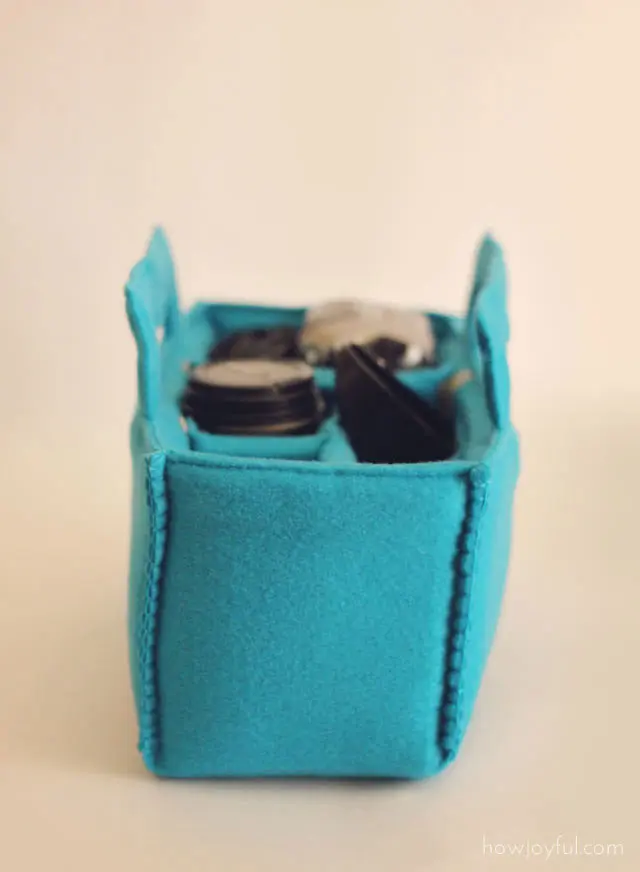
And there you go! your camera can be protected and carried more comfortably everywhere!


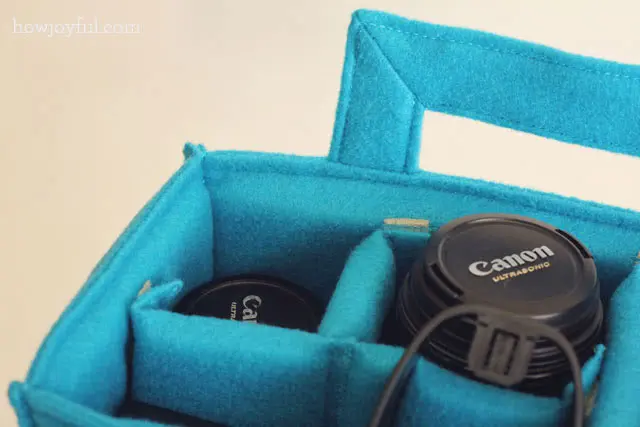
What do I have in my insert?
I actually used the old camera as the model for these pictures, because… well my actual camera needed to work! So just pardon the “vintage look” hehe. And what exactly do I carry in my to-go camera bag?


– Camera with the EF 50 f/1.8 lens on it
– 2 extra lenses
– Battery charger
– 2 extra batteries
– Remote control
– Flashlight diffuser
– Tripod hook
– extra memory card
… and everything fits perfectly =] I also made 2 little pockets for the little stuff.


there you go! my new camera carrier-insert. sturdy. pretty. turquoise! accepts any kind and color purse – not clutches allowed sorry!


I hope you guys enjoyed this tutorial, I know a lot of people were anxiously waiting for it! Sorry, it took me so long, but that's what I get for having such bad morning sickness hehe =]
Oh and if you are looking for just buying a camera bag instead, check out my list of the best and most beautiful camera bags for women. And if you want to check all the gear and tools I use to create the content for this blog, check my content creation page.
* This tutorial is provided for personal use only. If you wish to sell items made with this tutorial, please purchase a limited production license. Check the Site policy at the bottom for further information.
The pattern is a PDF file, and the link goes directly to Dropbox, but you don't need an account to view it, you will need Adobe Reader or a similar program once the file is downloaded. Thank you!
I hope you all had a great weekend!
Sarah Higgins
Monday 15th of June 2020
Everyone know that camera is how much important specially for travelers. I am always thinking about how can I carry my camera for any tour but in this blog you make it easier for me. Thanks for the tutorial.
Joy Kelley
Monday 22nd of June 2020
You are very welcome! =]
Filip
Sunday 29th of March 2015
Your tutorial inspired me to make such a bag insert myself. As my sewing skills are pretty limited my carrier does not look as pretty and professional as yours.....but it does the job. Thank you so much!
Greetings from Amsterdam, the Netherlands.
Joy Kelley
Sunday 29th of March 2015
I'm so happy that it inspired you to make your own!
Kirsten
Saturday 13th of December 2014
Wow, this is a great idea! Thank you for sharing! Greetings from Germany Kirsten
Terri
Tuesday 11th of November 2014
Thanks so much for posting this tutorial! Because of it I was inspired to pick up a $20 pleather hobo bag from Walmart and with less than $5 of 1/2" padding and some scraps of fabric I had around from a quilt I'd made last year I now have a stunning new handbag that I can't wait to use at my next shoot.
Joy Kelley
Wednesday 12th of November 2014
So excited for you, Terri! that was an awesome bargain!
Purse Organizer
Monday 27th of October 2014
That is indeed very clever, I am surprised that they don't make something like this although I imagine you couldn't beat the price-point of doing it yourself but I also imagine that not everyone is as gifted in crafting as yourself! Would you feel comfortable making 30-50 for us?
Joy Kelley
Sunday 16th of March 2014
You are funny! I am barely on my 3rd, one lol, I am so glad you liked it =]