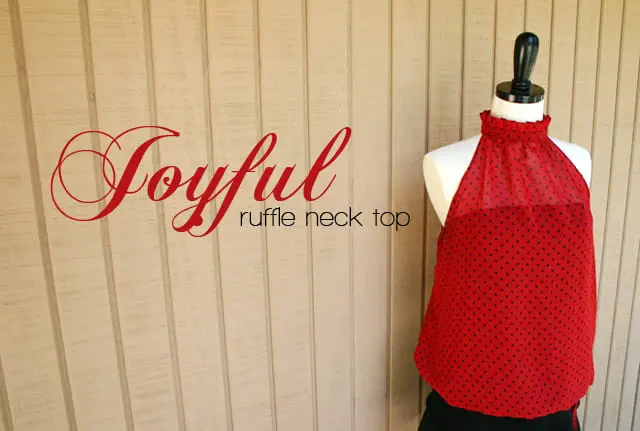
Last week I showed you the top I made for my MIL's birthday, and since so many of you loved the polka dotted top I sewed that morning, I decided to share a little tutorial of all the steps I took to make it! I used some leftover chiffon fabric, and sewed this in about 20 minutes, but if you are a beginner you might want to take a little longer just to make sure your finishes are good =]

Since I didn't take pictures while I was making it, I just drew illustrations. But since the fabric was so busy, I almost think that it's better to have it in illustration than trying to identify the pieces in the pattern.
The process is not very complicated and if you are making one for yourself I will describe the measurements I took, so you can adapt them to fit you.
Here a better look at the top:


For the top, I used some leftovers I had of red polka-dot Chiffon, and I wear the top with something under it because the fabric is see-through, but you can make it with your choice of fabric, so you can wear it alone.
I used a thin satin black ribbon for the button holder and a black button.
THE PIECES


- Top Front: The width for this piece is your bust, I added to my measurement 1 inch on each side for the folding, plus 1.5 inches on each side for comfort. So you need to add 5 inches to your bust to get the width. For the length I measure from the center top of my shoulders to my hips, adding 2.5 inches for the bottom fold. The width of the neck is my measurement from shoulder to shoulder because I wanted some folds in the front, and I lower the cut in the neck about 1.5 inches.
- Top Back: The Back Is basically the same piece, but without the lowering of the neck and with a cut in the center.
- Stripe for the bottom: You can make this piece, or you can use elastic in the bottom for the bubble effect. However, the length you want by 1.5 inches wide.
- Neck stripe front: Measure around your neck and add 2 inches for the folds, mine is 1.5 inches wide.
- Neck Stripe back: Same as front piece.
- Neck Ruffles: the length depends on how ruffly you want the neck, I did twice the measurement of the neck Stripe front and back for mine, by 3 inches wide.
THE PROCESS
NOTE: Since my fabric is see-through, I folded all the edges and sew them, so it would look better than just sewing and securing the edge with a zig-zag stitch, but this is just my choice, you can do it differently, according to your fabric.


B – First you need to sew the pieces 1 and 2 together. fold the sides carefully and pin, once you finish sew trough the center of the fold, my fold is 2/8 of an inch. Remember that you are folding 3 times, that's why we left 1 inch on each side to sew.

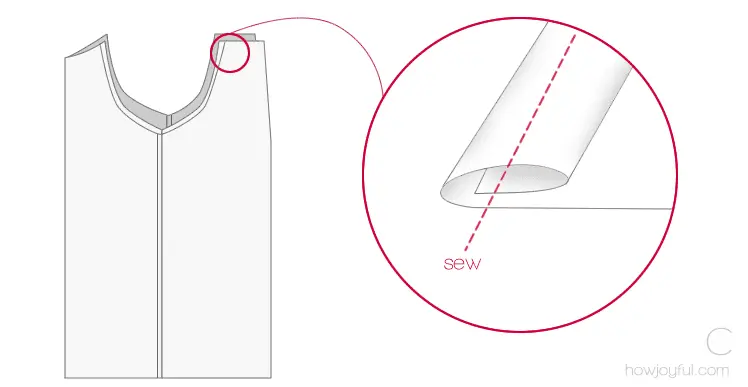
C – Now if you look at your tube from the side (Like in the graphic) you will need to fold again, but now just the edges of the shoulder area, all the way around, my fold is 1/8 of an inch wide.


D – In this graphic, we are looking at it from the back again, for this fold, I just folded and sew it. but In the graphic, I am showing the alternative of using a handmade bias tape, with a stripe of fabric.

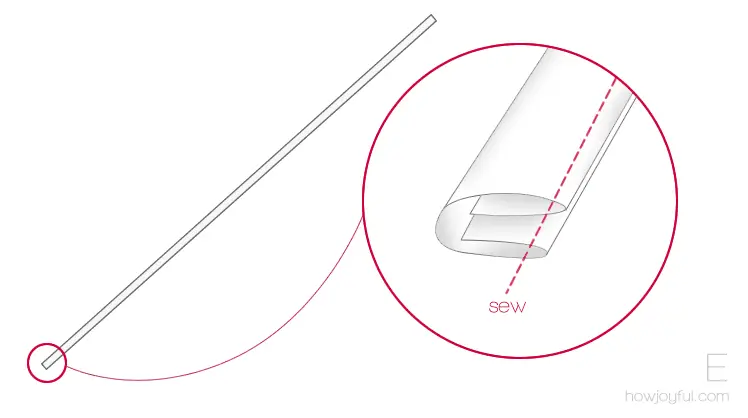
E – As I stated above, you can either go this piece or simply use elastic, if you do just remember to make this piece long enough to go around your hips and tie on the side.


F – fold the bottom piece and sew, my fold is 1 inch. That's why we left the body pieces 2.5 inches longer. I like to make 2 buttonholes on the side before folding so that way I can pull the stripe through the holes and have a clean finish.


G – Fold piece 6 Neck Ruffles in half, sew with the longest stitch you machine allows and then pull on the top tread. Even it up until your ruffles piece is the same length as pieces 4 and 5.


H – Make a sandwich with piece 4 in the bottom, piece 6 in the center, and piece 5 in the top, all the right sides of the fabric have to be facing inside. Sew on the edge of the side you made the ruffles.


I – Turn the pieces so the ruffles are in the top, fold the edges of pieces 4 and 5 to the inside like the graphic.


J – Add the ribbon for your button holder and fold all the edges to the inside, so they are all clean, pin when required. Add the body part to the center of the fold, measure your pieces to make sure everything is centered, for the font gather your fabric to get the wrinkle effect. Once you're satisfied with the position, sew it together.


K – Add the button on the back, and you are ready!
THE REVEAL


I love this top, is so comfortable and the ruffles make me feel very girly :) Here are some pictures of me wearing it last week!


Let me know if you make it I will love to see, Happy Sewing!
* This tutorial is provided for personal, non-commercial use only.
Check the Site policy at the bottom for further information, thank you!
flo
Sunday 21st of December 2014
There is magnificent, where is the pattern in PDF? Thank you
Shanice
Wednesday 22nd of October 2014
How do you print pattern pieces?
desig
Friday 17th of October 2014
hello! the tutorial is great. how did you measure the armhole also i noticed there is a space between the front and back piece at d the neck, what measurement did u use for the space. thanks
Crystal
Thursday 15th of August 2013
Hi - this tutorial is really great!!.....Such details and the measurements instructions are really helpful. Making this today for my little sis and my daughter....Thanks a ton!!! Please post some more.
bailey
Wednesday 13th of March 2013
Hi my name is Bailey i am 13 and i love to sew. I tried out your teddy bear pattern and it turned out great im going to give it to my cousins new baby. Also i was kinda surprised at how big it turned out but it looks great.