


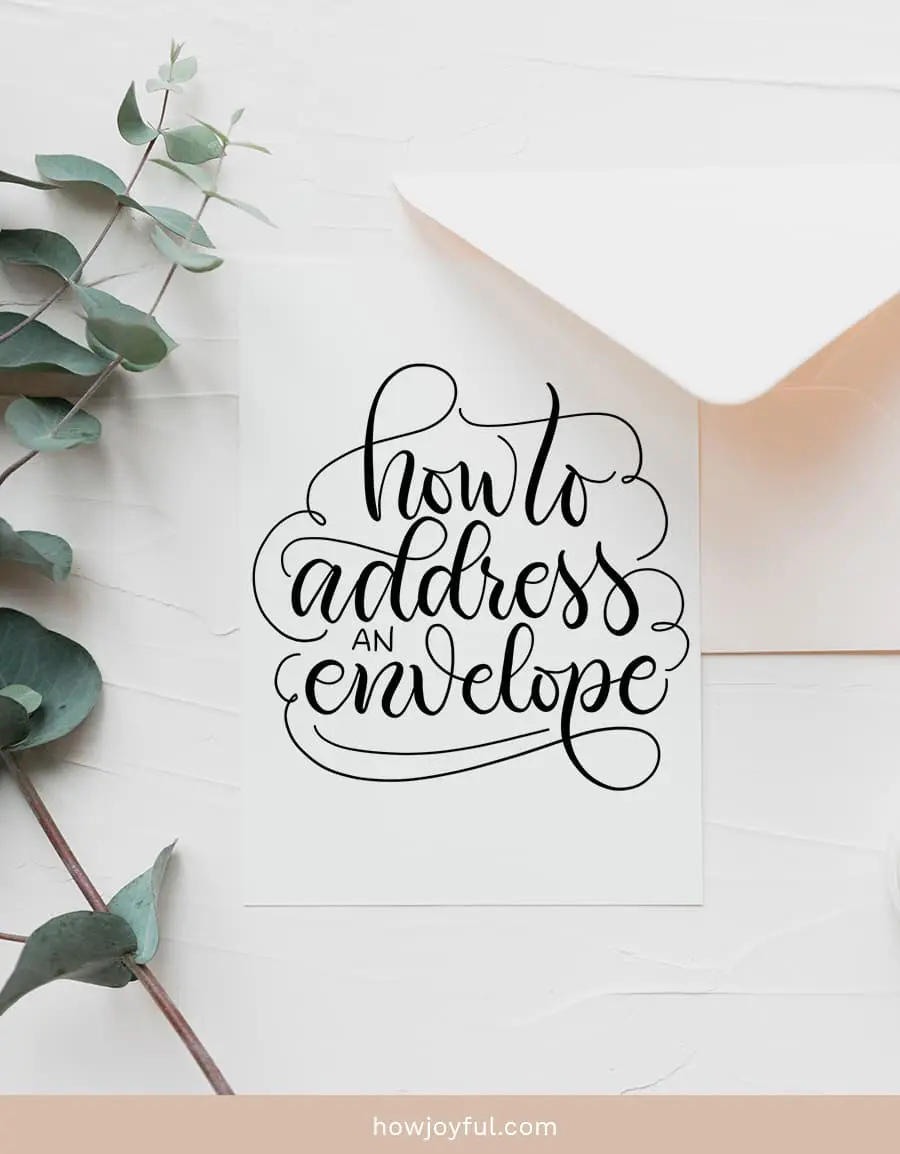
Business, formal, informal; ornate and flowery or official and smart – this article will show you how to format labels, flawlessly address envelopes, and ensure addressees are given accurate titles. None of your letters will ever get lost again!

In the old days, writing letters was the most effective way of communicating over a distance. It’s harder now to imagine how exciting receiving a letter by post must have been for pre-telephone and pre-internet folks.
That creak of the gate and knock on the front door. Opening it to find a cheerful postman standing there with a sealed envelope in his hand.
The first thing the person at the door would have done is bend to read for whom the letter was addressed. If the title and address did their job correctly, the letter would then be taken to or opened by the recipient, probably while the rest of the household gathered around waiting expectantly.
Sounds a lot better than an email box full of spam, doesn’t it?


Learning a new skill
As I always like to stress to someone when they are beginning to learn calligraphy, practice makes better. We have become so used to texting with our thumbs and typing on a keyboard, the muscle memory all that writing created in our hands and wrists during our school years quickly fades.
However difficult beautiful writing and spacing can appear to be when you’re first getting the hang of it, keep in mind you’ll be able to address an envelope properly and skillfully at the end of your training.
If you have decided to make this year the year you acquire a useful new skill, or even if you just simply want to learn how to correctly address your wedding invites, carry on reading to find out the best way to address an envelope for all occasions.
This technique can also be used for printing labeled addresses off the computer – not every letter has to be handwritten!
If you are on board and would like to get started I prepared this 101 guide to Brush Calligraphy to help you get started!
The history of letters
Try to imagine the Declaration of Independence written on sheet paper in Comic Sans font.
It’s impossible, right?
There’s something about putting pen to paper that lends a gravitas and thoughtfulness to the message.
But when did the habit of sending news, gossip, and announcements via posted letter first originate?
Straight after the paper was invented in China around 200 BCE, envelopes were used for the presentation of monetary gifts. The envelopes were made by hand and ceremoniously handed over to court officials.
To this day, red envelopes are presented at family gatherings and special social occasions as thanks for visiting or as a gesture of kindness.
Another interesting fact about the history of correspondence is that the British refer to the letters they send overseas as ‘the mail’, and domestic letter delivery as ‘the post’!
Nowadays, most people associate the stuff they find in their mailbox with only two things: bills and junk mail.
With the volume of paper-based mail sent through the United States Postal Service in freefall – declining more than 30% since its peak in 2006, it’s up to us to keep the excitement of receiving a handwritten letter by postal delivery alive into the next decade.


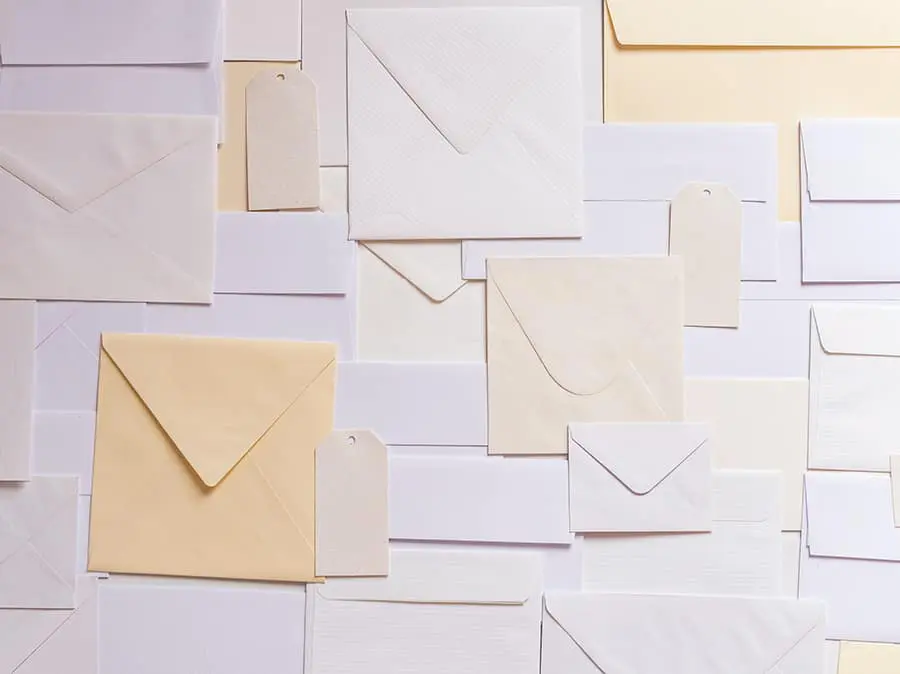
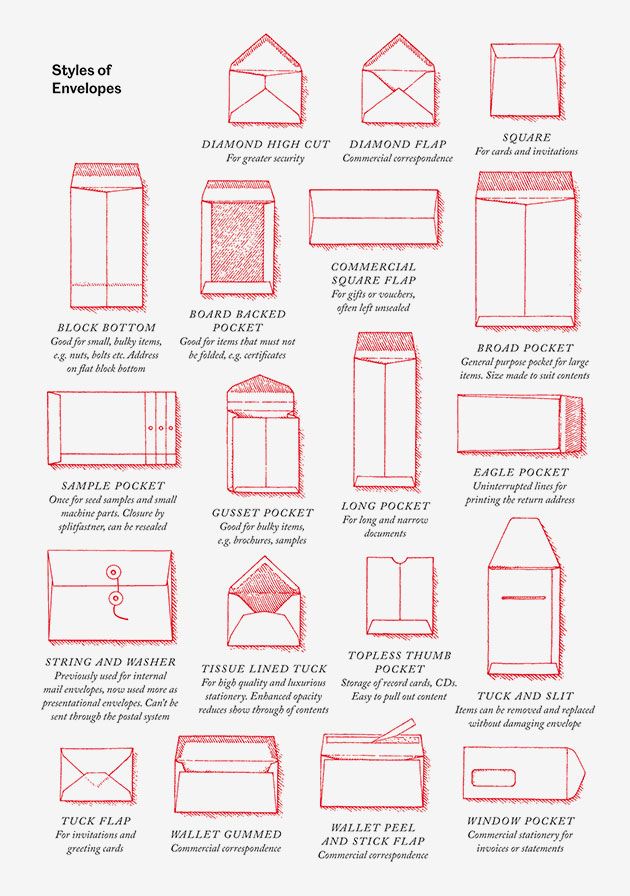
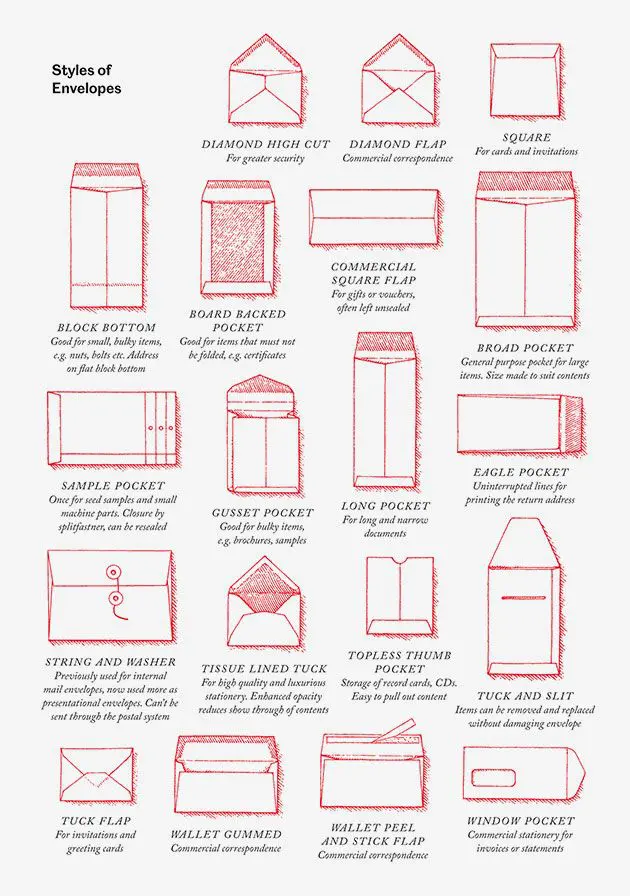
Different kinds of envelopes
The secret to a good envelope is making sure it’s not transparent. One of the key functions an envelope must perform is keeping safe the words inside.
This means the paper from which it’s made has to be thick enough to prohibit anyone from reading the actual letter. A good way to check for this before buying a pack of envelopes is to stick your finger inside one.
If you can see the outline of your finger through the envelope, you can bet someone will be able to read the black ink of a pen through it as well.

Writing addresses is not only for envelopes. The humble postcard has been around for nearly two centuries. The same as an envelope, a postcard also needs to have the correct address on it in order for it to make its way to the recipient.
Because the message on a postcard can be read by anyone, writing the address and title in a more informal manner is entirely appropriate.


Most common Envelope sizes
When planning your cards, wedding invitations, Christmas cards, or snail mail. You have to start with the envelope.
Deciding in the size and also the kind of envelope you will use for your project is super important, as it sets the possibilities of how you will address them and also if it's possible to embellish them in certain ways.
The most popular sizes for small mail are listed below:
- A1 Envelopes – 3 5/8 x 5 1/8 inches
- A2 Envelopes – 4 3/8 x 5 3/4 inches
- A6 Envelopes – 4 3/4 x 6 1/2 inches
- A7 Envelopes – 5 1/4 x 7 1/4 inches
- A8 Envelopes – 5 1/2 x 8 1/8 inches
- A9 Envelopes – 5 3/4 x 8 3/4 inches
- A10 Envelopes – 6 x 9 1/2 inches

High-end envelopes
Guess what the one-year wedding anniversary gift is? Paper! It’s for this reason Big-Dog luxury brand companies, such as Cartier and prestigious bespoke Stationary company Dempsey & Carroll offer paper gifts of custom-made envelopes with matching letterheads to their discerning buyers.
Other noteworthy stationary brands include:
- Connor – Personalized with handsome embossed letterheads, these thick stock correspondence cards are sold exclusively at Barneys. At $1,000 for 100 of these stiff, hand-lined envelopes and elegantly engraved 4-ply cotton-based cards, they are not something to chuck randomly into your shopping cart and hit the checkout.
- Bernard Maisner – Inspired by Rorschach inkblot images, the Bernard Maisner logo can be seen adorning their place cards, correspondence/thank you cards and envelopes in all the best places. Cute fact: each envelope has a different Rorschach inkblot on it.


How to write on your envelope in a straight line
Even if your envelopes don’t cost $10 each, it’s still an incredible waste of paper and time if you write the address sloping down or up. Don’t worry if you find yourself doing this, because it takes years of patience to learn how to place one letter and word on the same level as the previous one.
If you want to safeguard against a sloping address, follow these tips:
- Have a ruler, eraser, and light graphite pencil handy
- Align the ruler with the top or bottom edge of the envelope
- Draw as many address lines as you need thinly and lightly on the envelope using the ruler as an anchor point
- Write the address with the pencil lines to guide you
- Use the eraser to delete the pencil lines
- Make sure to wait until the ink is dry before erasing the lines – use blotting paper if uncertain
If you really want to protect yourself against any mistakes, write the entire address out in light pencil first and then trace over the top of it with ink.


Signed and sealed first, before delivered
Envelopes can be sealed and opened in a variety of ways. It depends on which ones you buy. Old school, standard envelopes require a lick of moisture before sticking them down.
This can be done with the tongue or with water. Then there are the envelopes that have a ribbon of wax paper covering the tacky glue that seals the envelope. It has to be peeled off before firmly pressing the envelope flap down.
If you want to make absolutely sure no one can tamper with your letter between the time it leaves your desk and when it arrives at the addressee’s, you might want to invest in some sealing wax. You light the end of the wax to soften it and then blot a big blob of the stuff onto the envelope flap.
Something else many letter writers do is to add a seal stamp. These are gorgeous little devices that press a logo or crest onto the soft sealing wax before it hardens.
And if you’re thinking that this sounds like a big effort and no one can easily open your private letters, think again!


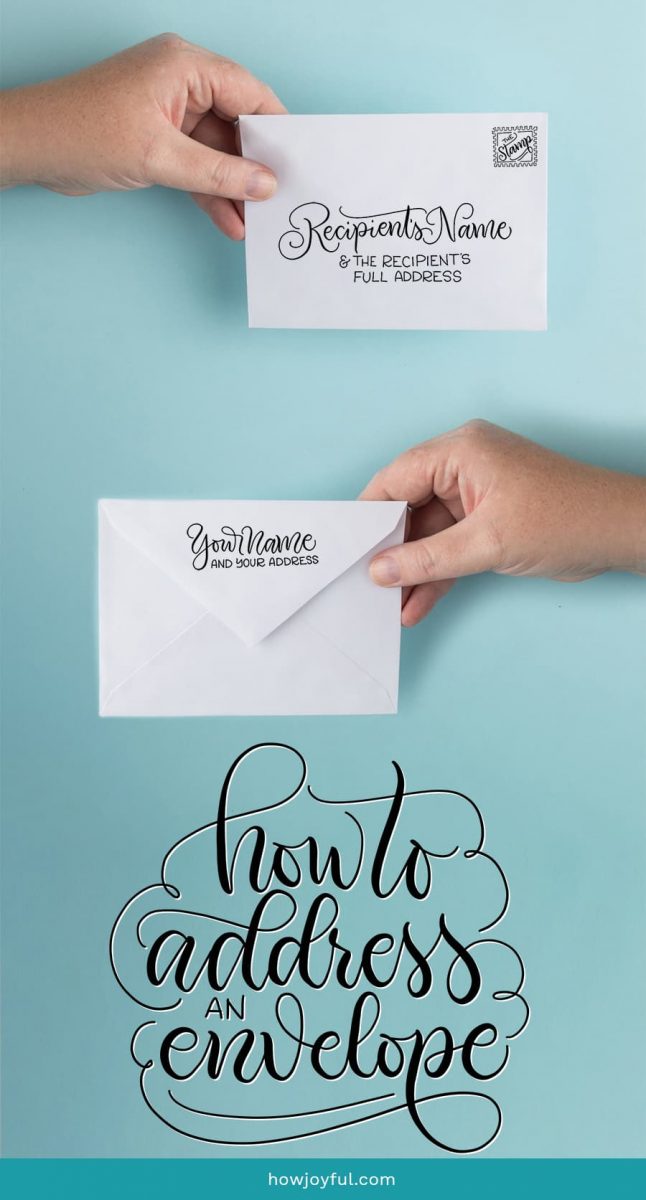
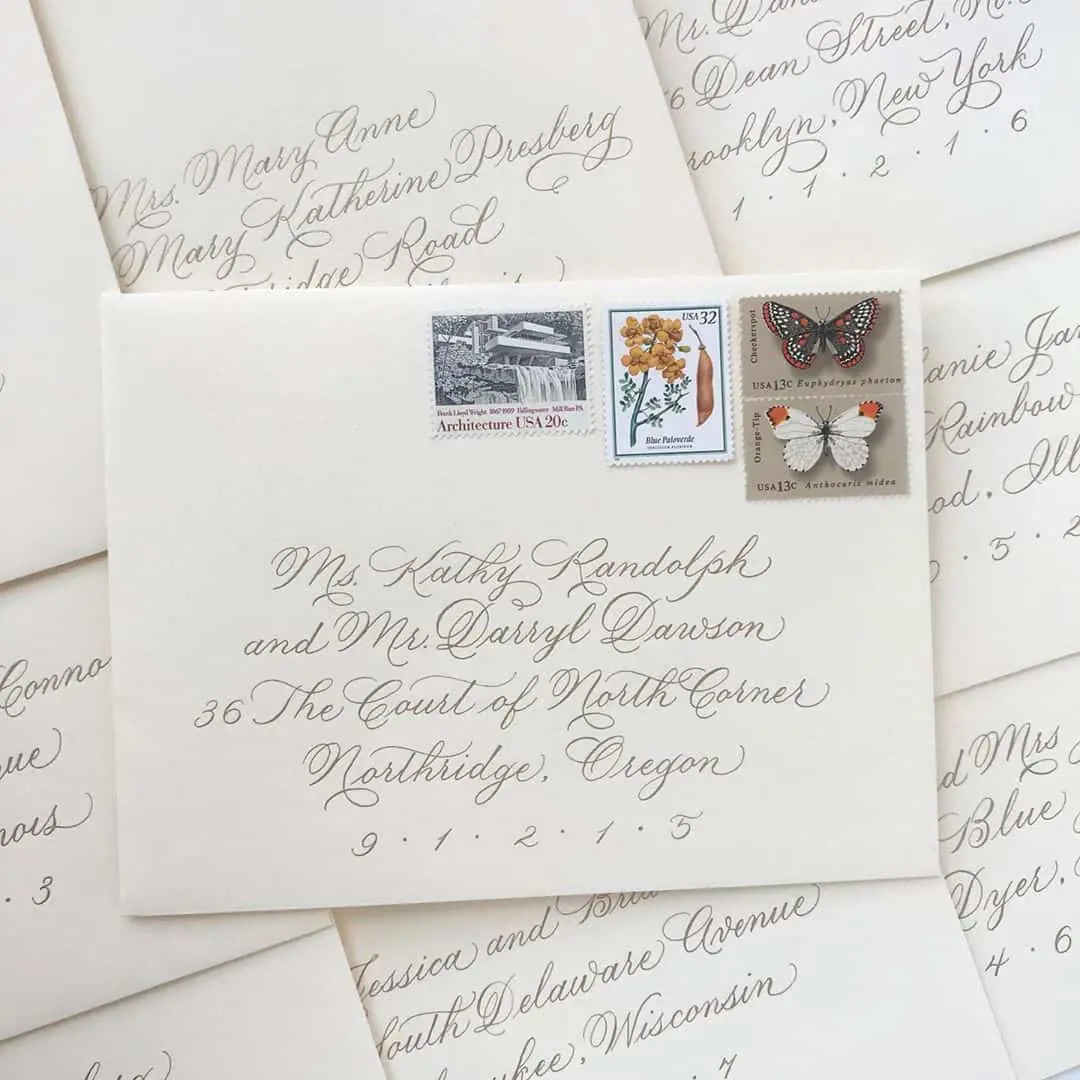
The correct way to address an envelope
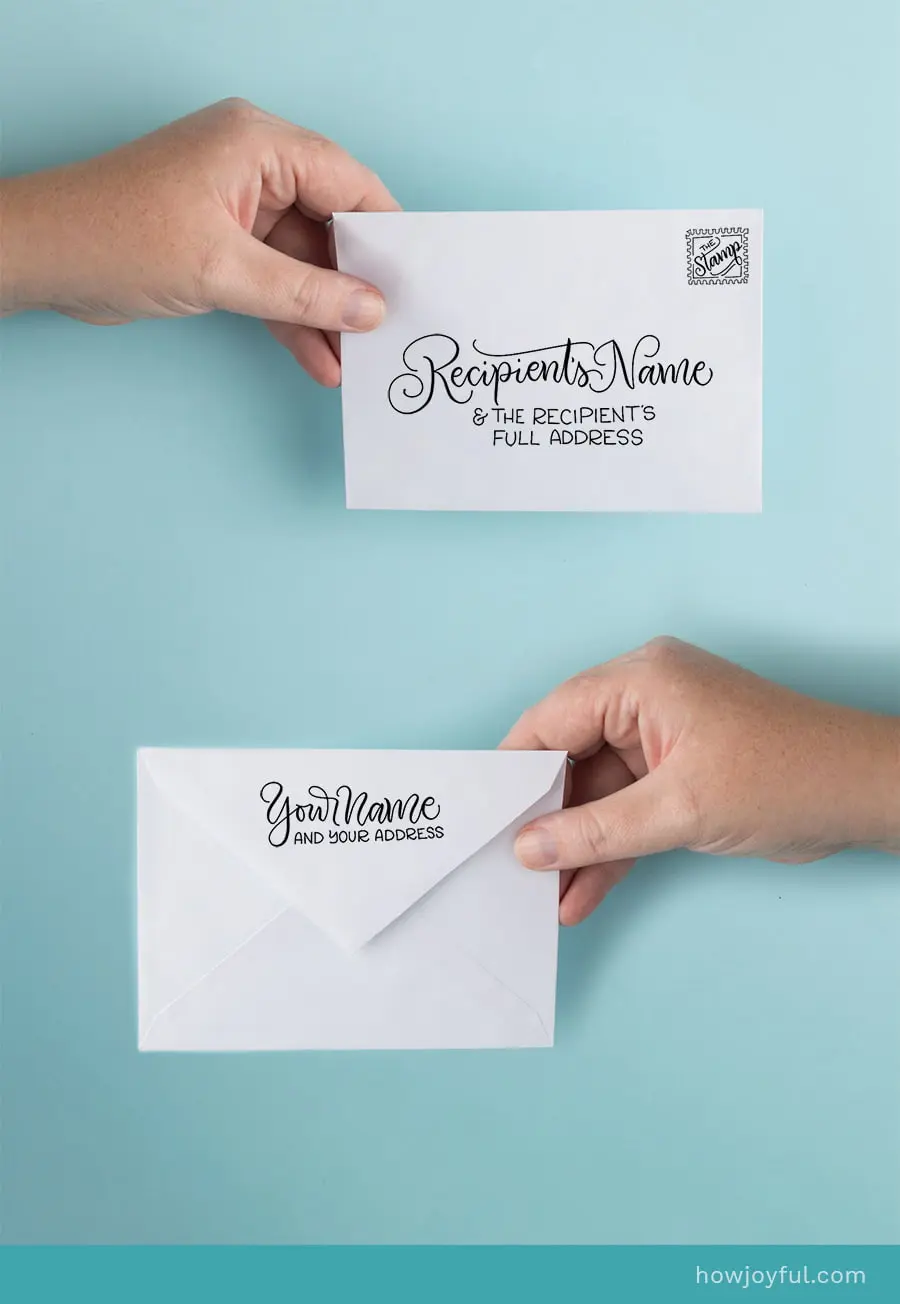
Depending on your preference, there are basically two different ways to go about it, the first one is to set all the information in the front of the envelope, as shown below:
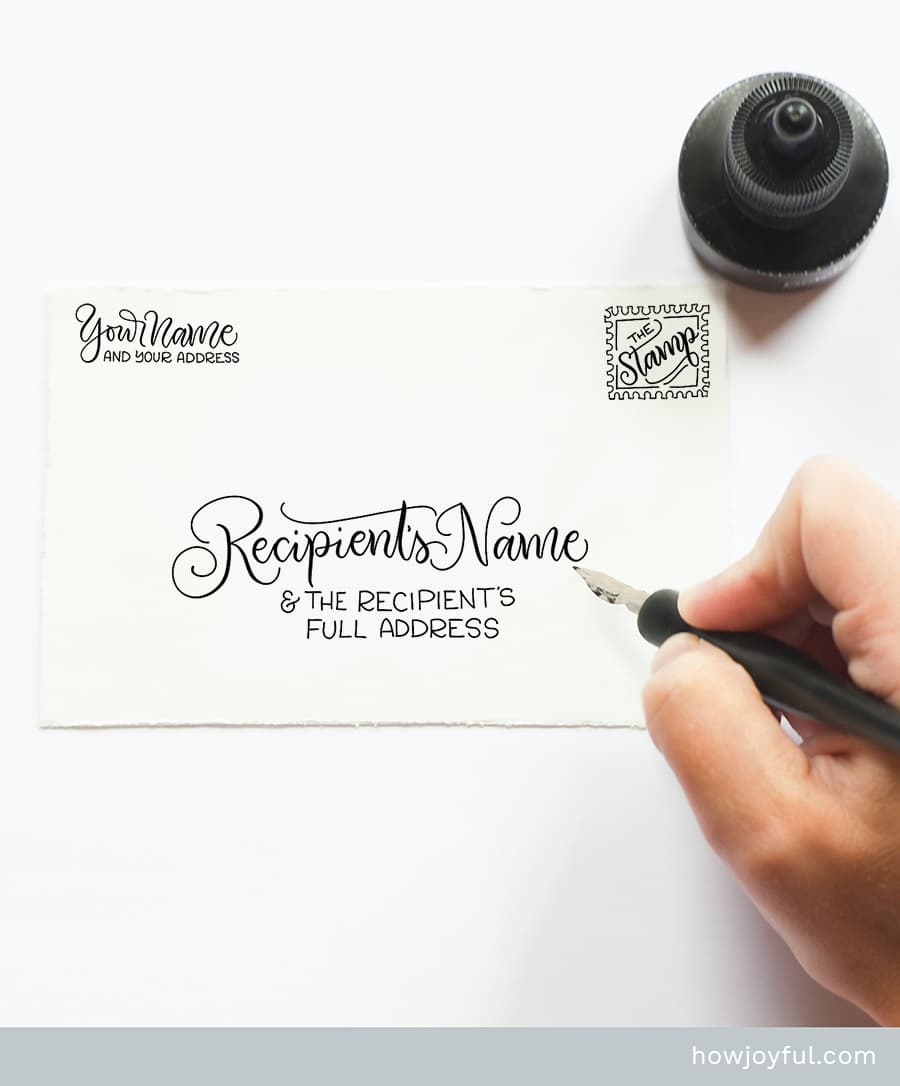

- 1. In the top left-hand corner of the envelope, write your name (the sender’s) in full.
- 2. On the next line underneath your name, write your street address or postal box number. This must be the address you want the letter returned to if it remains undelivered.
- 3. Then write the recipient’s name in the center and middle of the envelope. Use the name as the anchor from where you will drop the address underneath. This can be a street address, postal box number, office suite, or even tourist accommodation.
And the second way is to separate the information to have some in the back and some in the front, as shown below:

- 1. In the FRONT, top right corner, add your Stamp or postage.
- 2. in the FRONT, write the recipient’s name in the center and middle of the envelope. Use the name as the anchor from where you will drop the address underneath. This can be a street address, postal box number, office suite, or even tourist accommodation.
- 3. In the BACK, top-center of the envelope, write your name (the sender’s) in full.
- 4. On the next line underneath your name, write your street address or postal box number. This must be the address you want the letter returned to if it remains undelivered.
In some countries, it’s more common to put the sender’s name and address at the back of the envelope on the flap.
Also, it’s not absolutely essential to put your address on the envelope as, technically, the U.S. postal service only requires the recipient’s name and address in order to ensure successful delivery. However, if you are unsure about whether you have the addressee’s details down correctly, it’s best to write a return address in case the letter gets lost or something else happens.
► The correct way to write the sender’s address if the letter needs to be returned
- Write your name in full.
- On the next line underneath, write your street address or postal box details.
- If your address is longer than one line, it’s okay to use 2 lines if you need it.
- Below your street address, follow with the name of your town or city of residence, the correct abbreviated letters of your state, and the ZIP code.
► The Correct way to write the recipient’s name and address on the envelope
- Write their name in full – for formal or informal addressee titles, scroll down to the Wedding Invitation section.
- Underneath their name, write their address, postal box number, office suite, or hotel’s location.
- Below the street address, write the name of the town/city, abbreviated state letters, and ZIP.
- If the recipient is at a business or company, write the company’s name first; then write below the company’s name c/o (stands for “care of”) or ATTENTION or ATTN. followed by the recipient’s name.
If you are unsure about the ZIP code + 4 extra locator digits, the U.S. Postal Service has a dedicated website to help you find the four extra digits you need.
Go to their site, enter all the necessary information, press the ‘FIND’ icon, and the ZIP code tool will give you the correct ZIP+4 code you require.
It’s a good idea to go the extra mile to add the ZIP+4 code to your address – the more address information you write on your envelope, the easier it will be to get to where it needs to go or come back to you if the letter goes missing.


Address guidelines issued by the USPS
- Never write in pencil – only ink-based media or print is acceptable.
- Everything written in CAPITAL LETTERS is preferred. Don’t worry all you calligraphy fans out there – it’s possible to do this using your most elegant script!
- No punctuation. Yes, I know we’re taught to write New York as NY. and Mr. & Mrs. – however, the postal service prefers NO punctuation between the address words.
- No nicknames, no additional drawings, and no comedy. It might sound like a good idea to write “Gareth aka Old Stinky from the Athletic Team!!! But the USPS prefers only the recipient’s full legal name and title on the envelope.
- Abbreviations please for streets/avenues, apartment complexes, and states.


Return address stamps
One thing I am obsessed about when it comes to my envelopes is to make it as effort-free as possible, so I have a few options of stamps for our return addresses with my lettering.
I no longer make full hand-lettered custom stamps in my shop, because they were so labor-intensive.
BUT I do have a full collection of some designs I used to make in this Return address stamp category in my Zazzle here:


I've also found some options that you could check below in case you too want to speed up this process.
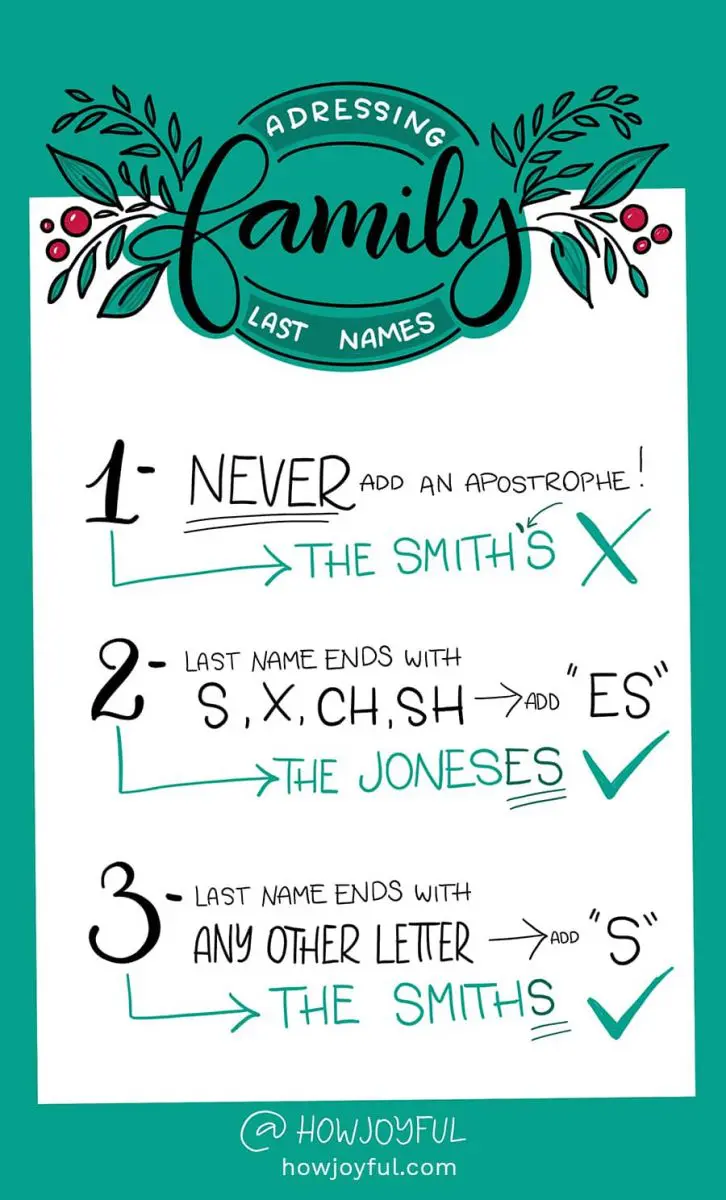
How to address family names
Christmas cards anyone?
I know so many people get so annoyed when they received the highly-anticipated Christmas cards and then BUM, someone has destroyed their family name.
The last name-addressing issue gets people super passionate on social media, especially the “grammar police” kind-of-people.
So in order to keep all of us in safe territory, I created this handy graphic below so that you can always address your Christmas cards correctly.
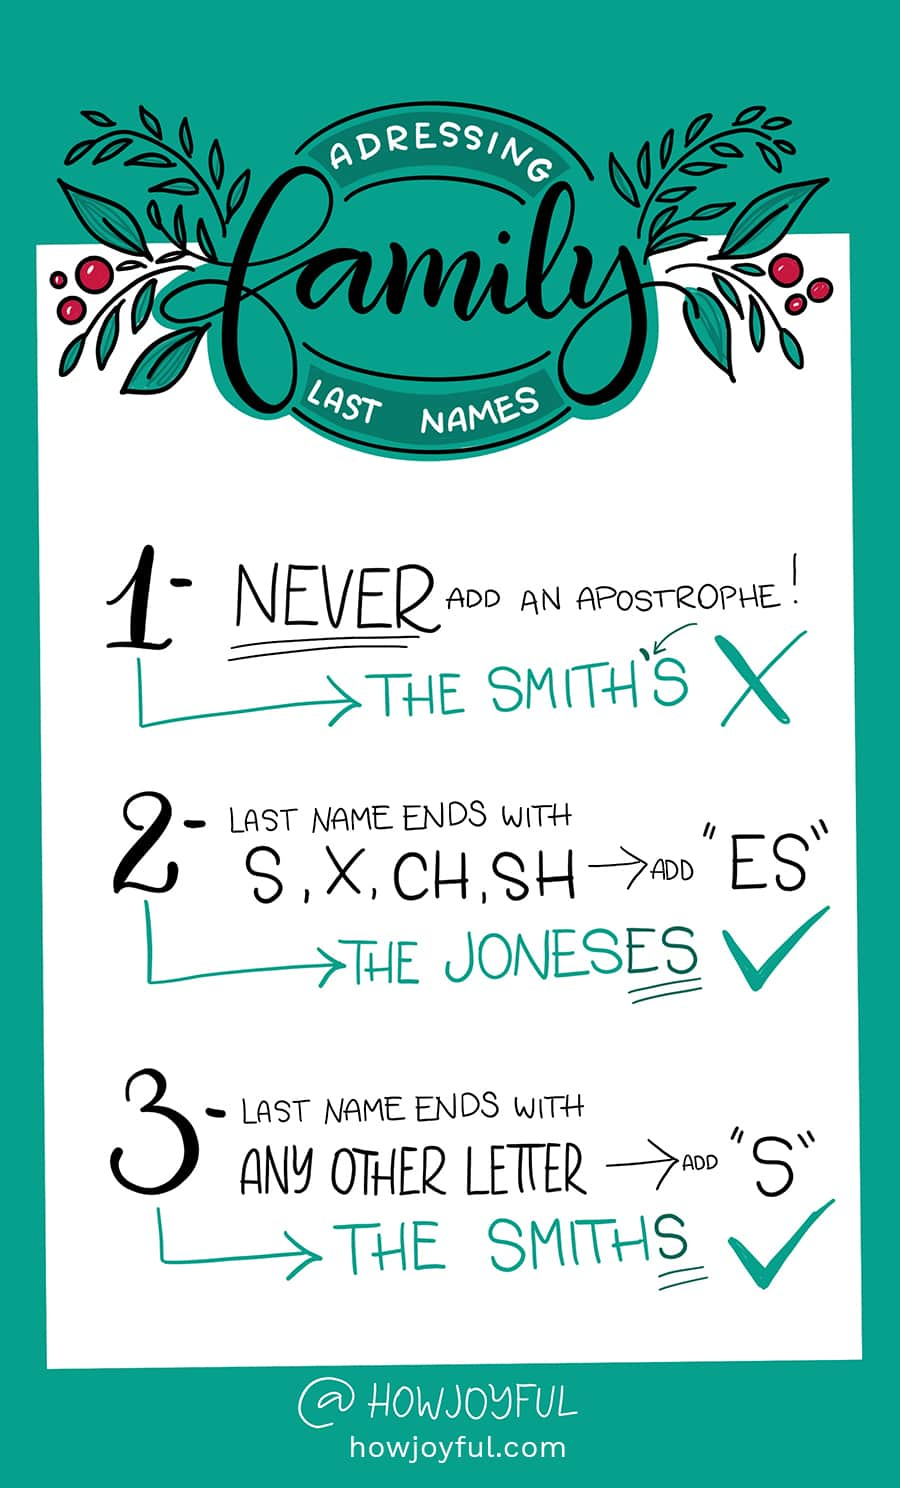

One handy cheat if the last name is too complicated is just to go with “THE complicated-last-name FAMILY” this way, we are off the hook!
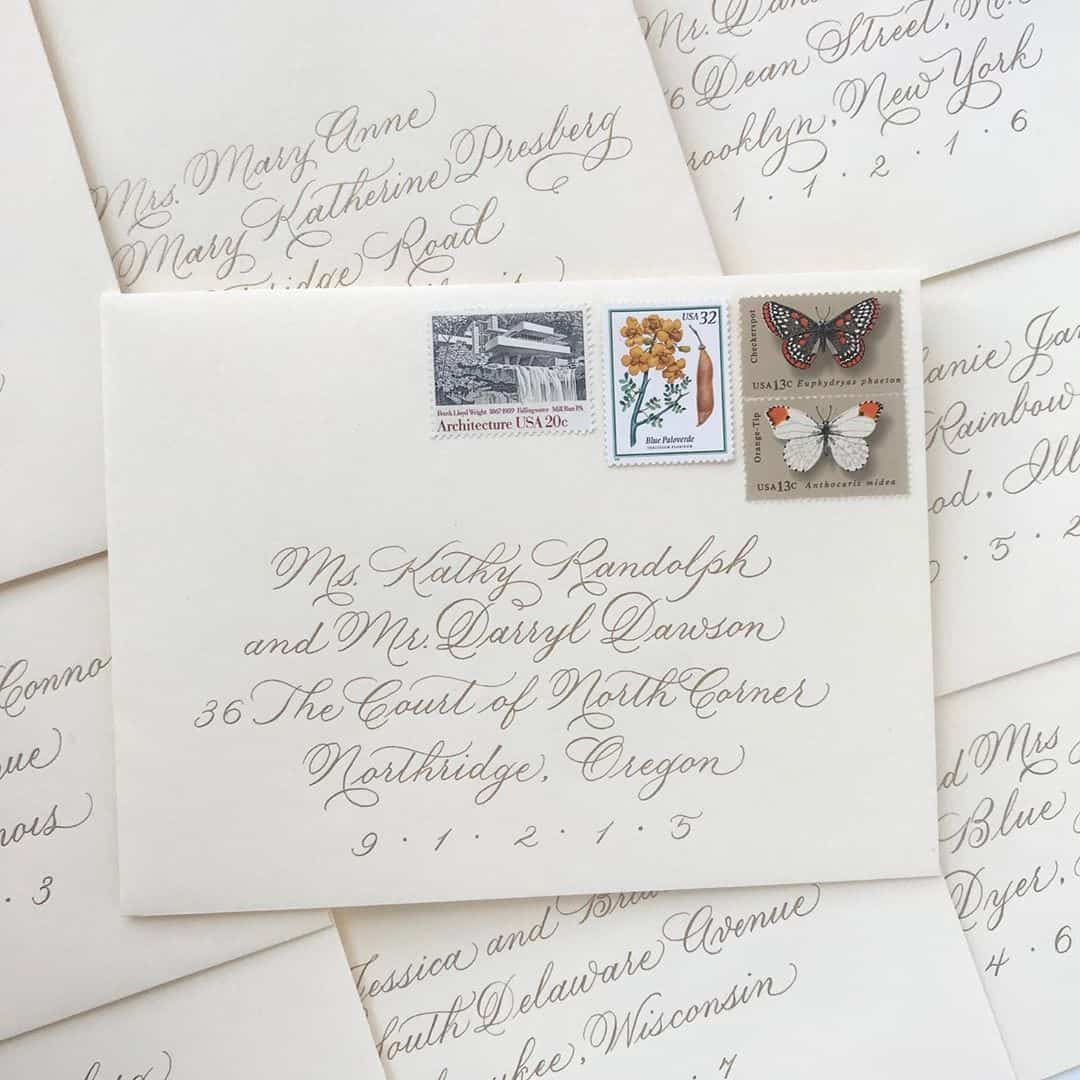
How to address wedding invitation envelopes
our wedding invites should never be an afterthought. If you want your wedding invitations to be as perfect as the day itself, you will need to invest just as much time into addressing every envelope as you do in assembling and personalizing the list of guests and invites themselves.
And for those of you who want to add beautifully handwritten and crafted place cards or seat reservations to your special occasion, I have great calligraphy tips on how to do that as well.
Here’s my go-to guide on how to address wedding invitation envelopes.


Inner and outer envelopes
Wedding invitations come with 2 envelopes:
- An outer envelope that wings your invite to the guest
- And an inner envelope for when the guest fills in their reply card and mail their response back to you.
Traditionally, the inner envelope is smaller than the outer one, and the flap is always unsealed so the guest can insert their response card easily. Some invite kits have a folded inner envelope instead.
Formality level
Depending on how formal you want your wedding to be, this will guide you on the best way to label your invites. This doesn’t only apply to weddings, but to any informal/formal occasion where invites are sent out.


Plan in advance who will write the addresses on the envelopes
For that ultra-classy look, you should seriously consider hiring a professional calligrapher for your invites.
If you have set your mind on addressing the envelopes yourself, there are tons of helpful hints and gorgeous equipment you can use to get that level of sophistication on your own.
Just make sure to plan ahead in order for your calligraphy writing supplies to be shipped and arrive on time for you to comfortably complete your labor of love.


Please! – Take Your Time
Remember that professional calligraphers won’t be able to churn out 150 handwritten invites overnight, so leave time in your schedule for that to be done too.
No one can cram in that much writing in one day.
Your hand, concentration, and posture will get really fatigued, and this will lead to sloppy handwriting and mistakes.


Calligraphy Utensils & Equipment
When your calligraphy tools arrive, give yourself plenty of time to get to know them better before launching straight into invitation writing.
This includes all those couples who want to include custom sparkles inside the envelope or write with custom-made ink colors.
Taking into account it’s polite to send out your wedding invitation 6 to 8 weeks before the event, this will give you a good indication on when to start ordering and addressing.
Formal Address
- Full names only – if someone likes their middle name/s used, these have to be written out in full as well. Eg. Mary Louise Baker, not Mary L. Baker
- You can use the abbreviations for Mr, Mrs, Ms, and Jr
- Husband’s name goes first for married couples
- For unmarried couples, each partner’s name goes on a separate line – the name of the one closest to you goes first. Eg. Your cousin, Alice, and their partner’s titles will be written:
- Ms. Alice Baker
- Mr. Ronald Butcher
- Doctor, Professor, and Reverend, etc. are written out in full.
- If your guest is a lawyer, there are two ways to write their name: William Bond, Esq. or William Bond, Esquire is the first way (no other title) or Mr. William Bond. If they are being invited with their spouse, the titles should be Mr. and Mrs. William Bond, or Mr. William Bond and Ms. Julie Manfred
- Don’t add the words “and family” or “& family” on formal invitation envelopes.


Inside the wedding envelopes your guests receive, it’s also important to get the tone and title right on the card itself.
Here are some guidelines.
Single guest
- Informal Wedding: Auntie Gail/Gail
- Formal Wedding: Mrs. Wyndham
Married couples
- Informal: John and Jill
- Formal: Mr. and Mrs. John Hill
Married couples who have different surnames
- Informal: John and Jill
- Formal: Ms. Jill Field
- Mr. John Hill (whoever is closest to you in relationship goes first)
An unmarried couple with the same address
- Informal: John and Jill
- Formal: Ms. Jill Field
- Mr. John Hill (whoever is closest to you in relationship goes first)
Families
- Informal: John and Jill, Jack and James
- Formal: Mr. and Mrs. John Hill, Jack and James
References
- emilypost.com: Guide to addressing correspondence
- Love Letters Great Men Collection
- USPS: Zip-code lookup
- woodstockmagazine.com: The disappearing art of the handwritten letter
- wikihow.com: Secretly Open-a-Sealed Envelope
- USPS: Addressing
- theknot.com: Wedding invitations etiquette
- wikipedia.org: Envelope
- wikipedia.org: Red envelope
- wikipedia.org: Mail
To wrap it up!
We've gone over every aspect of addressing envelopes, so now you have all you need to know about how to address them correctly.
If you want to bring classy back and begin handwriting letters to your friends and family there are only two things you need to remember:
- (1) the recipients will love receiving your letter, and
- (2) leave yourself plenty of time to learn and get it right.
Let me know if you would like any advice on which calligraphy tools make the best starter kit.
If you would like to save this post for later, I've included a couple of pins for you =]


Have a lovely day!
saffiertje
Tuesday 30th of November -0001
I LOVE THIS! I am going to check the wrap-around labels for the envelopes... Love the how to you post.... Thanx for that!
love Miranda
Joy Kelley
Friday 22nd of May 2020
I am so happy that you like it!