


Learn how to make an adorable baby girl DIY milestone blanket using Cricut’s Infusible ink – To track the growth of your baby in her first year of life.

This is a sponsored conversation written by me on behalf of Cricut. The opinions and text are all mines.
Capturing the growth of the first year of our babies is probably one of my favorite keepsakes from when my boys were little (they are not too big, but my littlest one just turned 3!! – sad face –
Babies grow so much in the first year that one month difference reveals so much, and what better way to capture it than having the same reference background or objects, aka growth trackers.


Blanket growth tracker
Blankets have become oh so popular to track babies' milestones and there are as many options as there are babies!
BUT When it comes to making your own the options are not too wide and most DIY TUTORIALS are only focused on using either iron-on heat transfers or using stencils and fabric ink.
Because of this, I was always hesitant to make a DIY baby blanket (I have all the blankets in my shop professionally printed with sublimation and direct ink printing that is safe for babies)
And then…
Cricut came out with Infusible ink, and I knew right away that I HAD to try and make blankets with it! If you already know what infusible ink is, you can get straight to the project and jump my explanation by clicking here.
What is infusible ink?
Infusible ink, as I shared in my post covering all about the Cricut machine, is one of Cricut's latest releases and one of the most exciting alternatives in the craft world.
A very simplified definition would be: Infusible ink is a DIY way to do sublimation printing at home.
The long explanation would be: The infusible ink sheets contain dried ink that is activated with high heat and becomes one with the compatible substrates, the main advantage is that with infusible ink you have no peel, flaking, or cracking since it becomes part of the surface you apply it and it becomes permanently infused.


To work with infusible inks you WILL need a and EasyPress or professional press.
Don’t know what an EasyPress 2 is? I wrote a full post about it here.
The bad part though is that, because of the high temperatures necessary to activate the ink, infusible ink sheets and pens will not really work with a household iron.
The benefit of infusible ink for this project
One of the things I was the most excited about with infusible ink that that, unlike iron-on vinyl. Infusible ink will not peel or crack when washing.
So, even if the blanket gets dirty after every photo shoot, washing will not alter the colors.
Let me list why I think infusible ink is the bee's knees:
- – Wash-proof: As I mentioned before, the biggest fear of making things that babies will get dirty fast is how they will stand intensive washing. Even after getting my EasyPress 2 to use iron-on vinyl, I still get a knot in the stomach when I first wash a project in fear of it getting destroyed. BUT with infusible ink after pressing, the ink becomes ONE with the substrate, there are no worries! (but still wash with like colors, of course)
- – Peel-proof: Unlike iron-on vinyl, Cricut’s infusible ink products guarantee your projects will not peel off because or wear, stretch or scratch!
- – Seamless and Smooth: It’s obvious that vinyl is not always seamless and completely smooth since it adheres to the top of the material. In the case of infusible ink, the ink will adhere to the surface without adding any extra weight or height to the surface. Completely seamless! YES!
I know you are probably as excited as I am about the possibilities, but I wanted to give a quick list of when infusible ink would NOT work for you, just in case:
- In order to use Infusible ink, you will need a compatible blank: Cricut has an ever-growing selection of items that are infusible ink approved, but just in case, make sure that they are good for sublimation.
- Artwork size: The artwork (or pieces) needs to be completely covered by your EasyPress. Since applying by parts will make your edges bleed and the transfer unstressful.
- Color of the substrate: Iron-on vinyl will work on pretty much any color surface because it’s an opaque sheet that you ADD to your surface, infusible ink will become one with your surface, so you want a light color base in order for your colors to be preserved.
Ok so now that you know everything you need about infusible ink, let’s jump into the PROJECT!!!
DIY Baby milestone blanket

 MATERIALS
- Infusible ink sheets: For this project, I used the distressed berry pack of 4 different sheets, and since I moved this game around my mats I had quite a few pieces left out of 3 sheets.
- Sublimation-friendly baby swaddle: I love this one because it is thick enough to be warm but super light and perfect to use as a lap or stroller blanket after your baby is out of the swaddle phase.
- EasyPress: In order to have the infusible ink sheets activated, you will need a press that can reach 380 F
- EasyPress Mat: I have not tried it without an EasyPress mat, but because of the high temperatures, I would not risk using the EasyPress without it.
- Teflon sheets or butcher paper: The cool thing about getting the pack of infusible ink sheets is that they include Teflon sheets for you to protect your project, but you can always get extras just in case they get ink in them, I ended up cutting away stained pieces out of mine to prevent it from transfer it by mistake.
- Lint roller: You don't want any lint or dust on your swaddle, because that will prevent the ink from getting to the substrate and leave white sparkles.
- Cricut tools: I used the small scissors the most and the tweezers to lift some of the pieces after they were done so I wouldn't burn myself.
- Heat resistant tape: This is optional, I didn’t have it and I made the project work, BUT I think that using tape would have made it so much easier!
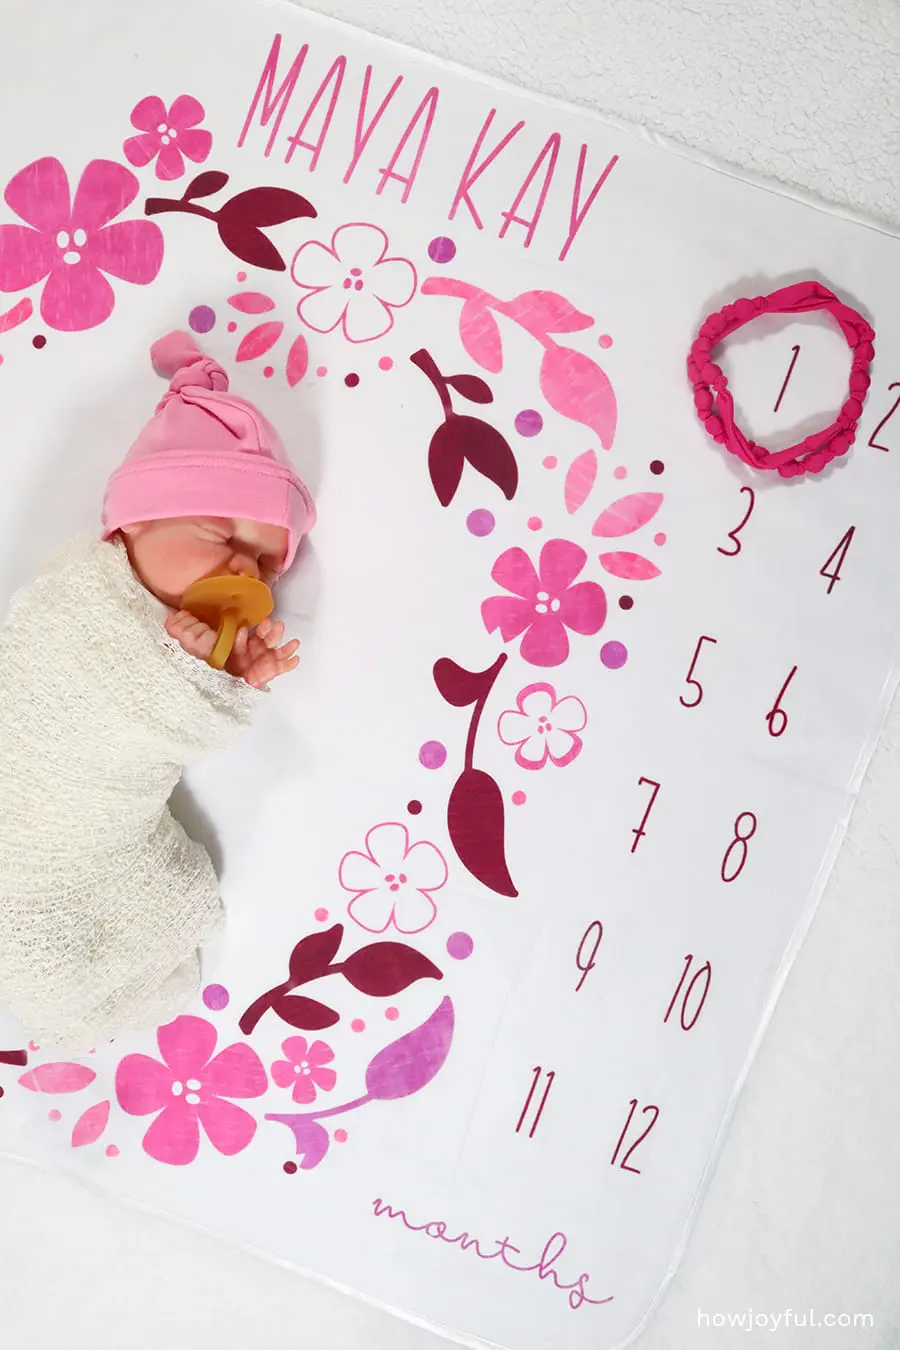
- The Design: I set a project that is FREE for you to use if you have a Design Space subscription because it used elements from their library. I did this to save material. If I had more sheets to work with, I would have just welded the colors together, so that they would stay in place, but this way, we can save material by cutting all pieces separated and assemble them in the blanket.
I think it works just fine, and you can reference the image as I did to place all the pieces. When the time to add the dots came, I just randomly added them to fill white spaces around the wreath.
Notes about this project
- Since I know that infusible ink is not cheap, I set the design so that you can assemble all the pieces and make them in just 4 sheets, I think that if you were to use more sheets and overlap the colors by sections, this project would be SO much more expensive than just buying a milestone blanket.
- Infusible ink has to be applied in one pass, unlike iron-on vinyl, you can't go over it again or your edges will look blotchy, so you need to layer the design so that you can work in small areas at a time.
- I have the biggest EasyPress 2 (12 x 10 inches) and for the numbers and name, it was perfect. BUT for the wreath, there were areas where it was a little too big. I think a smaller EasyPress would have worked perfectly to work on the flowers.
MAKE IT
As recommended by the infusible help section.
The first thing I did when laying my blank blanket out was to place my EasyPress mat below it and give it a quick heat. After that, I rolled the whole blanket with the link roller.
Honestly though because I took so long to layer the design, I don't think there was any heat left on the blanket, so don't stress about it.
After cutting my pieces, I weeded them and used a small scissor to cut all the little pieces and organized them.


I placed the design in the blanket using a sewing ruler to place my number and I used the picture of the file design to arrange the flower, leaves, and dots around.


Once I was happy with how it looked, I made a plan of attack for my EasyPress 2. Looked in the Cricut heat guide and used the setting recommended for most fabric substrates 385 degrees Fahrenheit for 40 seconds.

 I layered my project this way from the bottom to top:
- Make sure I had a flat strong surface
- EayPress mat, I used the biggest size
- A big piece of butcher paper of protective sheet
- Your swaddle
- The infusible ink pieces
- The included Teflon paper
- EasyPress 2
I started with the numbers. Be careful and don't make the same mistake I did and place them in the CORRECT order, oops!!


Notice that 6 and 5? Yeah, I didn't! But I fake it on the final pictures just so that it didn't look too weird!


After I was happy with the numbers, I moved to work on the baby's name.


For the flowers and leaves, I try to make sure that I used small parts and removed the parts that were not completely inside the area of the EasyPress since you do not want to have half-pressed pieces.
The ink does not behave well when you go over it twice. In some spots, I was forced to go over twice, but it was very little, and while it didn’t look horrible, the edges got a little blurry.


I worked circularly and made sure to cover small parts at a time. I added a video, so you can see exactly how I placed everything.


This was my very first project with infusible ink and I loved it so much!
It was so much easier than I thought, BUT I had very low expectations when I started, and I was planning on making a different and very simple design if the flower wreath didn't work.
I am so happy that it did work out =]


DIY milestone baby girl blanket using infusible ink
Learn how to make an adorable baby girl DIY milestone blanket using Cricut’s Infusible ink - So cute and easy! Track the growth of your baby in her first year of life.
Materials
Instructions
- Open the Project I set up here. Cut the infusible ink and remember to mirror the images when they are on the mat.
- Weed your infusible inks sheets by craking them with your hands.
- Cut each piece with small scissors.
- Clean your swaddle with the lint roller and make sure that there's nothing else on the surface.
 Lay down your pieces using the image of the design as a reference.
- Once you are happy with how your design looks in the blanket, heat up your EasyPress.
- Set it at 385F for 40 seconds.
- Layer your project putting Teflon protective sheets (or butcher paper) in between the EasyPress mat and your blanket and also above your pieces, before putting your EasyPress down.
 I used the Teflon sheet as a reference for the area that I could cover.
- Start working your way around the swaddle.
 It took me about 9 presses to get the whole design transferred using my 12x10 EasyPress.
Notes
Since I know that infusible ink is not cheap, I set the design so that you can assemble all the pieces and make them in just 4 sheets (or less depending on how you arrange the pieces in the mats).
I think that if you were to use more sheets and overlap the colors by sections, this project would be SO much more expensive than just buying a milestone blanket.
Also, Infusible ink has to be applied in one pass, unlike iron-on vinyl, you can't go over it again or your edges will look blotchy, so you need to layer the design so that you can work in small areas at a time.
Recommended Products
As a Cricut Affiliate and brand ambassador, I earn a commission from qualifying purchases at no extra cost to you.


This lovely blanket was modeled by one of the dolls I bought for my shop. BUT it's going to go to one of my Instagram followers.
I will be sharing more designs I am planning and if I need to make it personalized, and you are the first to DM me the information I request, you can also win one of my tutorial's projects for free!
So make sure you watch my IG stories!
Save this for later
PS. Did you like this project? Make sure you pin it for later!


PS. For the marker you see in the pictures, I used a wrapped necklace that I made and I have the tutorial right here.
I hope you like it and if you make it I would love for you to tag me on Instagram! Also, stay tuned for a BOY design pretty soon!
Happy creating!
Leslie H
Friday 25th of September 2020
Love the design. Making it this weekend for a baby shower gift. The video showed you using something when the press overlapped what had already been done. Is it just folded cardstock? I have the 9x9 press, but wanted to have something ready in case I run into the same issue. Also, did you just reuse the protective sheets that come with the ink sheets or did you use something else? I usually use a Teflon sheet when doing HTV, but wasn’t sure how it would work with the infusible ink. Can’t wait to try it.
Joy Kelley
Saturday 12th of December 2020
Hi Leslie! Yes, I used folded cardstock as well as a Teflon sheets, I purchased re-usable Teflon sheets, so they are good for using in other projects, I just make sure to clean them very well after I am done with an infusible project because any ink left on them would transfer when applying heat again.
Honestly, I found infusible ink much easier than HTV even though it just sounds super intimidating. I hope you give it a try! It's so fun! Joy -
Brittany
Wednesday 27th of May 2020
Hi!
I was wondering where you got the marker for the milestone blanket or did you make it?
Thank you!
Joy Kelley
Wednesday 27th of May 2020
Hi Brittany! For the marker I actually used a DIY necklace I made with fabric, I have the tutorial for it here.
I thought the pink looked super cute with the colors of the blanket =]
joshlyn
Tuesday 3rd of March 2020
thank you so much! you are such an inspiration to me! your work is so beautiful!!!
Joy Kelley
Wednesday 4th of March 2020
I am so happy to read your message! and thank you again for continuing to visit <3
Joshlyn
Monday 2nd of March 2020
Hey! So I'm attending a baby shower and I've gone ahead and gotten my large swaddle blanket and my infusible ink, I'm having a hard time finding any good flowers similar to your project but I cant get the links to bring me to yours, I have check the community projects and still no luck just wondering if you could help! Really wanted to make this!
Joy Kelley
Monday 2nd of March 2020
Hi Joshlyn!
EDIT: it seems that the link to my project is working, I have no idea why it was not, so here it is again: https://design.cricut.com/landing/project-detail/5dd3e8a8f358a306a0728e66
I am so sorry! I am not sure why the project link is not working. Since you can't find the project in Design Space. I will share the codes for the individual shapes, that way you can get them:
- I used the designs #M8DB1AFF and #M8DB1B07 for the flowers. - I also added extra flowers of #M8781A04 - For the leaves, I used #MC4C9E7C, #MC4C9E90 and #MC4C9E97 - For the numbers and name, I used the font "Kyden" - And for word "months", I used the font "Loop-Di-Loop"
I hope that helps and that you are able to make this for your friend! If you have more questions just let me know!
(I will update this post and comment as soon as I hear from the guys at Cricut!) xo
Sandra
Tuesday 18th of February 2020
Hi, I am looking at using infusible ink for a blanket for a baby shower gift the 30x30 is a good size? Also I only have a heat press - could I still use that even though it would be done it sections. It is for a boy, so I'll be using a different layout than yours.
thank you!
Joy Kelley
Thursday 20th of February 2020
Hi Sandra!
I really liked the 30x30" blanket, if you are planning to use it for swaddling a baby, this size would work for most babies up to about 2-3 months, after that it might be too small.
For reference, in my shop, the smallest swaddle I sell is a 30x40" and I personally used this one for my boys (they were around 10lb when born) and swaddles them until pass the 2 months, after that, I used them as lap blankets in the car seat, or just to snuggle.
The only thing I would recommend you to be cautious when doing sections is to try and not go over the same spot twice. When you do that, the infusible ink gets a little bloated and the lines are not as sharp.
If you HAVE to go over the same spot, try to use paper or something to cover the areas that already have infusible ink applied to.
Good luck with your project! XO