


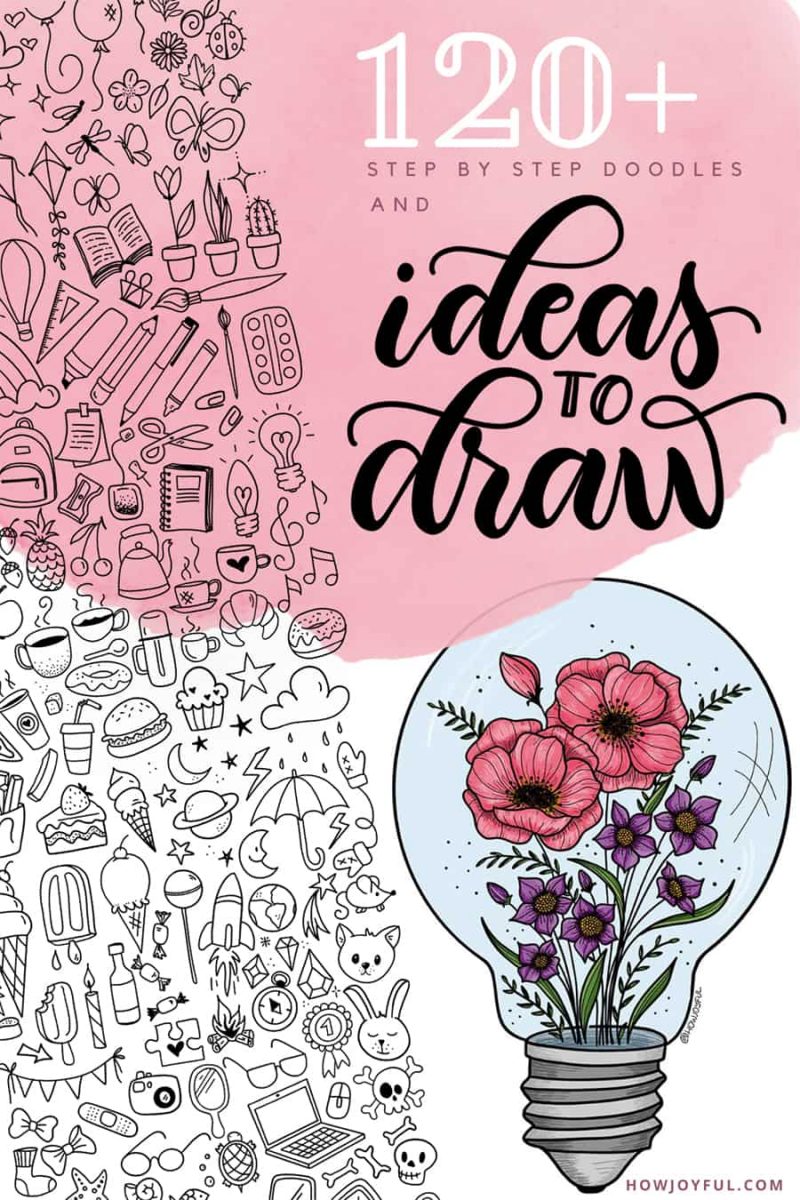

Getting drawing ideas for your new notebook, or getting a doodle idea for your lettering pieces is no easy task. So to help you out, I compiled some super cute drawing ideas and added step-by-step instructions for most of them, this way you can start drawing and embellishing as soon as possible!
In this post I will start by covering all the basic shapes and then some simple doodles, then at the end you will see some medium and advanced doodles along with all my favorite tools for drawing and inking!
- Basic shapes and glossary
- Drawing ideas and step-by-step instructions
- Intermediate monoline drawing ideas
- Sketching tool recommendations
- Inking tool recommendations
- Paper and notebook recommendation
- More post about Journals and Doodles
- Pilot Dr. Grip Mechanical Pencil
- Tombow Eraser
- Mechanical Pencil Set
- Pentel Triangle Eraser
- Staedtler Eraser
- Amazon drawing pack
- Beginner Drafting Set
- Beginner Drafting Set
- Sketching pack (50 pieces)
- Faber-Castell Pitt Pen set
- Staedtler Lumocolor Fine Point
- Tombow Fudenosuke Brush Pen
- Pentel Fudenosuke Brush Pen
- HP 32 lb paper
- Strathmore tracing paper
- Canson tracing paper
- More post about drawing
Basic shapes and glossary
When adding color, always allow for the light to hit the object from only one side. You will notice that when the drawing is three-dimensional, it takes a bit more concentration to learn, but don’t be put off because the technique is quickly mastered.
- Oval / ellipse
- Triangle
- Isosceles triangle
- Right angle triangle
- Trapezoid
- Heart
- Cone
- Cloche dome
- Cube
- Rhombus
- Rod
- Frill
- Spiral
- Wave
- Ridge
- Illumination dashes
- Nozzle shape
- Arc / arch
- Teardrop
- Serrate / jagged
- Arrow
- Bullet
- 2D ^
- 3D
Drawing ideas and step-by-step instructions
I had already shared ideas for what to draw before, but I feel like I glossed over the end-result for each doodle, so today, I wanted to share how they look after you add shading and color because going from line-drawing to adding color and shading lines can make such a huge impact.
I am dividing all the ideas for what to draw into categories, this way you can find doodles easier, and as usual, remember to use the table of content to jump to the area you wish to look closer.
I also put together my favorite sketching and inking tools at the bottom of the post in case you are looking for recommendations, if you want to see the full list of creatives tools I recommend check out my Tools page. And if you are looking for more material on visual communication via drawing, check the book I recommend below.
Get a book

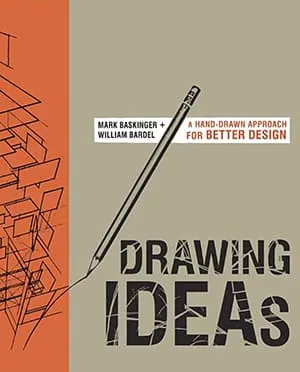
Drawing ideas: A hand-drawn approach for better design
This book by Mark Baskinger and William Bardel focuses on WHY to draw (instead of HOW to draw). So, it's the perfect companion if you are interested in HOW to communicate your ideas visually, effectively, and efficiently.
School drawing ideas
Lets's jump into this list with some of the most popular things we use when we are journaling, school tools, and creativity tools. I also like that most of these shapes are very basic, so it's easier to start with rectangles and basic shapes if you have no experience with doodling.
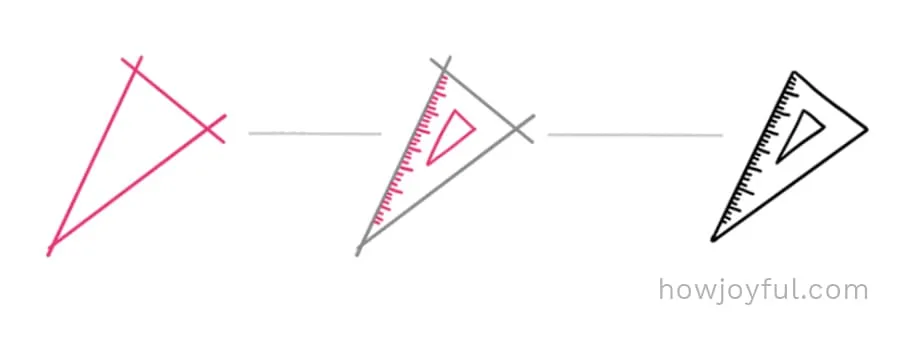
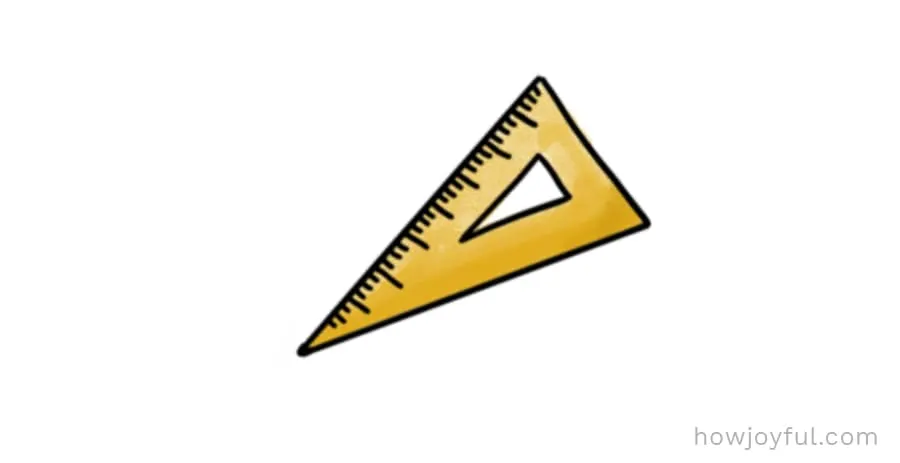
1 – Squad ruler
A set square is hands down my favorite kind of ruler. I love to use it when sketching out anything that requires precision. It can create isosceles and right-angle triangles in seconds. When I want to add creative tools to my journal or lettering pieces, this is my go-to piece of kit. Draw an isosceles triangle with another smaller one inside it. Add measuring lines for texture. Erase any unnecessary lines.


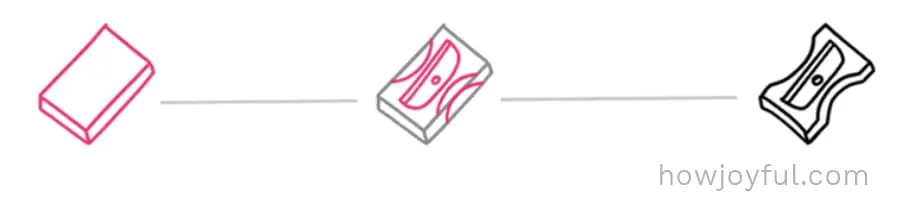
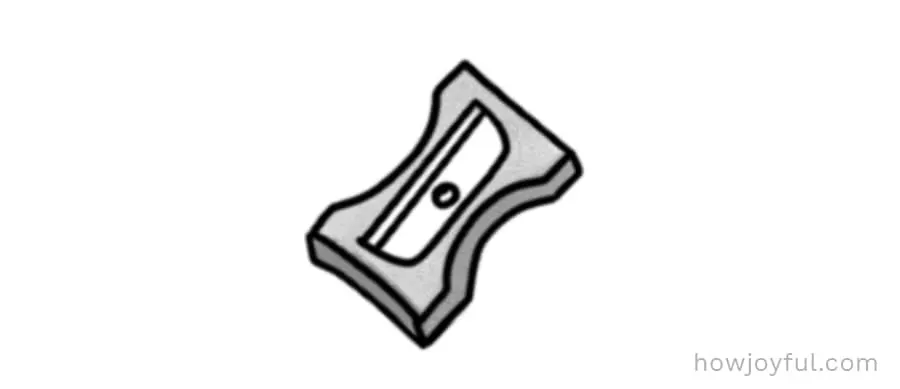
2 – Pencil sharpener
Create good guidelines by starting with a rectangle and adding dimension lines. Next, create the side indentations and blade details.


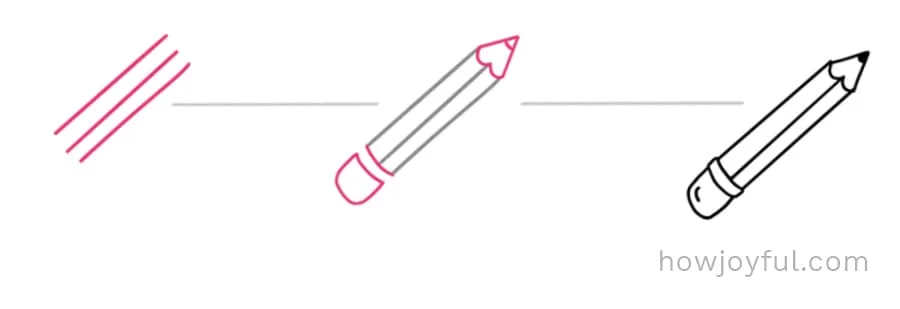
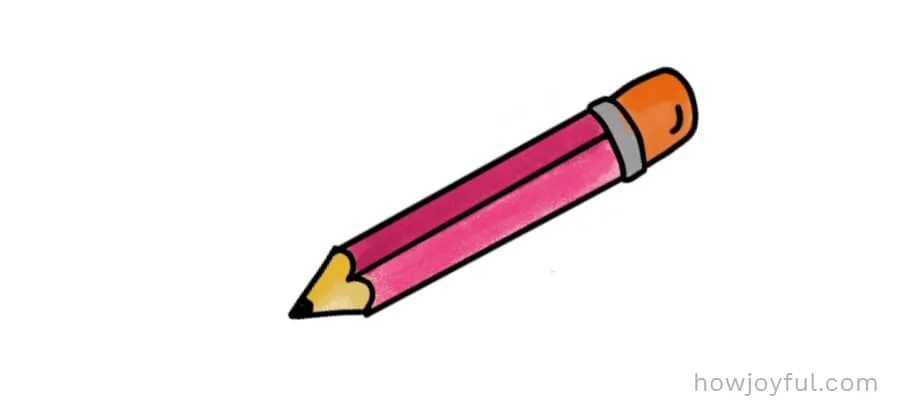
3 – Pencil doodle
This is a simple pencil sketch, just start with 3 parallel lines, continue drawing the point of the pencil, and fill in the color of the pencil. Lastly, draw the eraser at the other end.


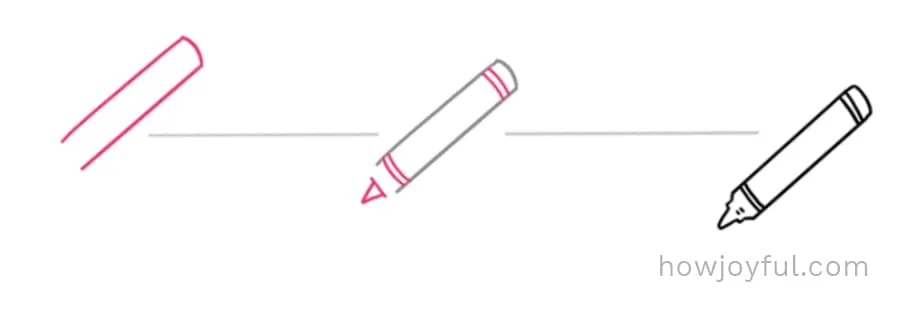
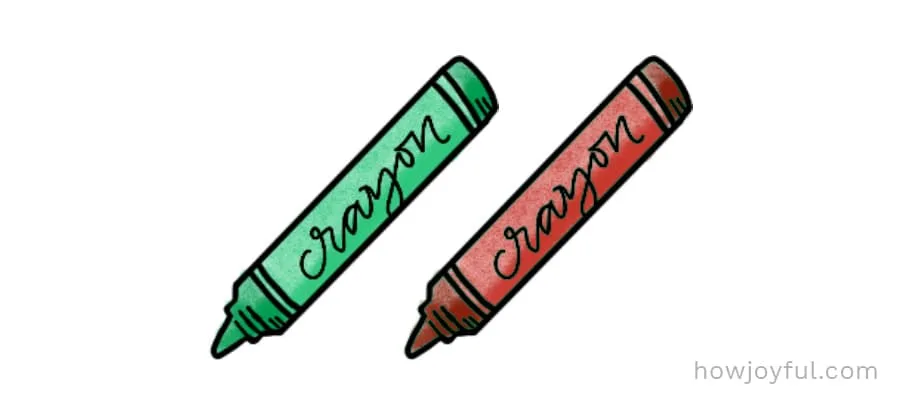
4 – Crayon
This crayon sketch is a very simplified version of a real crayon. Just start with two parallel lines, and draw a semi-curved on the top end. Draw close lines to mark where the end and start of the label would be. Draw a pointed triangle at the bottom and connect it making two indents.


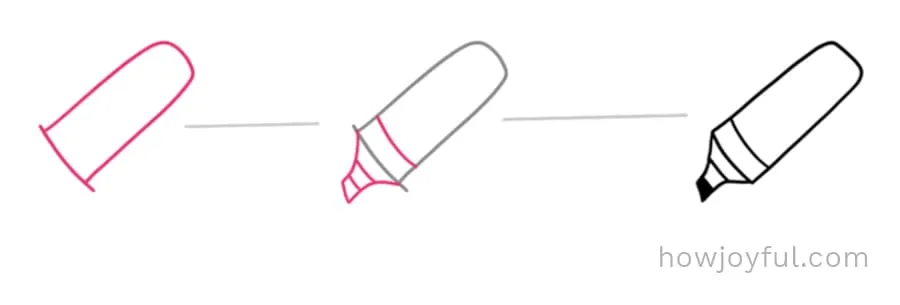
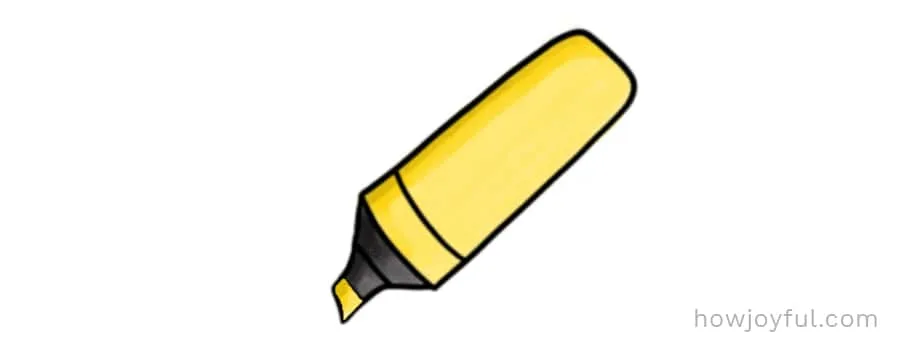
5 – Stabilo highlighter
These are my favorite highlighters, and so fun to draw. Start with a semi-curve bottom line, after that draw an oval-ended rectangle. Then work on the tip of the marker.


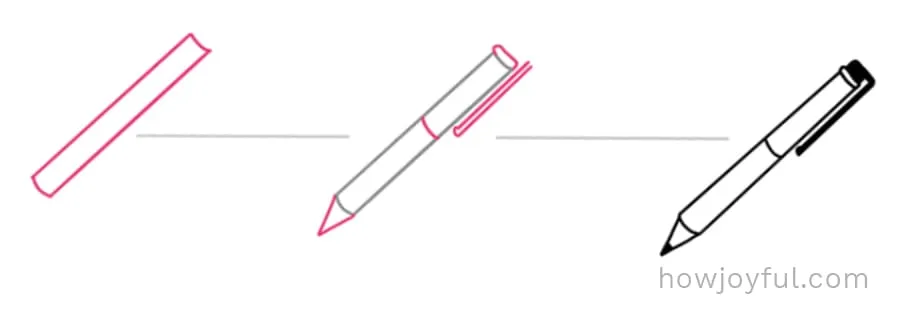
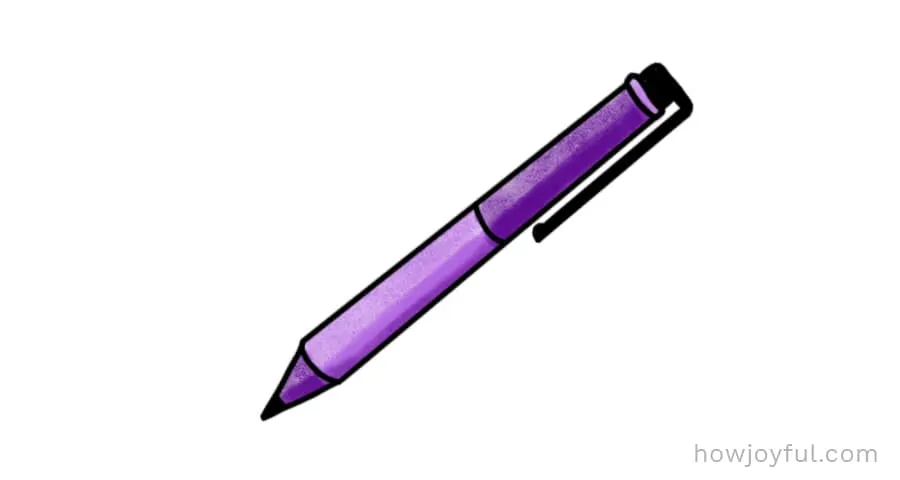
6 – Ink pens
To draw this ink pen you will start just as you did for the pen, two parallel lines with a semi concave line at the top, work on the tip, and then add tow small lines on the top of one of the sides, attach this to the main body to make the lid of the ink pen.


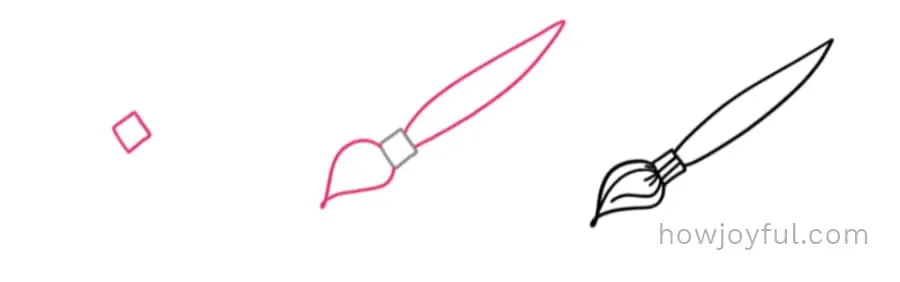
7 – Brush
To draw this simple and exaggerated “cartoonish” brush, start with a small square that will be the piece that holds the hair of the brush and the body. After that draw, the hair part and make sure to make it extra puffy. After the handle is drawn make some lines to the metal part that holds the hair of the brush.


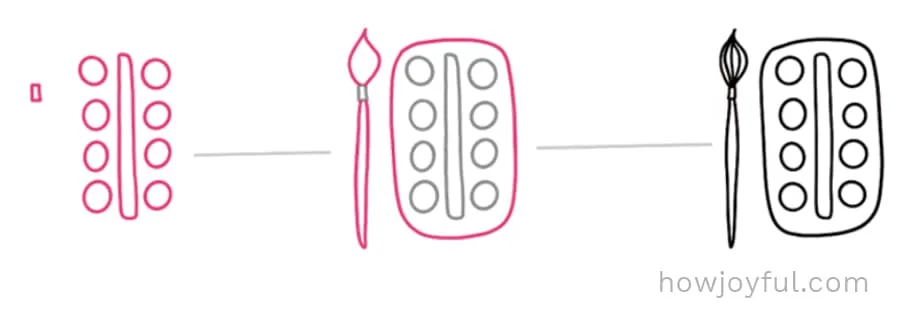
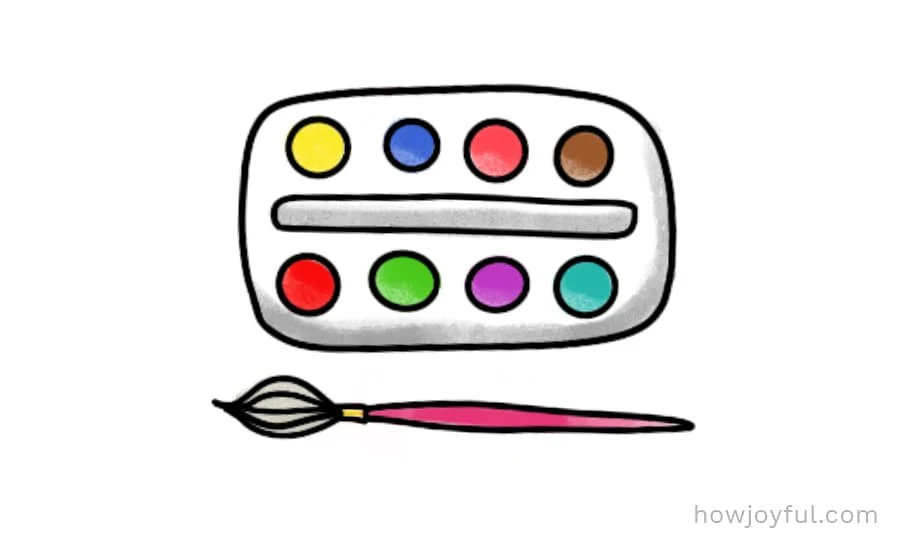
8 – Watercolors
To draw this simple watercolor palette, start with a long rectangle in the center, then draw circles on both sides of the long-thin rectangle. After that, draw a rounded-rectangle around all the circles. After that draw a thinner version of the brush we drew before.


9 – Paper notes and tape
Begin by drawing a straight vertical line and adding one slightly downward horizontal line at the top and a straight horizontal line at the bottom. When you join the two horizontal sides together, add a very slight bend to the line. Place another rectangle shape on top of the base shape, but this time make the second vertical bend more pronounced. Draw a small rectangle on the top horizontal line to signify the tape. Add “writing” and erase any visible lines from the bottom rectangle.


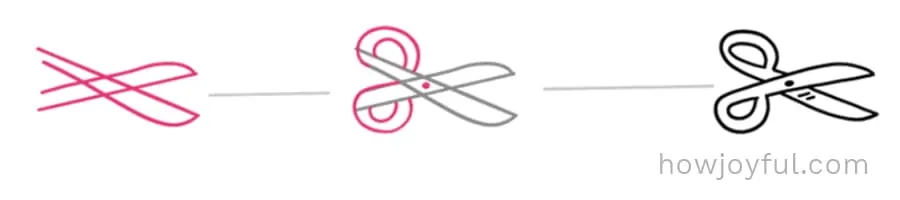
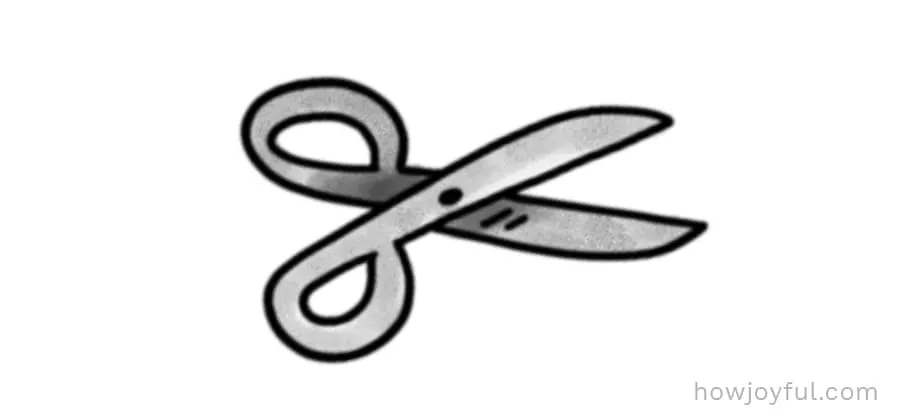
10 – Scissors
Draw a flattened ex-cross and then double it up. Close the right side of your double ex-cross, with a rounded arch on the one side, joining it to the other side to create the illusion of the sharp end of the scissors. On the left side, add two semi-circles for the handles. Erase any unnecessary lines and add a small dot in the middle for the scissors screw and two small lines on one of the blades to signify the gleam of the metal.


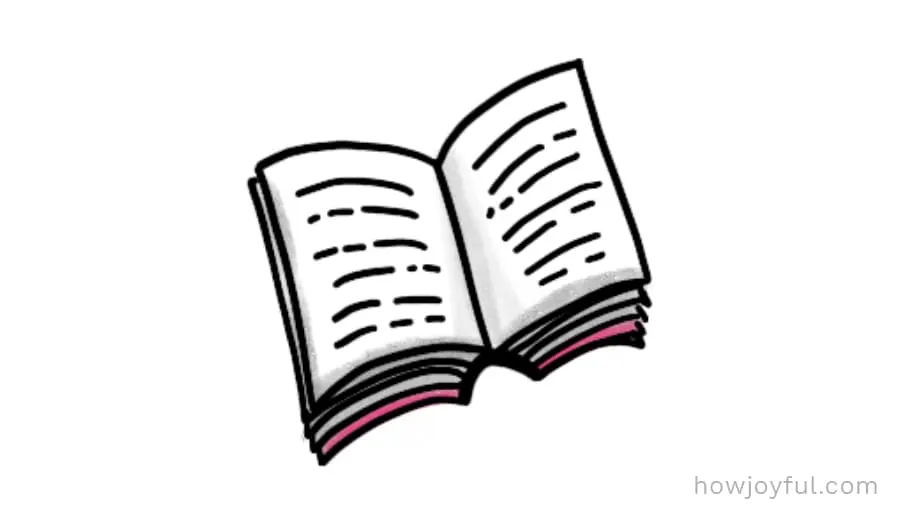
11 – Book doodle
For this one, we are starting with two pages in the shape of two adjacent rectangles with a slight bow. Then add dimension by repeating the bottom lines and joining them to the main pages, add lines inside the page and also at the bottom to make it look like multiple pages.


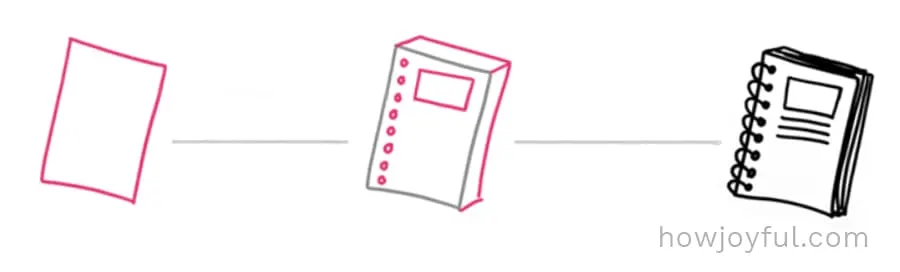
12 – Notebook
Draw a rectangle. Add 3D dimension lines, spiral holes, and a label. Create page texture and link the spiral holes with binding.


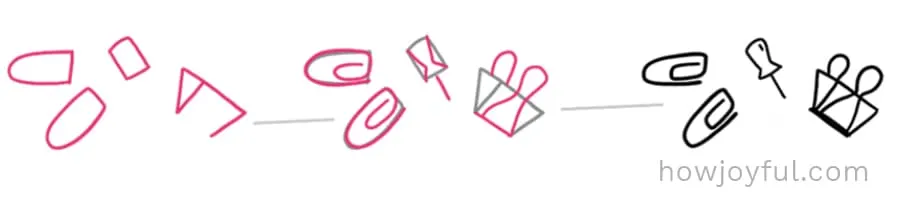
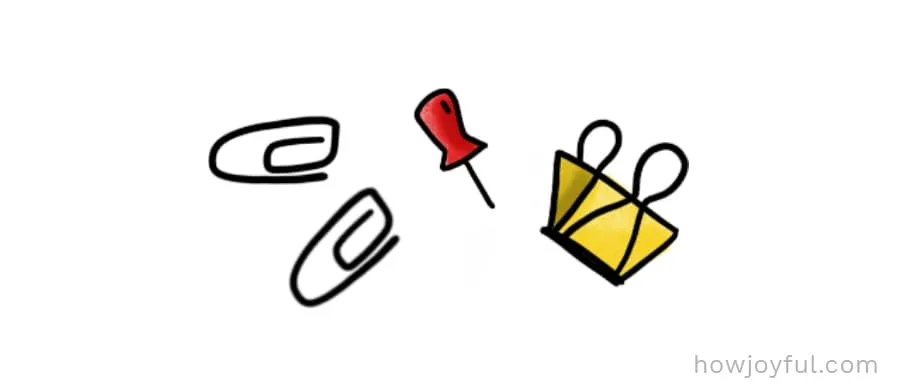
13 – Paper clips
Draw bullet shapes for the paper clips, a small rectangle for the tack, and an unfinished pyramid shape for the bulldog clip. Add a dimension line to the bulldog clip. Create spirals for the paper clips, taper in the sides for the tack, and add handles to the bulldog clip. Add texture lines.


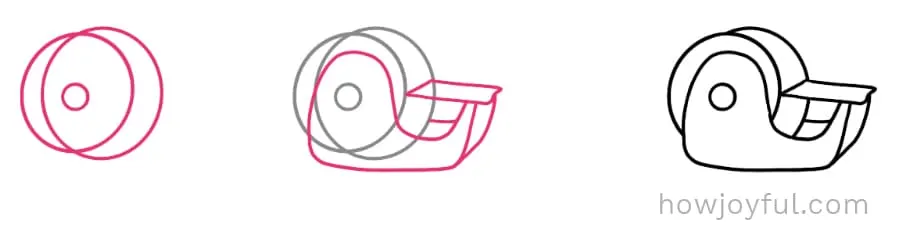
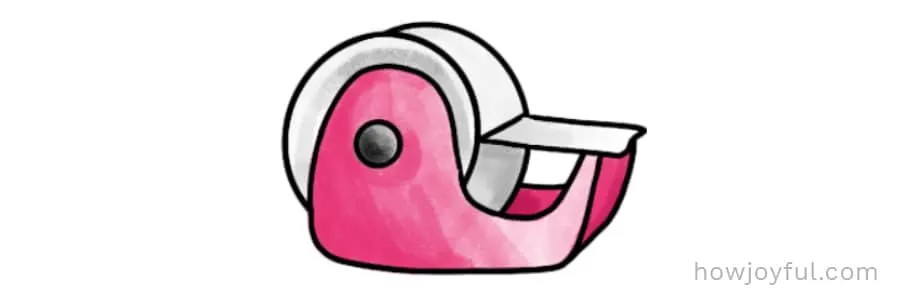
14 – Tape dispenser
Draw two circles, with the slightly larger one on top of the other. Anchor the two circles together with a hole. Using the hole as a guide, draw around the hole to create the base (it will look a bit like a Christmas elf’s boot). Add dimension lines to create the tape and back of the base.


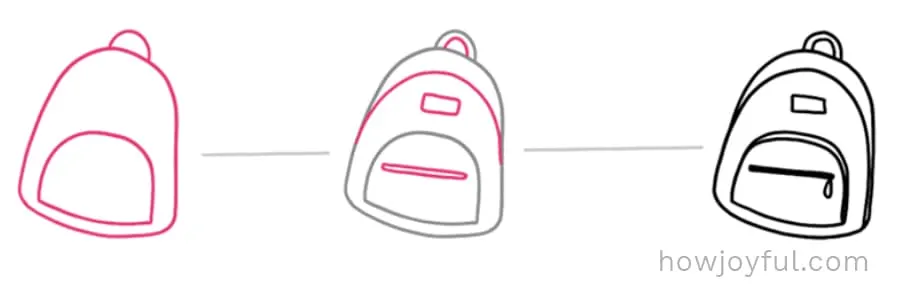
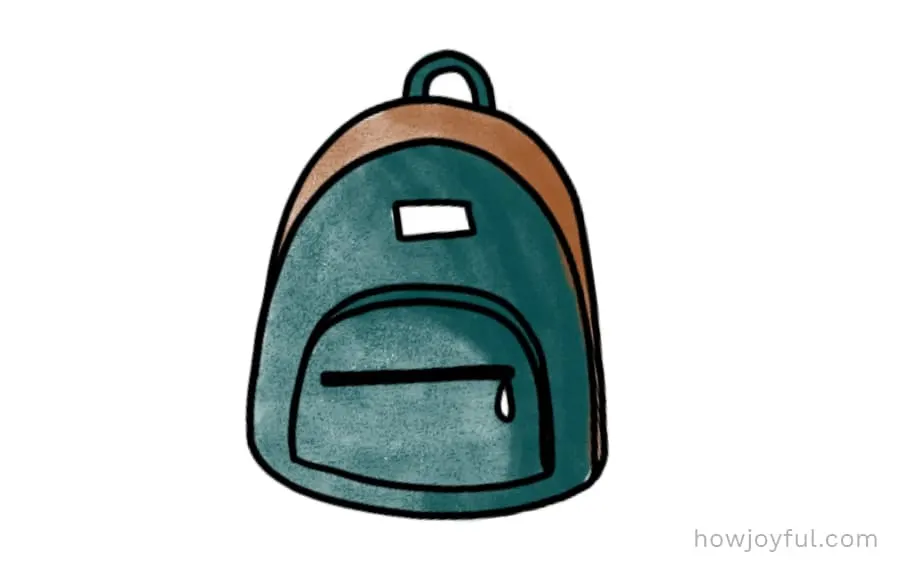
15 – Backpacks
Draw an upright dome, like a fancy dining cloche. Add a smaller one inside it to create the backpack pocket and a small hoop at the top. Add dimension lines, a logo patch, and zipper. Don’t forget to add the zipper pull tab.


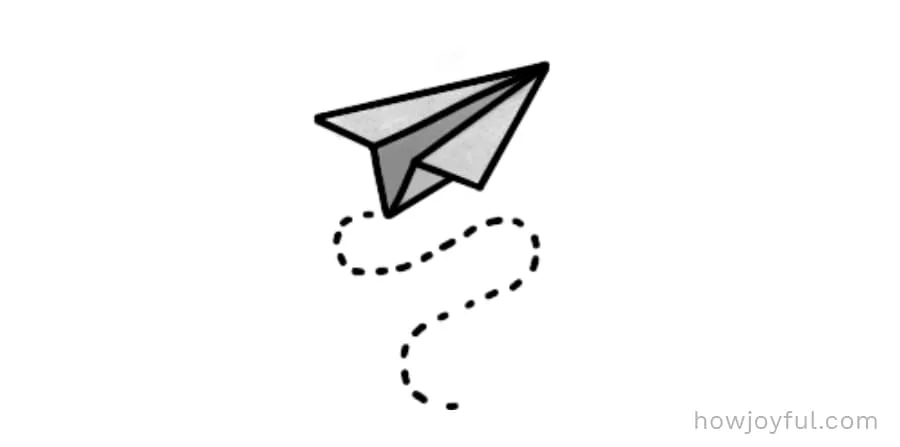
16 – Paper planes
Draw a triangle with two angles facing away from you. Draw two lines going up the middle of the triangle; then add a small triangle connecting to the two lines to create the illusion of a dart fold. Add a squiggle line to signify the direction your paper plane is flying in. Erase the line at the bottom and join the small triangle to the bottom right side of the main triangle. Turn the direction line into short dashes to signify movement.

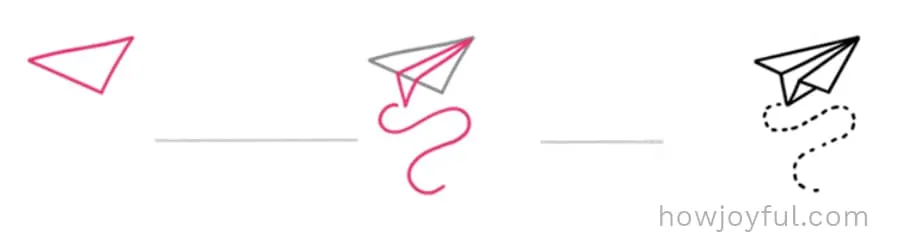

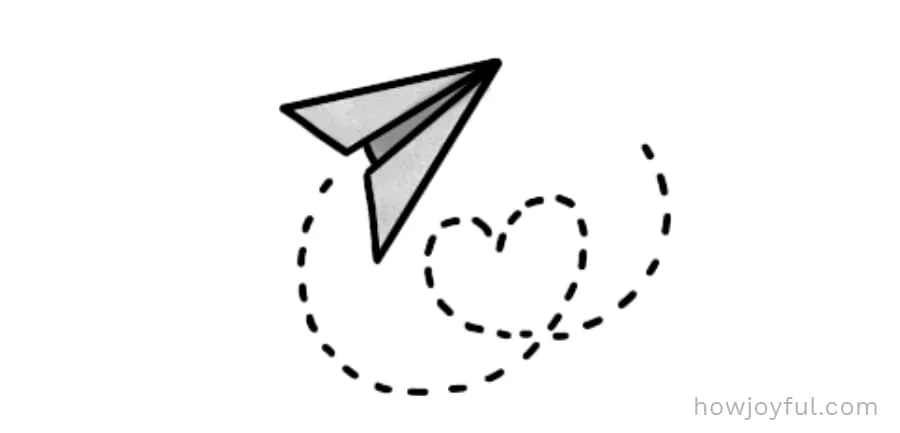
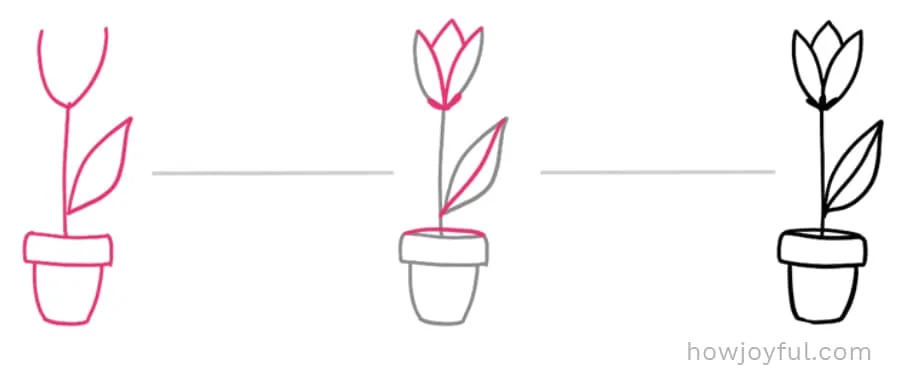
17 – Paper plane hearts
Draw a triangle, but this time indent the bottom line to create a slight peak. Draw two lines from the bottom peak up to the top of the triangle. Move the peak line in slightly and erase any lines you don’t need. Fill in your direction and movement squiggle line with dashes and don’t forget to do it in the shape of a heart!


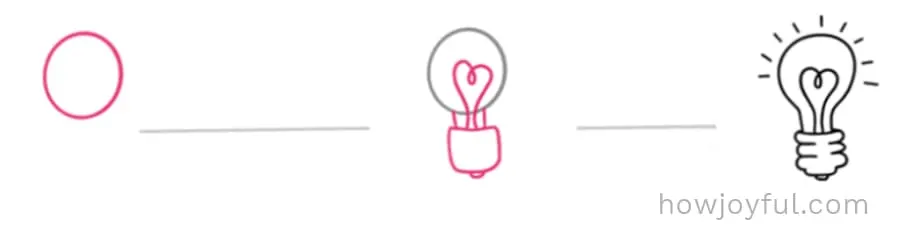
18 – Round light bulb
Draw a circle. Add a rough square shape under the circle to create the lightbulb base. Draw the filament inside the circle and remember to extend it out of the bottom, joining it to the base. Add another two small lines to connect glass to the base. Draw a small bump at the bottom of the base to create the lightbulb node. Give your lightbulb a burst of light by adding short ray lines arcing around the top. Add texture to the base with lines to create bumps.


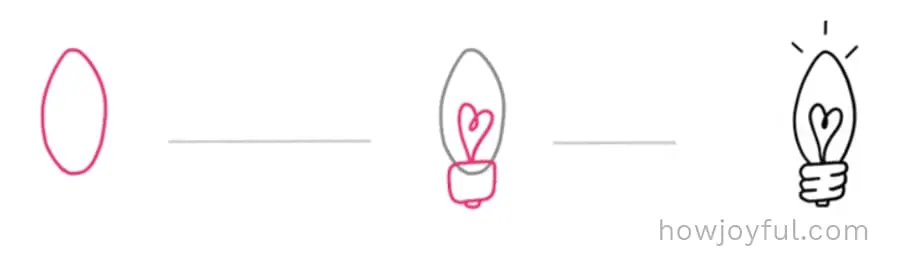
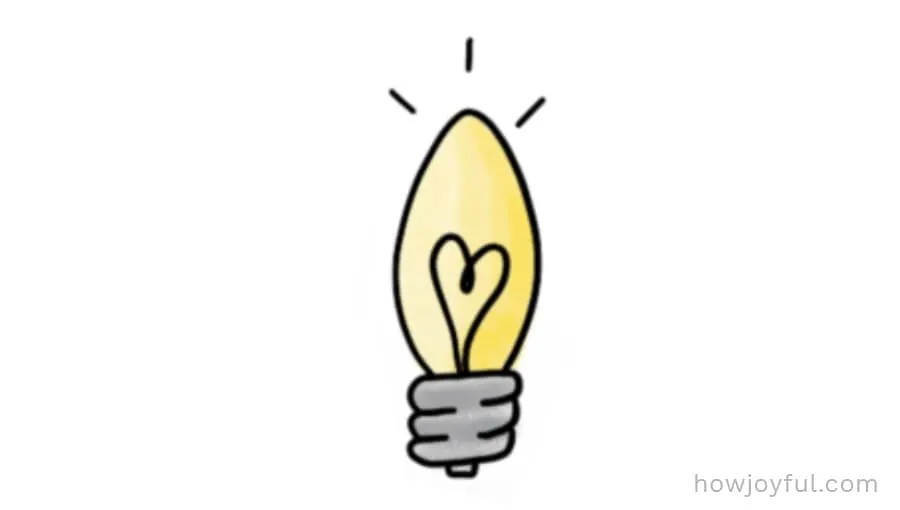
19 – Light bulb
Draw an upright oval. Add a rough square at the base and then insert the filament heart. Add three lines at the top to denote iridescence. Fill in texture lines at the base and a node bump at the bottom.


Food & snacks drawing ideas
Now it's time to doodle and drool, I know that each time I draw foods and snacks, I also start wanting some snacks for myself. I might also use some as reference, totally justifiable right!?
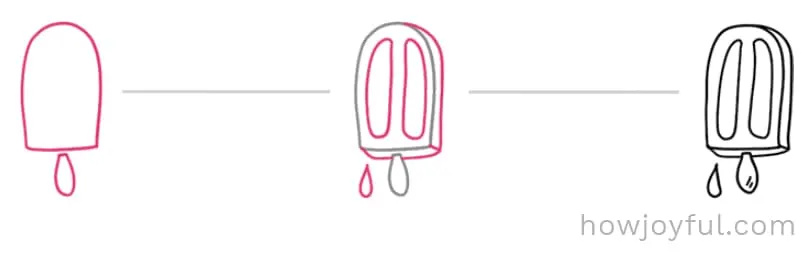
20 – Popsicle
Draw a narrow cloche shape with a rounded teardrop at the bottom. Add texture and dimension lines. Don’t forget to add a drop of melting popsicle to the bottom!


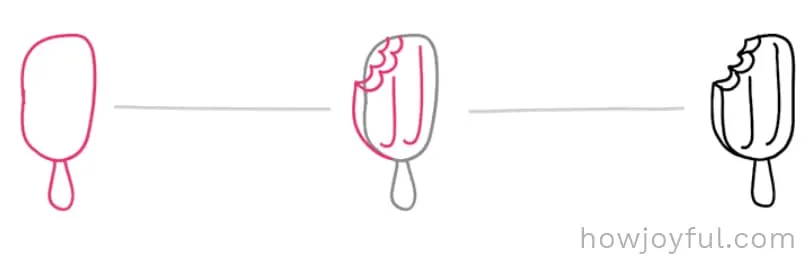
21 – Popsicle with a bite
Draw an upright oval shape with a handle at the bottom. Add the bite frills, texture, and dimension lines. Erase the unnecessary lines before coloring in.


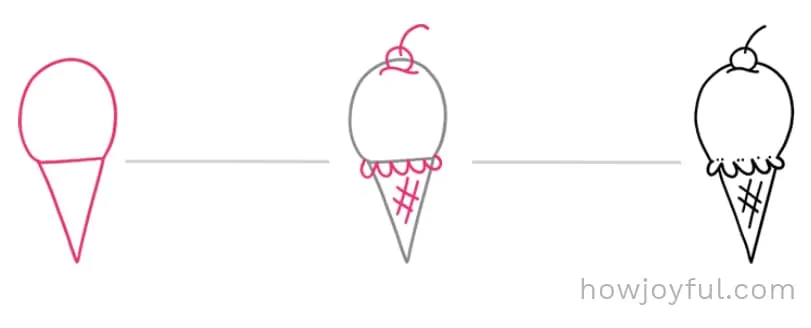
22 – Ice cream cone
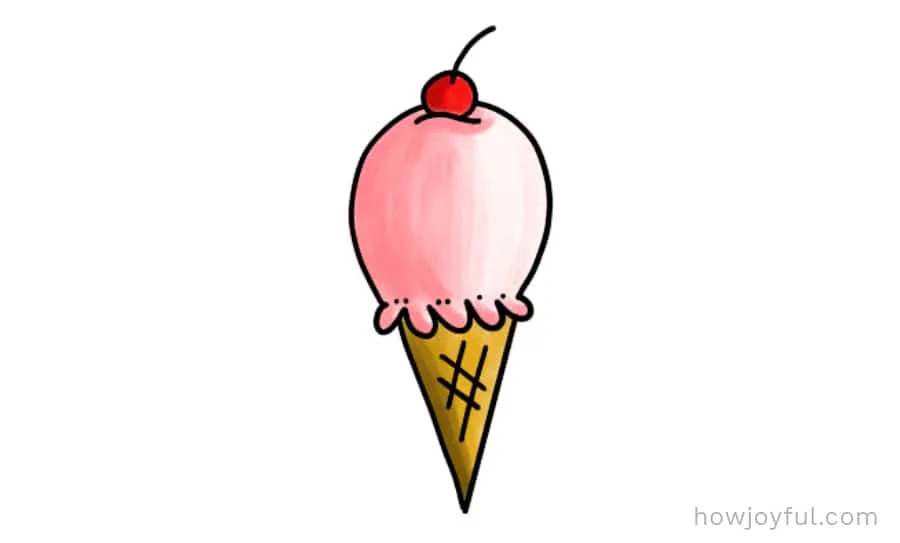
Draw an acute isosceles triangle with the point down. Add a cloche shape on top. Just below the top of the cloche dome shape, add a texture line with a small circle inside it. Add a stem, melting ice cream frill, and texture to the cone and ice cream. Erase extra lines.


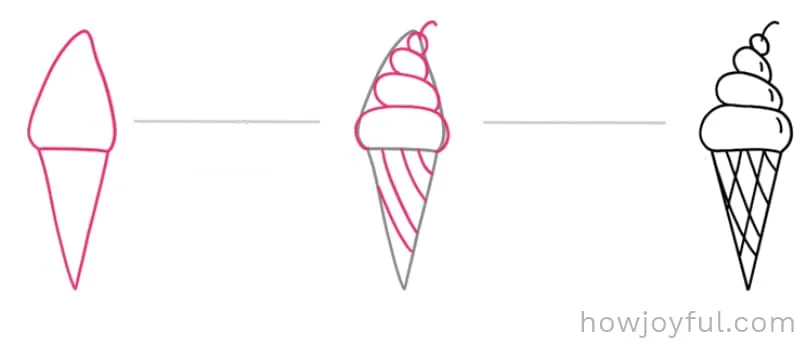
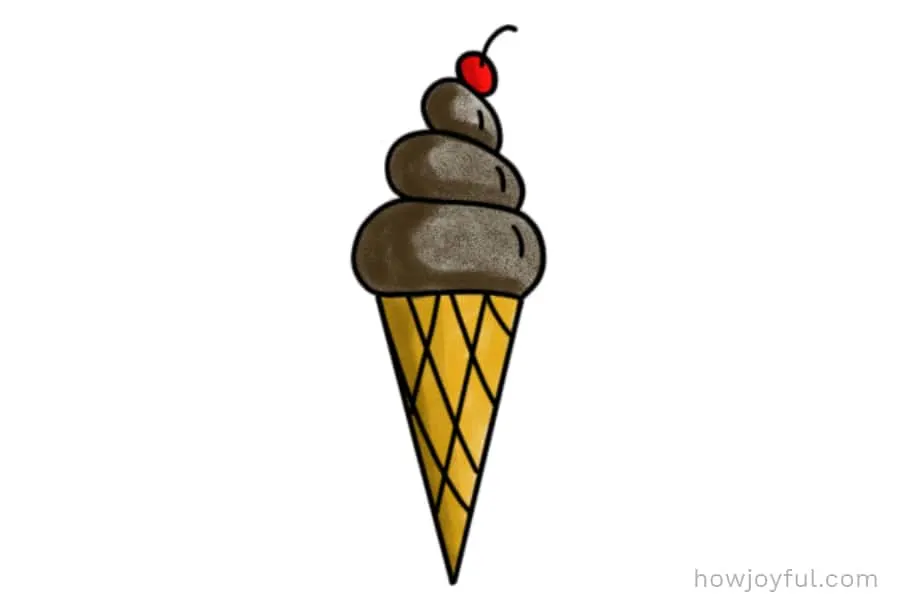
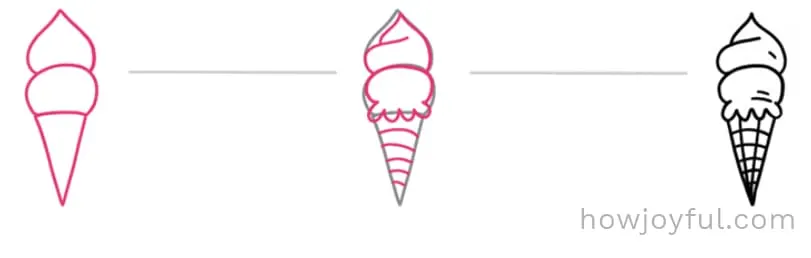
23 – Soft serve Ice cream with cherry
Draw an isosceles triangle with the point down. Add a soft-edged triangle to the top. Use this as a frame to create the soft serve swirls and cone texture. Create the cherry on top and some small curved arcs on the right side to emphasize the shape.


24 – Scoop of ice cream in a cone
Draw an isosceles triangle with the point downward. Add a circle shape at the top and then an onion dome on top of that. Draw in texture and shape by adding a frill for the melting ice cream at the bottom and lines on the cone and onion dome.


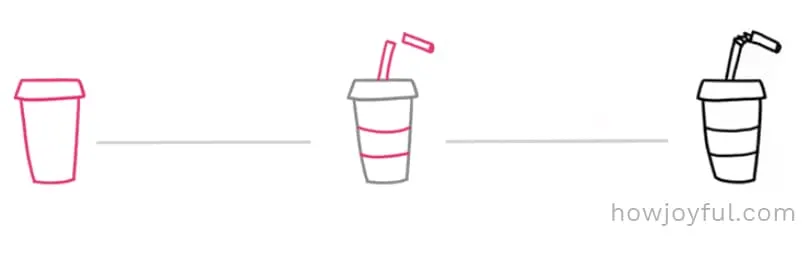
25 – Soda drink
Draw an upright rectangle with the top horizontal lines slightly wider than the bottom. Add a lid at the top, remember to make it wider than the cup shape. Add two thin rectangular shapes at approximate right angles to each other for the straw. Draw the cup holder and the straw’s bendy section.


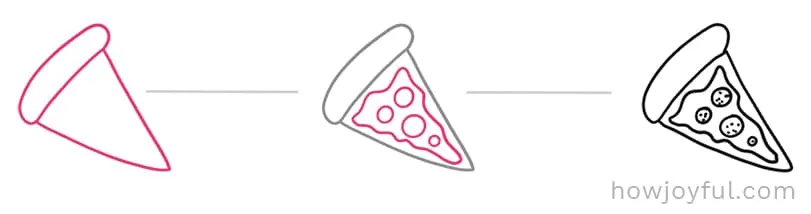
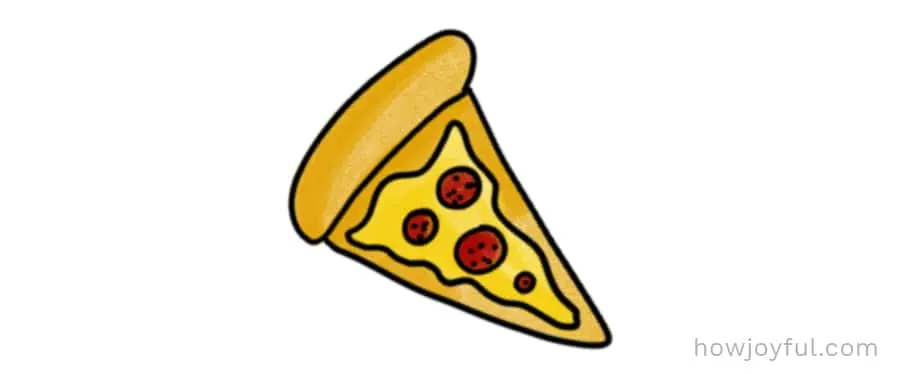
26 – Pizza slice
Draw an isosceles triangle and add a rim at the base to form the crust. Add the cheese by drawing a squiggle margin inside the triangle. Create the pepperoni circles on top and add texture.


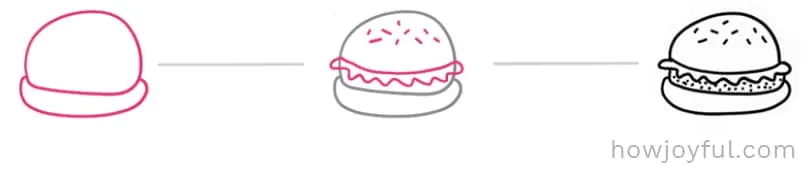
27 – Hamburger
Draw a flattened circle and add a rim at the bottom. Add a serrated frill midway through the flattened circle to create the lettuce. Add the sesame seeds by making some small, short dash lines on the top bun. Give your patty texture with some dots.


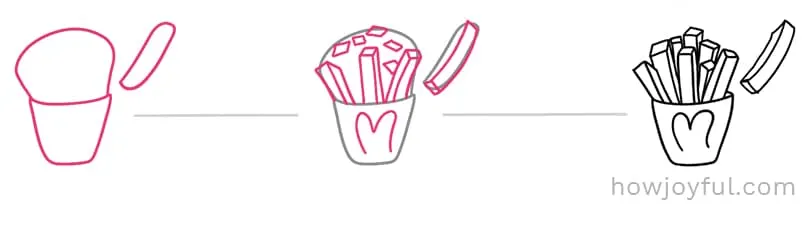
28 – French fries
Where would a burger be without French fries, right? Start by drawing an upside down trapezoid and adding a French fry frame on top. Add three rod shapes into the frame and one extra rod outside the frame. Add more background fries inside the frame and some texture. Erase any unnecessary lines.


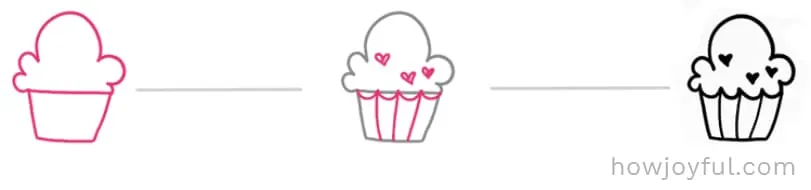
29 – Cupcake
Draw an upside down trapezoid (pyramid shape with the top missing). Add a cloud outline shape at the top and bring it down over the case. Add texture lines to the cupcake case and a few textural hearts to the frosting.


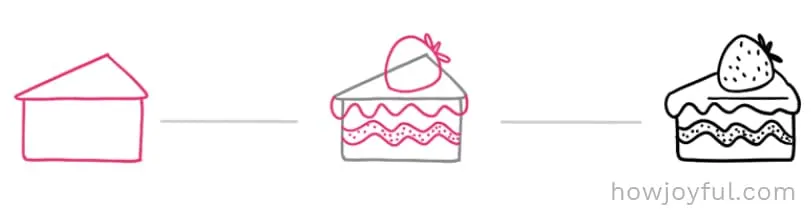
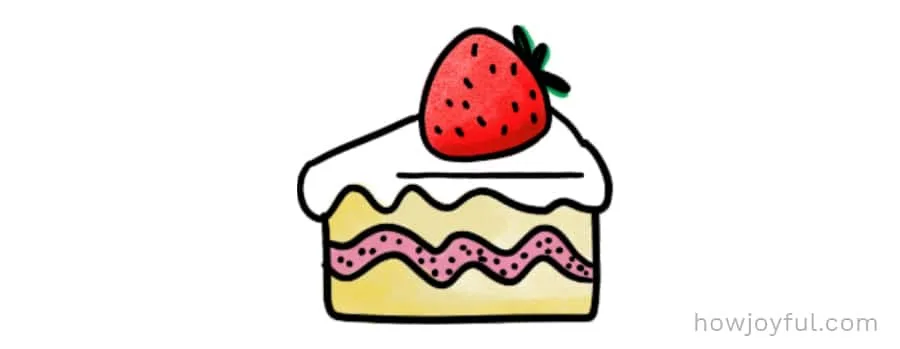
30 – Cake slice with strawberry
Draw a horizontal rectangle with a scalene triangle on top. Add a frosting squiggle line; very rounded triangle shape for the strawberry on top; add parallel wave double line for the filling. Erase the lines you don’t need, add texture components to the strawberry, and color.


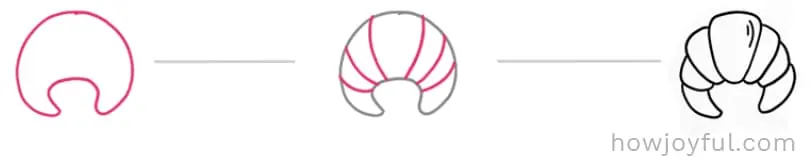
31 – Croissant pastry
Draw a crescent shape, similar to a crescent moon. At even intervals, add lines to create the pastry rolls. Segment each pastry part and add texture at the center.


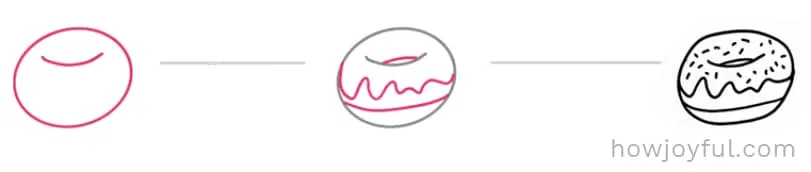
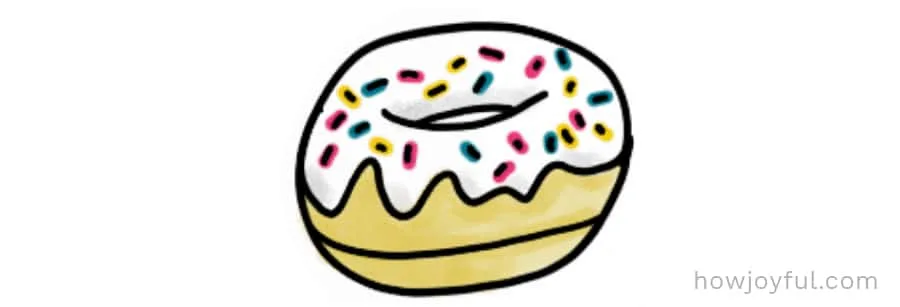
32 – Donut
Draw an oval. At the top, add a slight curved upward arc and then an opposite one to join it. Add the frosting squiggle at the bottom. Add texture with a few dots.


33 – Donut with sprinkles
Draw a slightly flattened circle. Add your slight curved arc and the opposite arc on top to create the illusion of a hole. Add a squiggle for the frosting and sprinkle dashes.


How to draw fruit
Most of the mini-tutorial fruit drawings I am including in this list are super-simple to learn how to draw – very beginner-friendly. So, don’t be intimidated, and let’s get busy drawing some cute fruit!
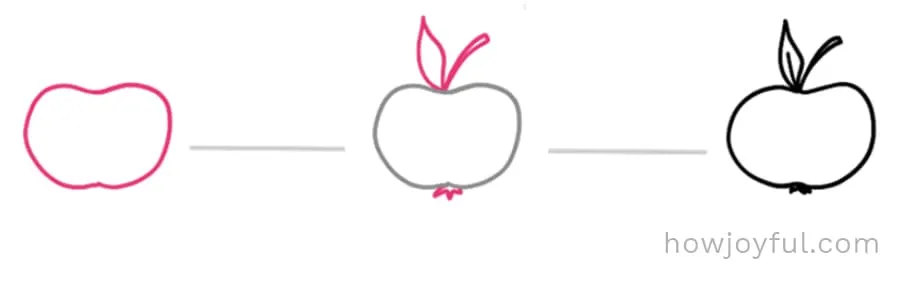
34 – Apple
Draw two facing mirrored Cs with their tops and bottoms meet. Add a stem and leaf at the top and a small squiggle at the bottom for the calyx. Add a textured line to the leaf.


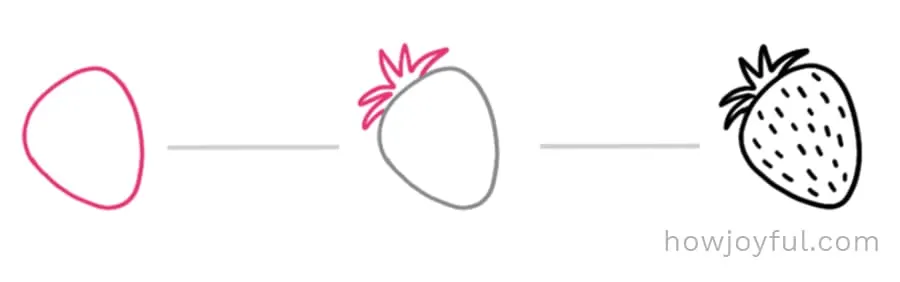
35 – Strawberry
Begin by drawing a very round edged triangle on a tilt (similar in shape to a guitar pick). Add a clump of fronds at the top. Fill in the strawberry body with evenly spaced short dashes for the seeds.


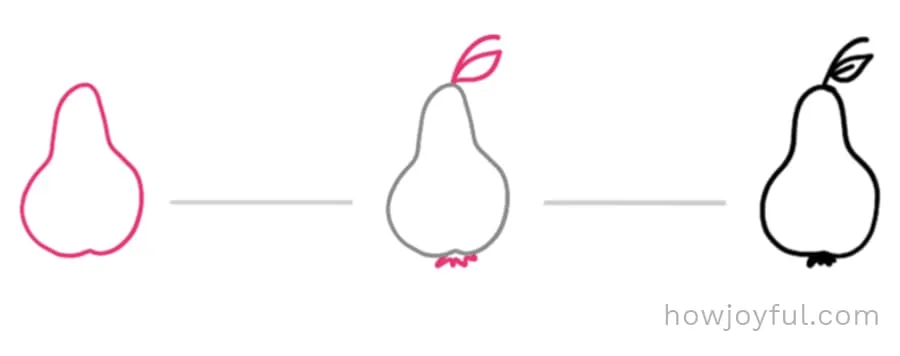
36 – Pear
Start with a cone head shape with a dimple at the bottom. Add one line at the top for the stalk and a teardrop shape for the leaf.


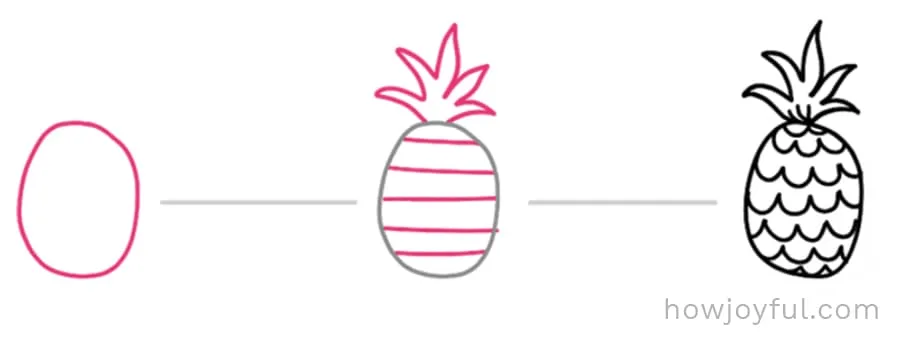
37 – Pineapple
Start with an upright oval. Cross it with horizontal lines and add a frond on top. Add the textural details in the form of waves.


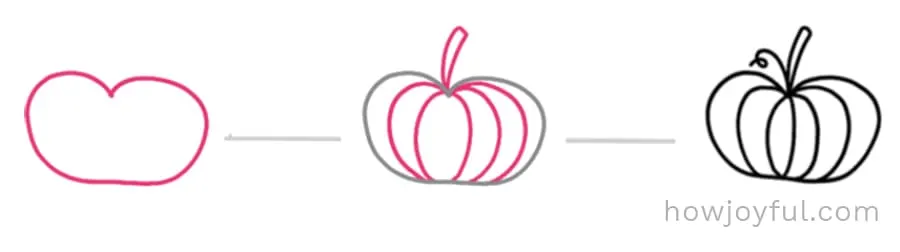
38 – Pumpkin
Draw a heart shape with the pointed end cut off and rounded. Add the stem and lines to form crescent shaped segments. Don’t forget the spiral vine!


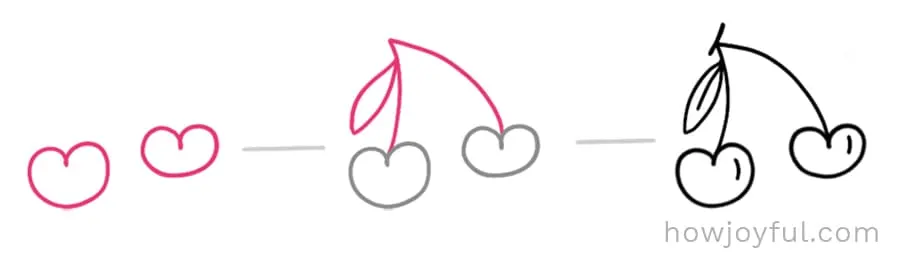
39 – Cherries
Start by drawing two heart shapes with very rounded, soft bottom lines. Join the two shapes together with a V. Add a leaf to one side of the V. Add textural detail to the cherry bodies and leaf.


40 – Berries
Draw two basic circle shapes close together, but not touching. Connect the two circles with a V and add a leaf to one side of the V. Add textural detail to the berry bodies and stems.


Coffee and drinks
The next batch of drawings is some of my absolute favorites because cups and mugs are so easy to draw with charming results! Just as before, these doodles and drawings are beginner-friendly, so dive in with no fear of getting it wrong.
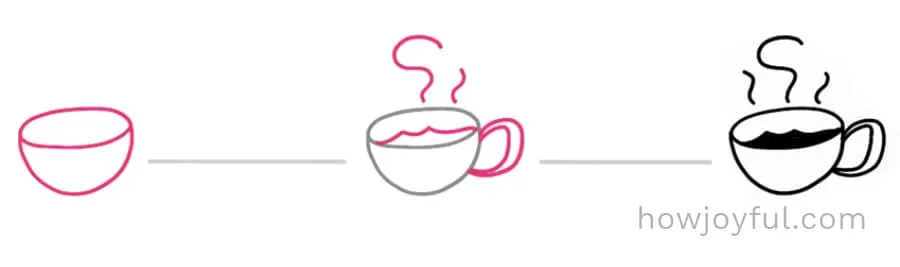
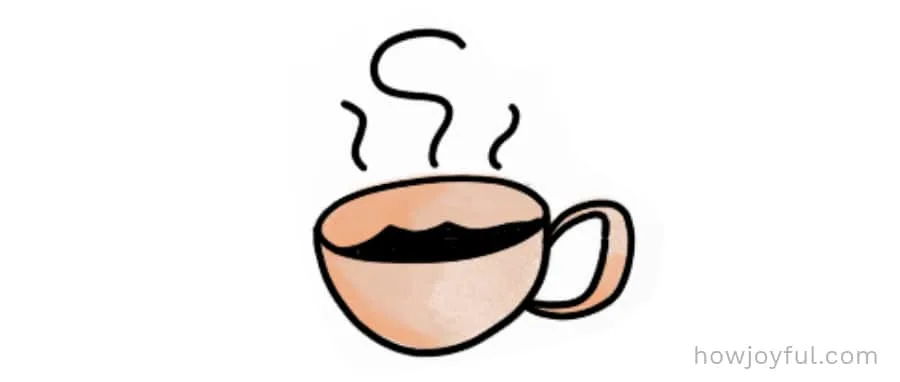
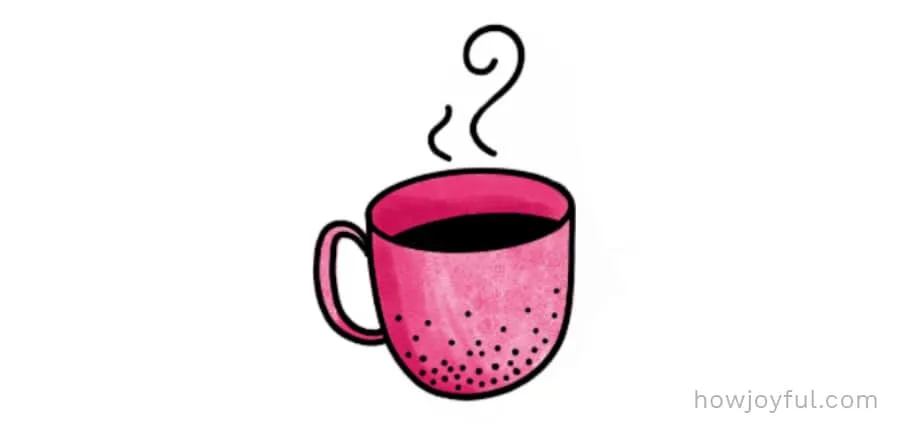
41 – Hot drink
Draw an upside down cloche dome shape. Add an ellipse at the top. Add a handle and some vertical waves to indicate steam. Add textural details on the outside of the cup.


42 – Spoon
Draw a circle and add a handle. Create the illusion of depth by adding a semicircle arc line inside. Erase unwanted lines before coloring.


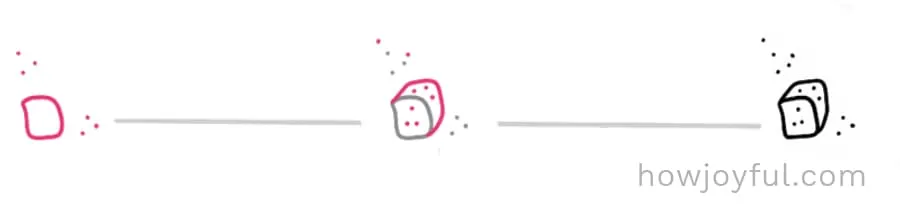
43 – Sugar cube
Draw a wonky square! Add dimension details and texture. Feel free to dot around the cube to indicate sugar crystals.


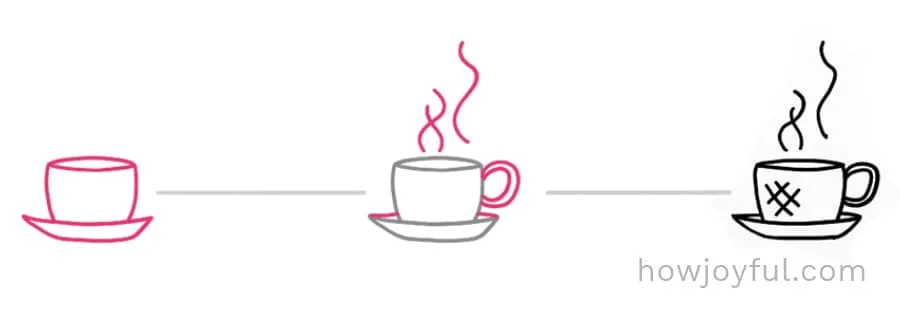
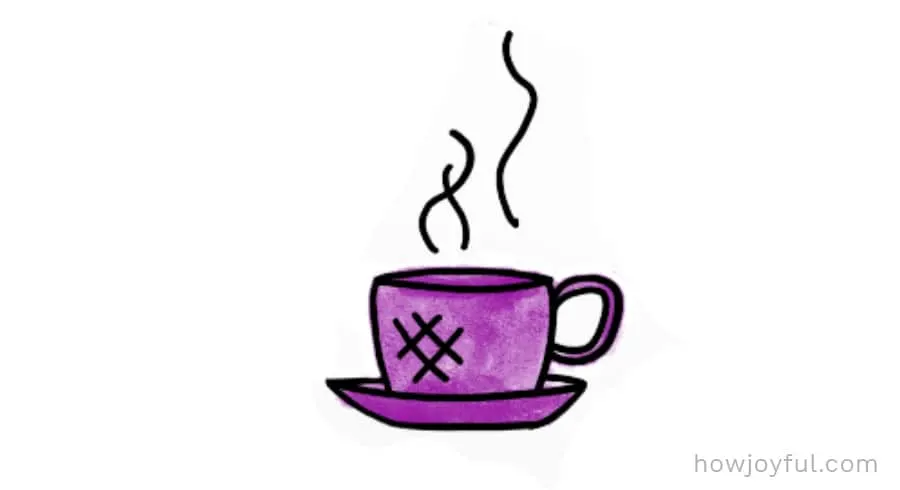
44 – Coffee cup
Draw a flattened out crescent shape to create the saucer. Extend two slightly curved vertical lines indented from either side. Connect these lines with an ellipse to create the cup. Add a handle, steam waves, and dimension detail to the saucer. Finally, add texture detail to the cup. What about a cupcake to go with that?


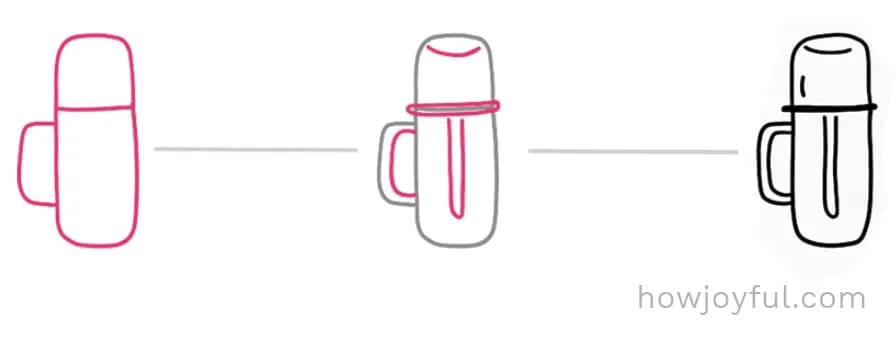
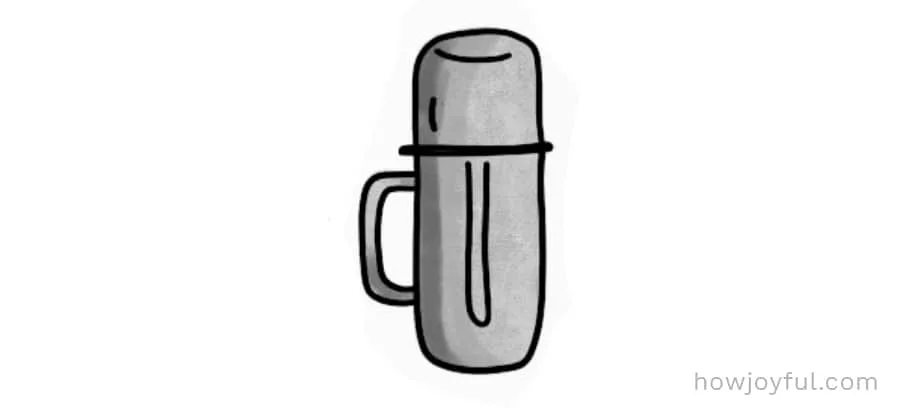
45 – Thermo hot water
Draw a rectangle with rounded corners. Add a handle and bisect the rectangle to create a lid. Add dimension and texture details.


46 – Teacup
Draw a horizontal semicircle to form a crescent. Add an ellipse at the top. Add on a handle and bisect the ellipse with a jagged line to form the tea. Create steam curls and swirls. Color in the tea. You can add decoration to your teacup if you want.


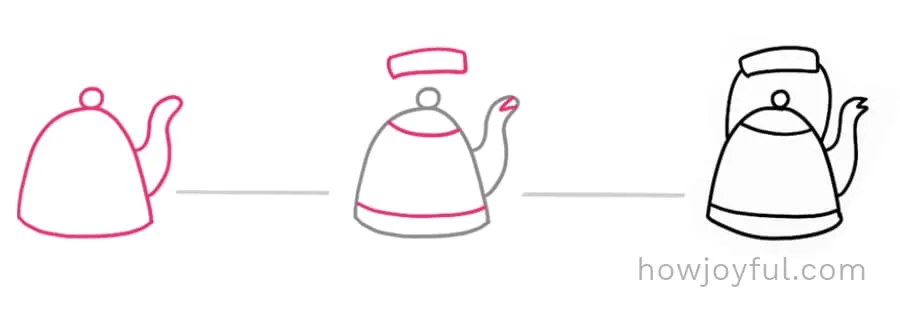
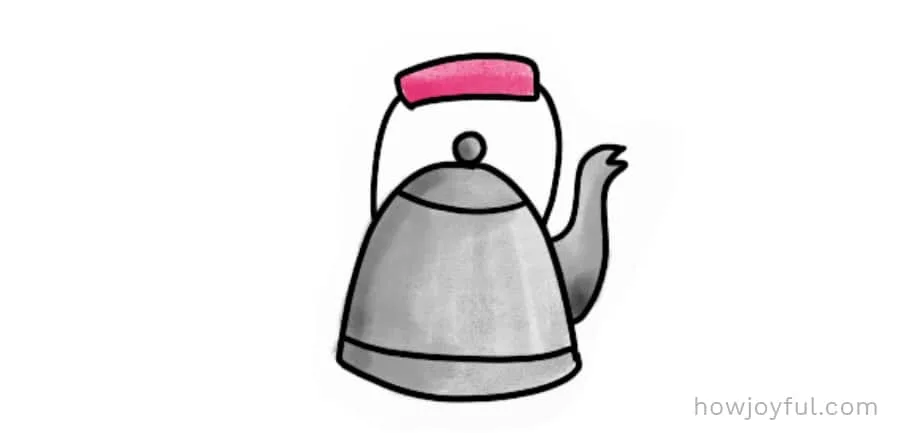
47 – Tea kettle
Draw a cloche dome shape. Add a small circle at the top of the dome and a spout coming off one of the sides. If you are not sure about how to draw a spout, just think of an elephant’s trunk. Trisect the dome to create the lid and base of the kettle. Draw a slightly curved horizontal rectangle over the top of the lid and then add two lines down to the kettle side to make a handle.


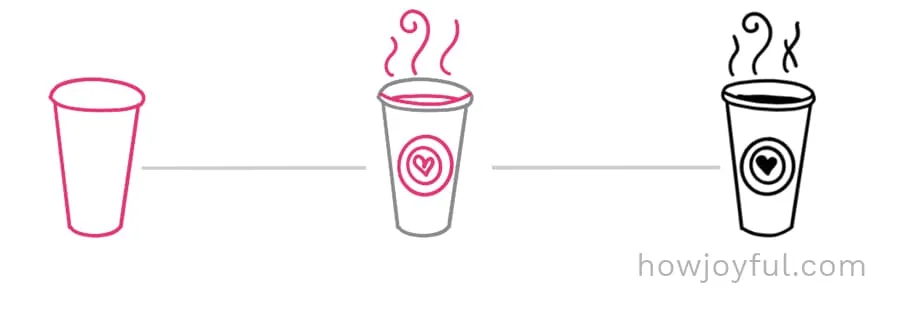
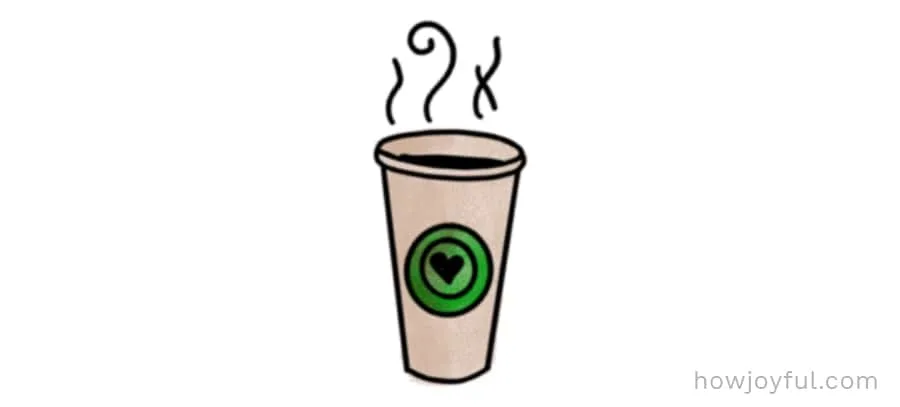
48 – Takeout coffee – Paper coffee cup
Draw an upside down acute isosceles triangle and remove the bottom point to create the cup base. Add an ellipse at the top to create the lid. Add the logo icon in the middle of the cup, dimension lines to the lid, and steam waves coming from the lid top. Color the coffee a shade darker.


49 – Drink cup
Draw a cloche dome shape and add an ellipse to the top. Add texture details, handle, and steam curls and waves. Don’t forget to draw the dimension detail to create the drink inside.


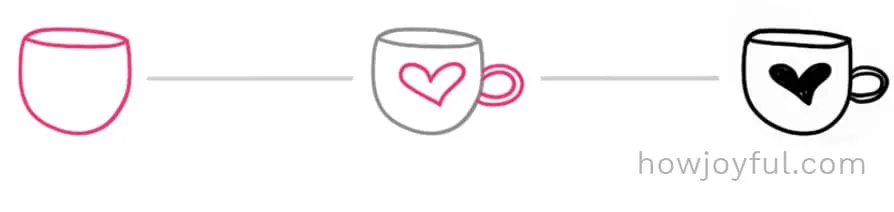
50 – Heart cup
Draw a cloche dome and add an ellipse at the top. Add a handle and draw the heart inside.


Cute ideas for doodles
Next, I wanted to share some drawing ideas that didn't really fit into a specific category but that are super cute, so that's what we are going to go with =]
51 – Square envelope
Draw a square shape with rounded corners. Add a V line inside to create the flap. Draw the lines for the lower flap and a small heart.


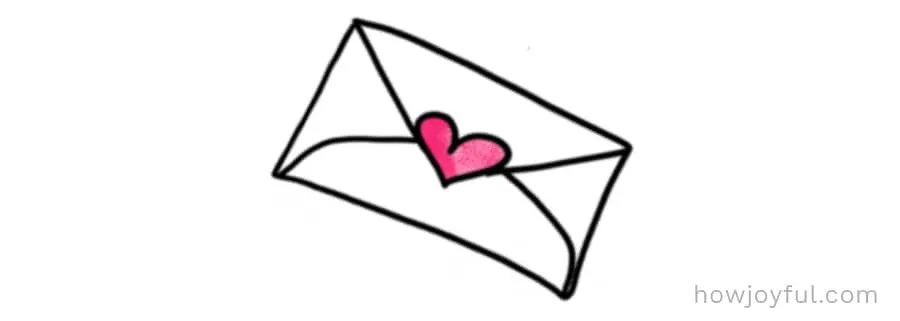
52 – Envelope sealed with a heart
Draw a rectangle. Add a heart to the center. Using the heart as an anchor, extend four lines from the heart to the corners.


54 – Stamp
Draw a small rectangle. Add a small heart in the middle. Embellish with ridge detail around the edge.


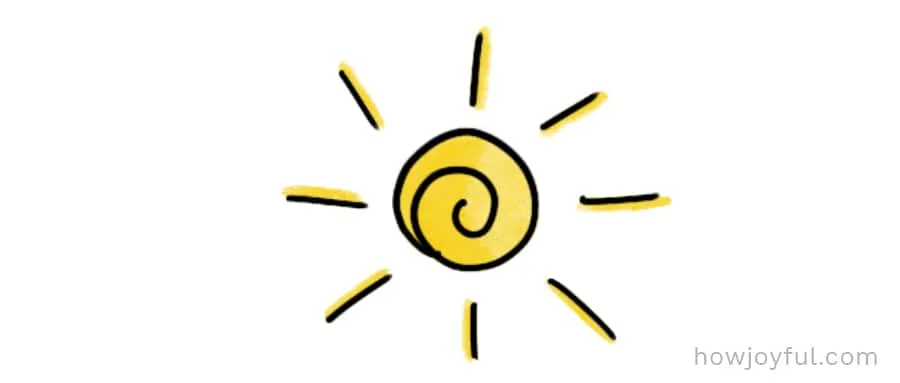
44 – Easy sun
Draw a circle. Add a spiral to the middle. Add illumination dashes around the circle on the outside.


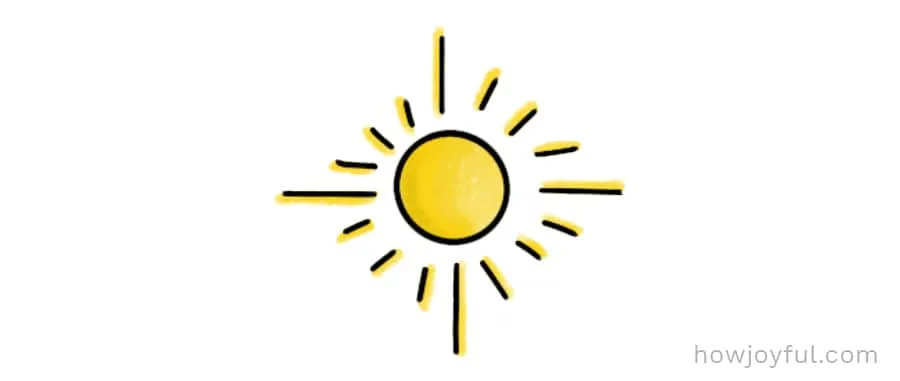
45 – Sun
Draw the circle. Add longer lines along the perimeter at the top, bottom, and sides. Fill in the perimeter with an even number of shorter lines.


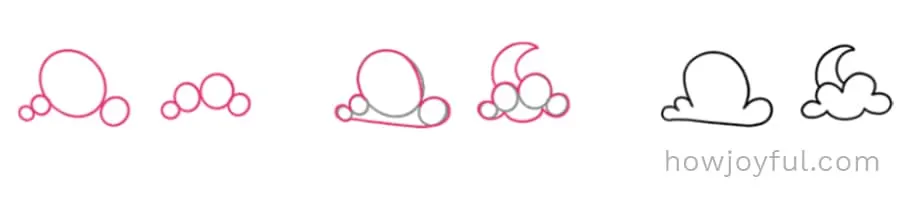
46 – Easy clouds
Draw two rough circles side by side. Add smaller circles on the lower left and right sides of the bigger ones (it will look like two little gnome heads facing away from each other). Draw a horizontal line underneath and join it up with the circle outlines. Erase any unwanted lines.


47 – Clouds and moon
Draw two groups of a series of touching circles in different sizes. Draw a horizontal line underneath the first group of circles and continue it into an outline of the circles. Outline the second group of circles and draw a half crescent at the top. Erase any unwanted lines.


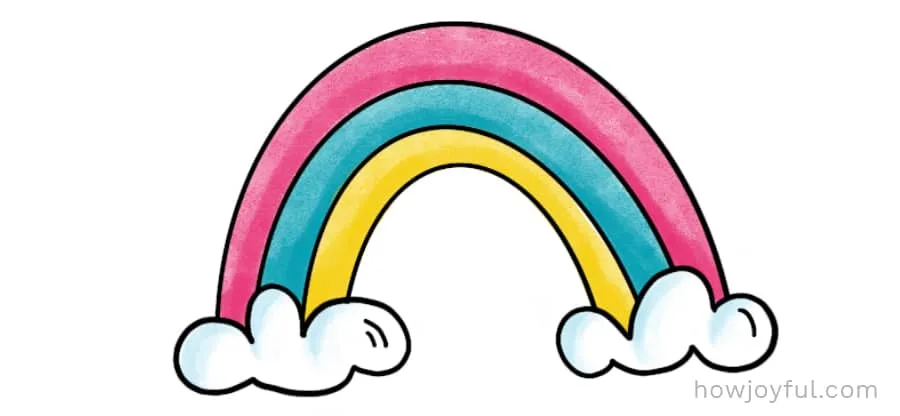
48 – Rainbow and clouds
Draw two arches, with the smaller arch under the upper arch. Add two groups of three circles at either end. Outline the circles to create two clouds. Fill in the rainbow with delineation to create the color spectrum. Add texture to the clouds and erase any unwanted lines.


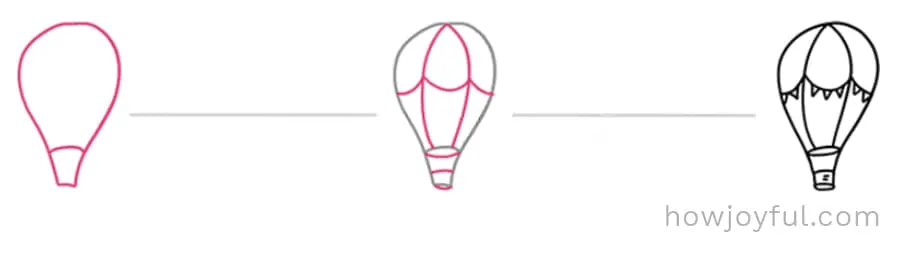
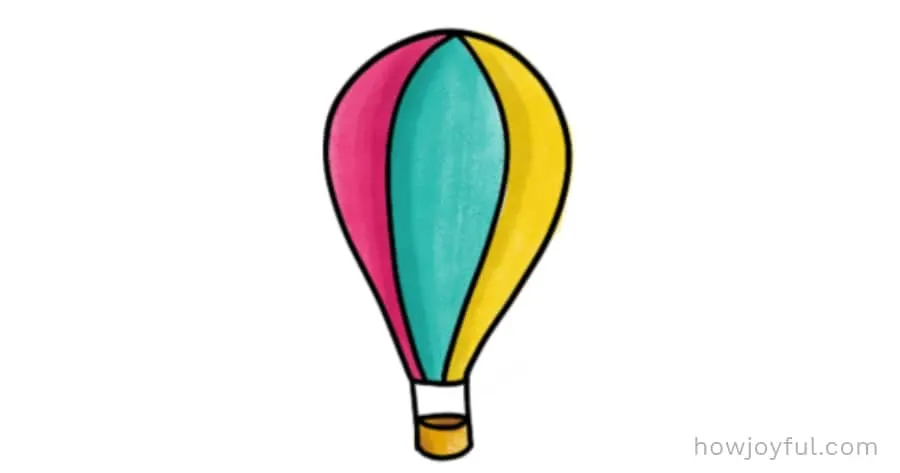
49 – Hot air balloon
Draw a dome shape and extend the bottom into a nozzle shape. Add vertical and horizontal detail to the balloon and basket. Create festoons by drawing tiny triangles onto the horizontal balloon arc lines. Add textural details.


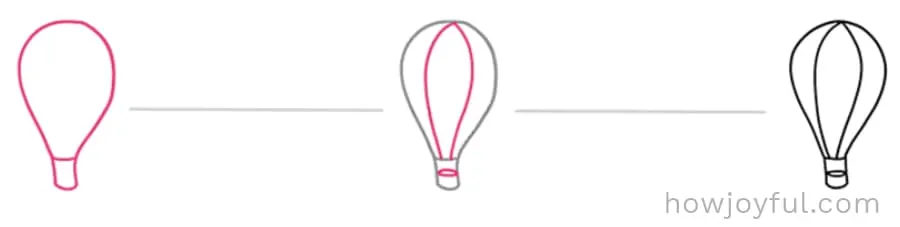
50 – Simple hot air balloon
Draw a dome shape and extend the bottom out into a nozzle shape. Add vertical lines in the balloon and horizontal lines to create the basket and ropes.


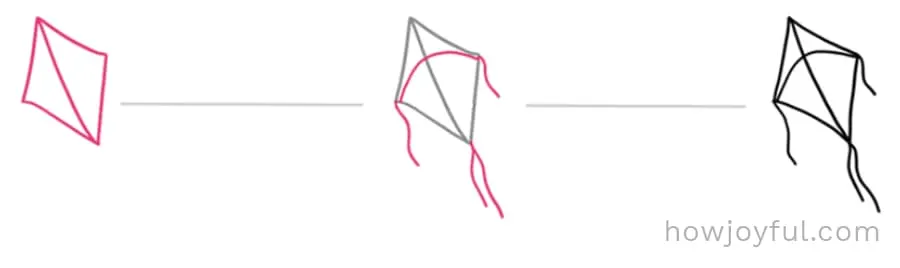
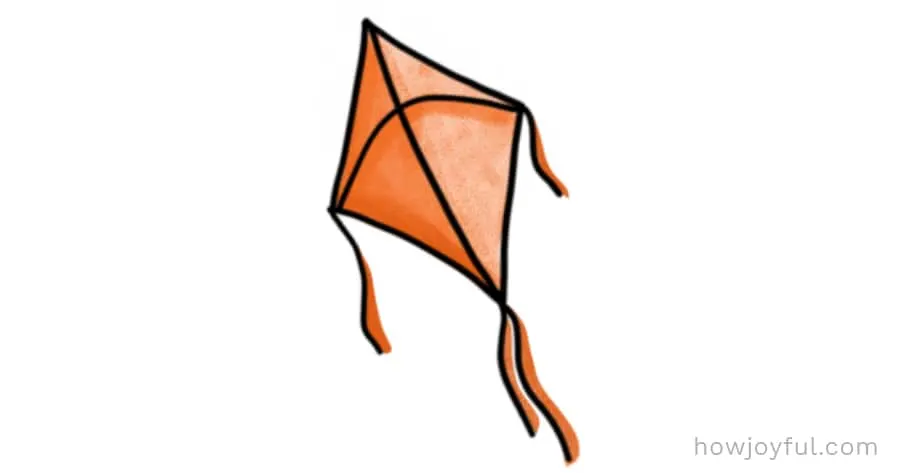
51 – Kite
Draw a diamond shape with slightly arced sides. Fill in the diamond shape with a vertical line and then add an arced horizontal line. Add the tail and wing lines. Feel free to add a string line with a hand holding on!


52 – Kite with long tail
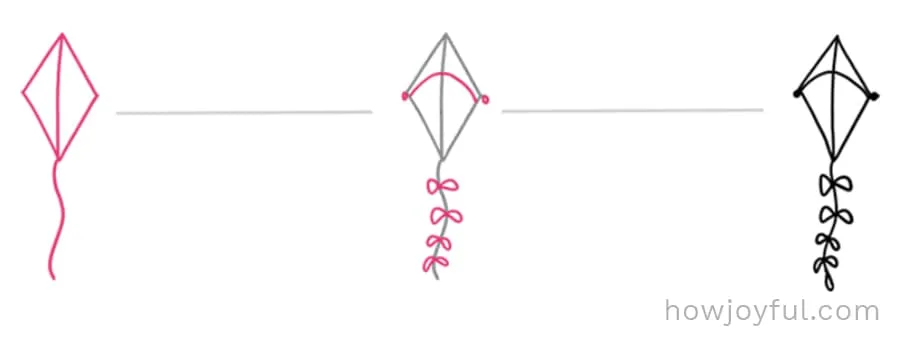
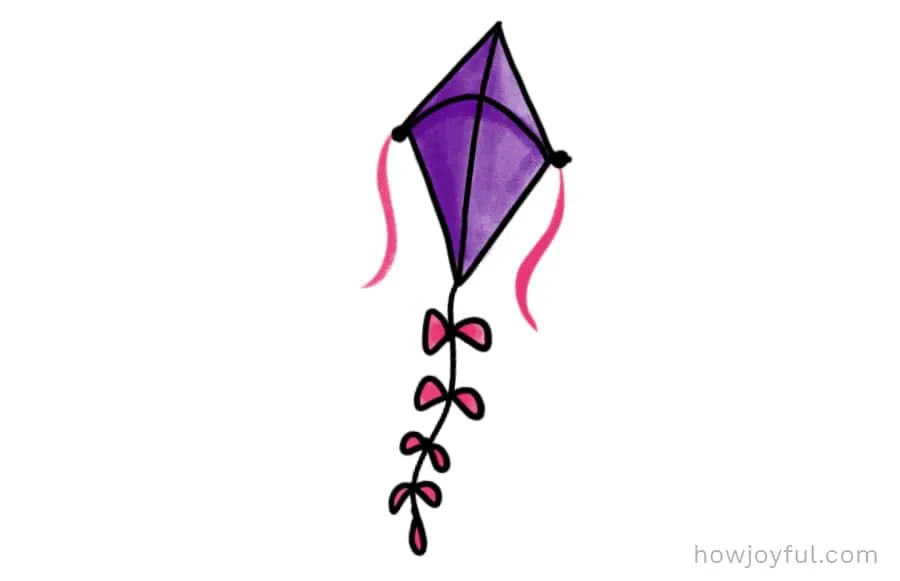
Draw a diamond shape (an elongated rhombus). Bisect it with a vertical line inside. Add an arced horizontal line and a slightly waved line at the bottom to create the tail. Add texture detail in the form of bows and two wing ribbons on either side.


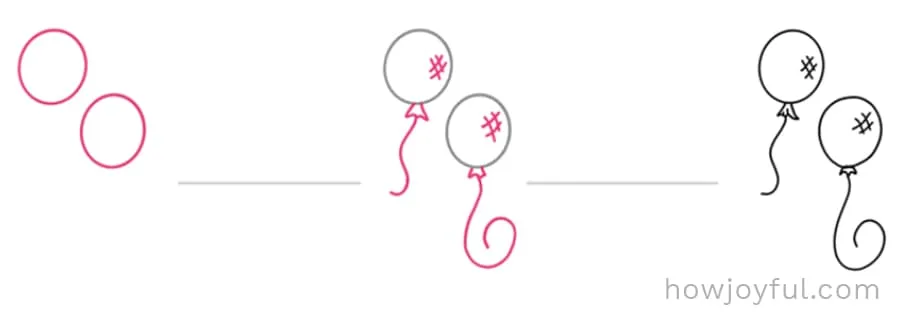
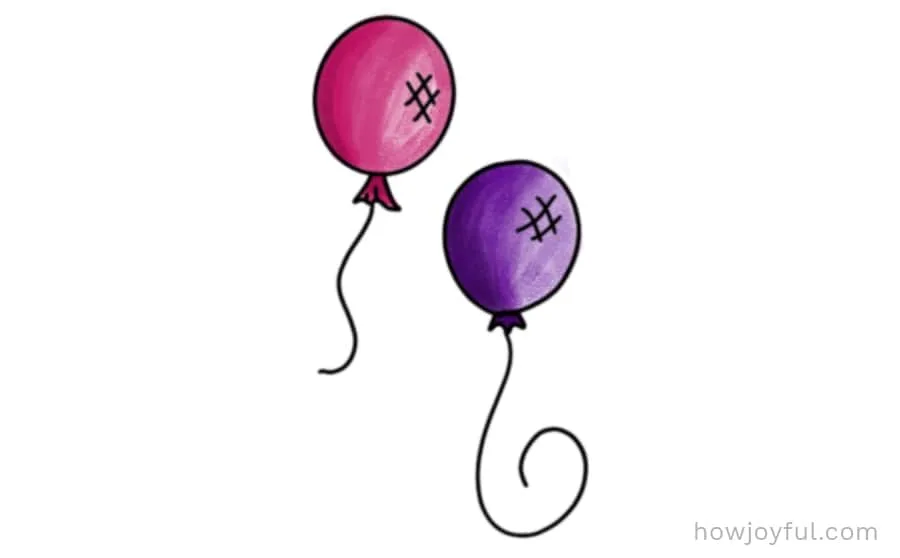
53 – Easy balloons
Draw two slightly squashed circles. Add a tiny isosceles triangle at the bottom, making sure to remove the point at the top. Add textural details inside the balloon and to the triangle part at the bottom. Draw a piece of curling string.


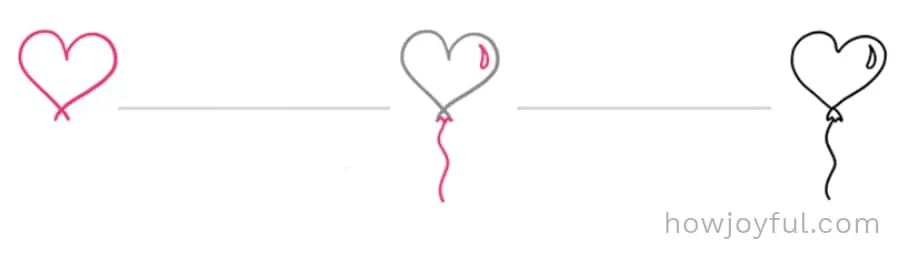
54 – Hart balloon
Draw a heart; the sides do not have to match. Add a small triangle shape with a ragged edge at the bottom. Draw on the string line at the bottom and add texture detail to the balloon.


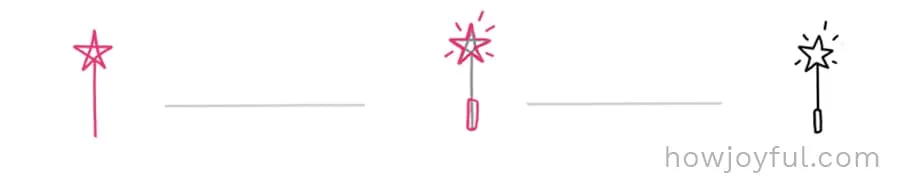
55 – Magic wand
Draw a pentagram (five sided) star. Add a line at the bottom to create a stick. Add textural and illumination lines. Erase any unwanted lines.


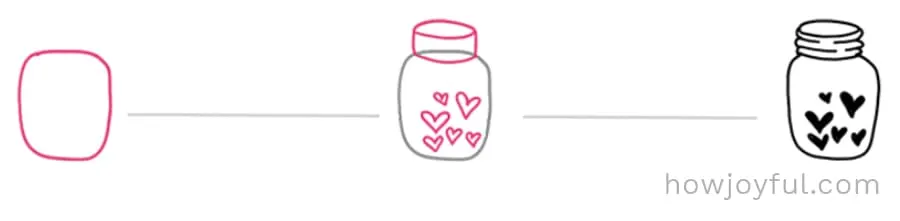
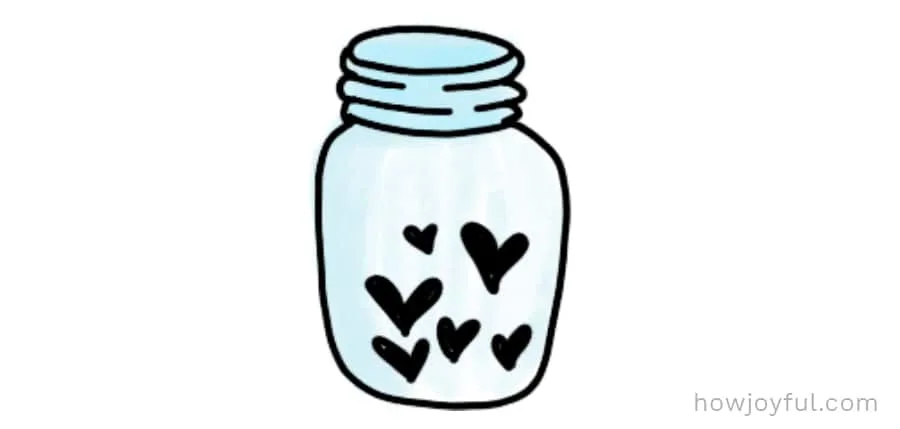
56 – Jar with hearts
Draw an upright rectangle with rounded corners. Add a smaller rectangle at the top to make a lid. Add textural and dimension lines. Draw in the hearts of fill the jar.


Ocean drawing ideas
Now it's time to take inspiration from the ocean and check at some easy drawing ideas for creatures found under or around the sea.
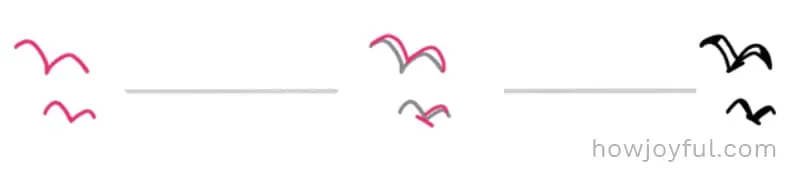
57 – Seagull
For your flock of seagulls, start off with creating two joined arcs. Add as many joined arc shapes as you need to make your flock. Double up the lines to give the seagull shape more form. The bigger seagulls need more form to create the illusion of proximity. Add a short line at the bottom of the joined arcs to give your seagull a body.


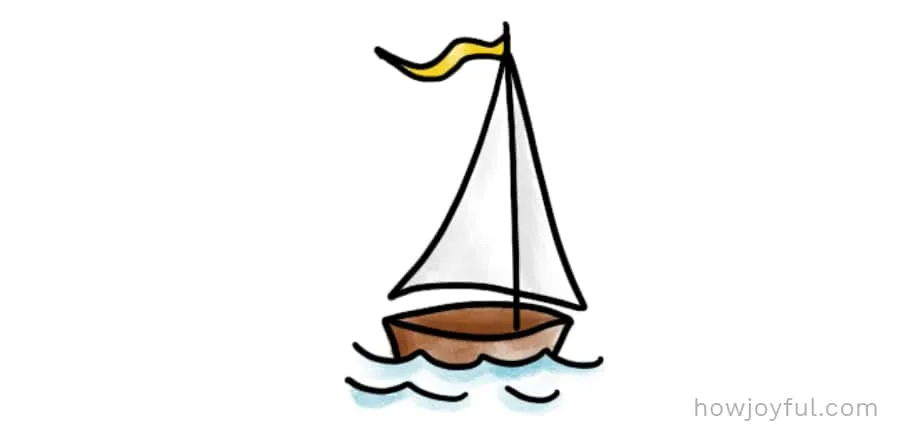
58 – Simple boat
Draw two mirrored right angle triangles. Extend the middle line out to create the mast. Add a vague crescent shape at the bottom to be the hull. Create the flag and add textural detail to the sails and hull. Add some curling waves. Next stop – seagulls!


59 – Small boat
Start off by drawing some waves. On top of the waves, draw two small lines rising up at a slight outward angle. Using these two lines as an anchor, draw an ellipse shape with points joining the lines. Add a line as a mast. Draw an acute isosceles triangle shape on top of the mast, but not quite reaching the ends. Create texture by adding a flag on top of the mast and more waves.


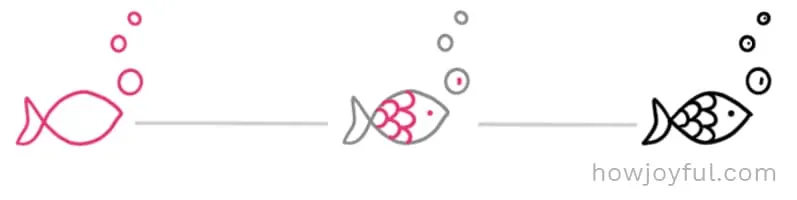
60 – Small fish
Cross two mirrored arc semicircles. Create bubbles and close off tail with a slightly dented line. Draw in the scales and make an eye. Add texture to some of the bubbles.


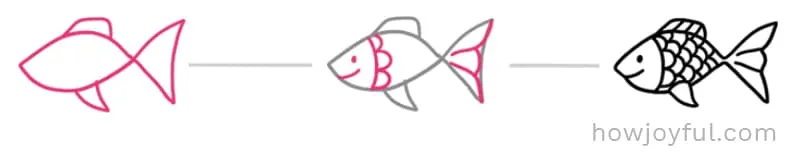
61 – Cute fish
Draw a horizontal oval with pointed ends. Add fins at the top and bottom of the oval. Attach a basic triangle shape to one pointed end to create a tail. Add face features, scales, and texture details to the fins.


62 – Simple fish
One horizontal oval shape with pointed ends; one triangular shape attached to one end; Bisect the triangle to create a tail. Add eye and scales.


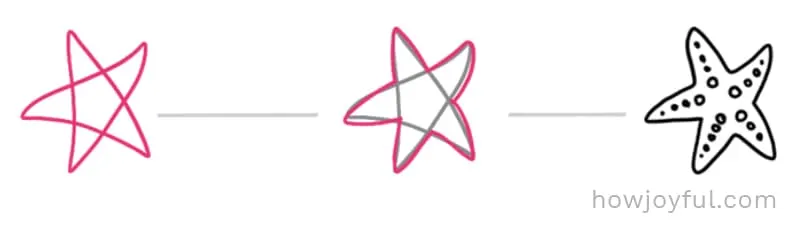
63 – Sea star
Draw a five pointed star and outline it. Erase the unwanted lines and add texture details.


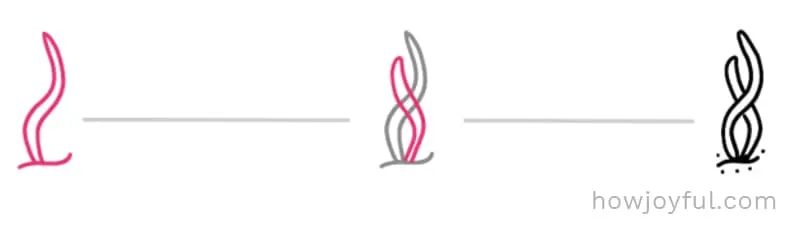
64 – Seaweed
Draw a squiggly vertical line waving upward. Double it and add another weaving in the opposite direction. Add sand texture at the bottom.


65 – Hermit crab seashell
Draw a spiral. Close it off at the end with a small ellipse. Add texture and shading details.


66 – Scallop seashell
Draw an oval with one side more curved than the other. Add a base at the flattened side. Using the base as an anchor, draw elongated teardrop shapes fanning in a semicircle.


67 – Turtle
Start with an oval and add another inside it. Draw in the head at the top. Add the feet with claws and tail. Add texture to the shell and the eyes.


Stars and space drawing ideas
I love drawing stars and galaxy theme doodles, but I simplify these a lot, so they can be easier to draw, of course, if you want more of a challenge, you can go a little more realistic with the details =]
68 – Star
Draw a pentagram; outline it; erase the unwanted lines.


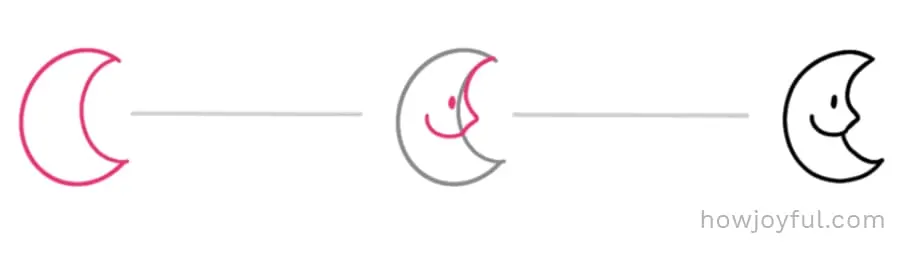
69 – Crescent moon face
Draw a vertical crescent. Add the nose, mouth, and eye details. Erase any unnecessary lines.


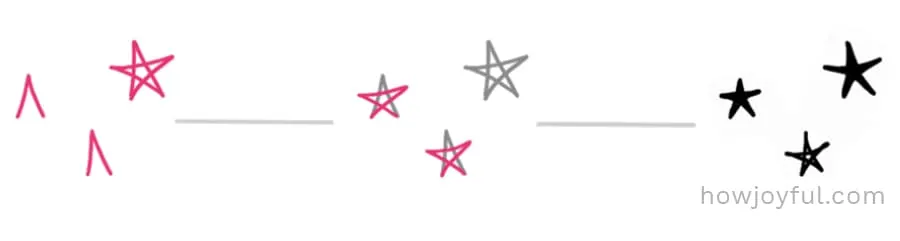
70 – Small stars
Start with an upside down V. Extend the line to one side, bring it across, and then join the line to the other side of the V. Add texture details.


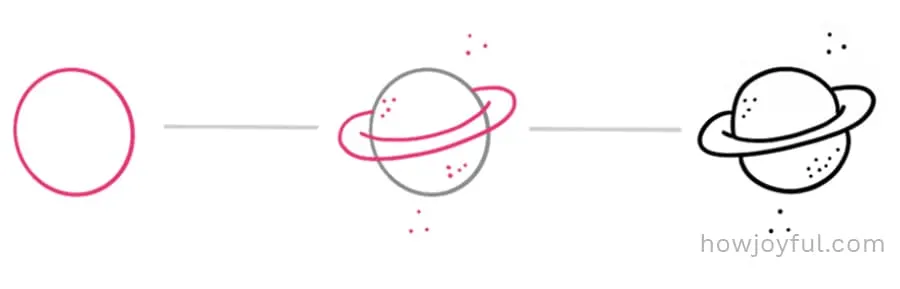
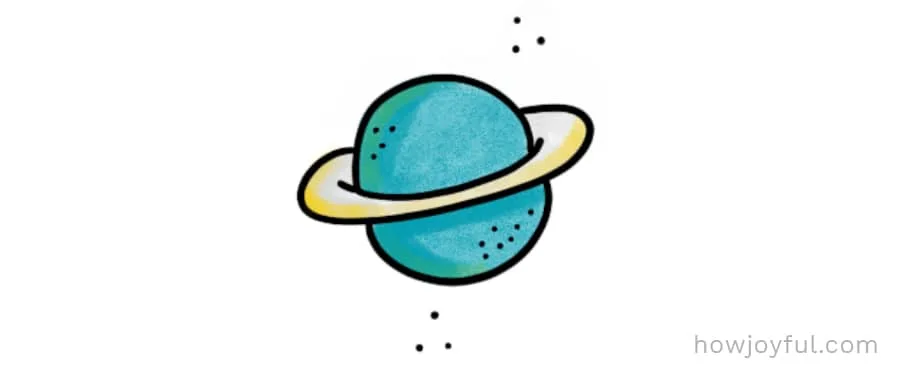
71 – Planet
Start with a circle. Draw a donut around the middle of the circle (it will look like the brim of a hat). Add texture details.


72 – Star dust
Quick and easy to draw. Use V shapes or cross shapes and embellish with illumination lines.


73 – Earth
Start with a circle and add the continents as a textural component. The color will really define it.


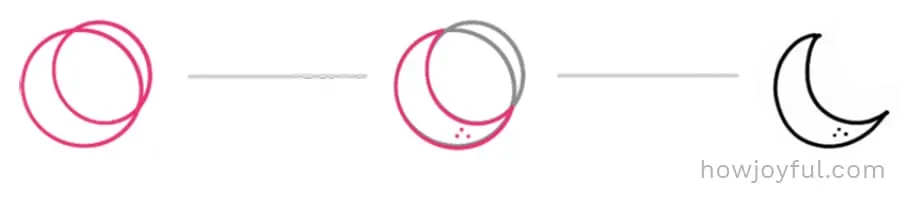
74 – Half moon
Want to know how to draw the perfect freestyle crescent? Draw one circle slightly to the side and over the top of the bottom circle. Add texture detail to the crescent, erase the unwanted top crescent and there you have it!


75 – Shooting star
Draw an arrow. Add two lines to the arrow shaft and a small V in front of the arrowhead. Fill in the textural details and color.


76 – Rocket
Draw a bullet shape. Add the side fins and one in the middle in the shape of an oval. Put horizontal lines to create the top module. Add a flame coming out of the bottom, and you’re ready to launch!


77 – Thunderbolt / Lightning
Draw a zigzag and double it up. Remember to keep the top blunt and the bottom sharp edged.


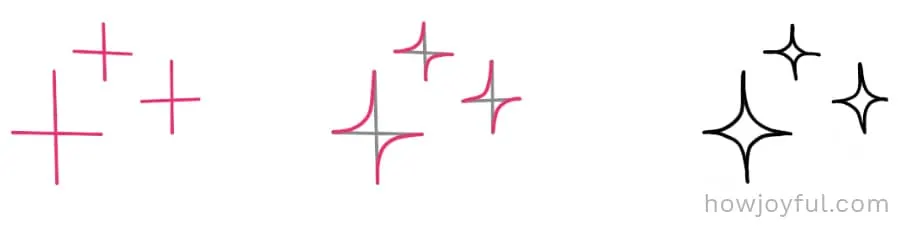
78 – Shinning stars
Draw upright crosses; add arcs from point to point; erase unwanted lines. Interestingly, this shape star is the one associated with guardian angels the most.


Tech ideas to draw
I could not let out some tech drawing ideas, while some are super simple, I have also simplified them (just like I did with many of the ones before) to make them easy for you to draw in 3 steps.
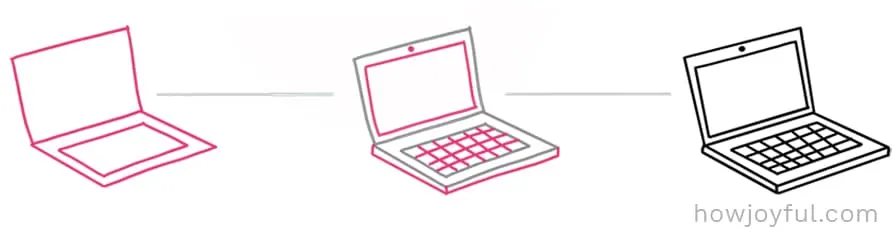
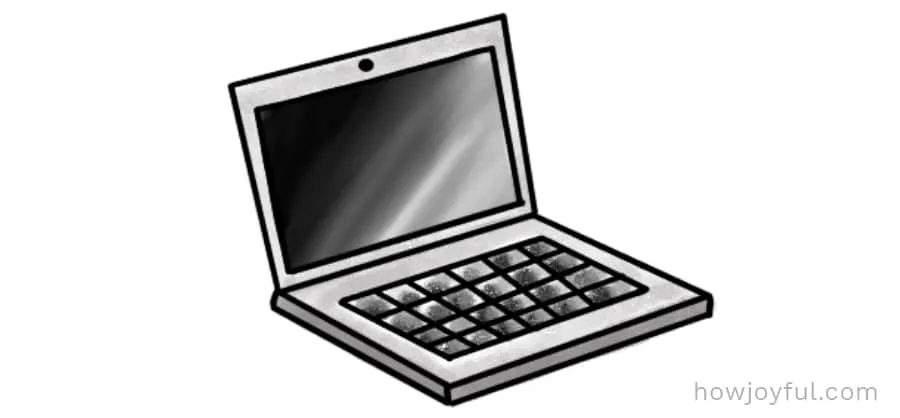
79 – Laptop
Draw a sideways rhombus and then mirror it. Add the texture details of the keyboard and screen, don’t forget to add shading to the screen for authenticity.


80 – Computer mouse
Draw an oval. Bisect it horizontally. Add right and left click sides and a small oval in the middle. Shade.


81 – iPad
Draw a smaller round cornered rectangle inside a slightly larger one. Add button and screen texture detail.


82 – Game tablet / Game Boy
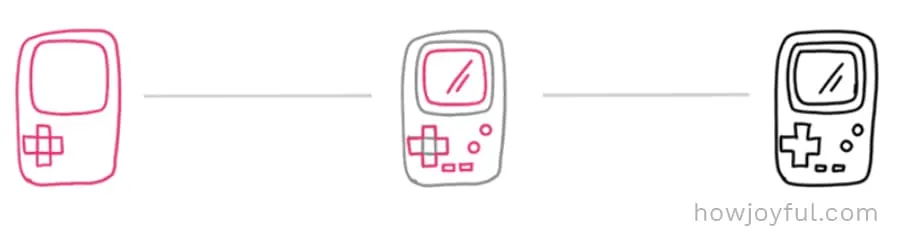
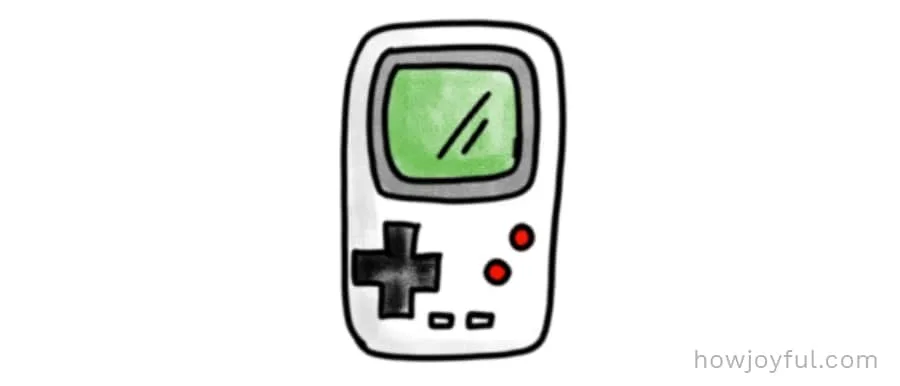
Draw a round-cornered rectangle and another one inside it at the top. Add the controls and texture before coloring in.


83 – Camera
Draw a horizontal rectangle with soft corners. Add the lens, camera eye, and buttons. Add texture to the lens.


84 – Battery
Draw a rod according to which type of battery you want to draw. Add an ellipse to one side and place a knob on top (this will be the positive end).


85 – Lock
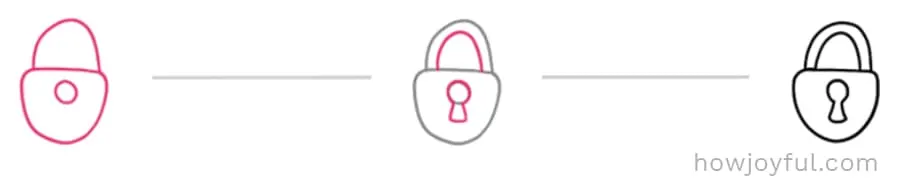
Draw an upside down cloche dome. Add a semicircle arch at the top and a small circle for the keyhole. Extend the keyhole down and double the top arch to form the hook.


86 – Round glasses
Draw two circles side by side. Connect the circle with an arch bridge and make the temple sticks. Shade for texture.


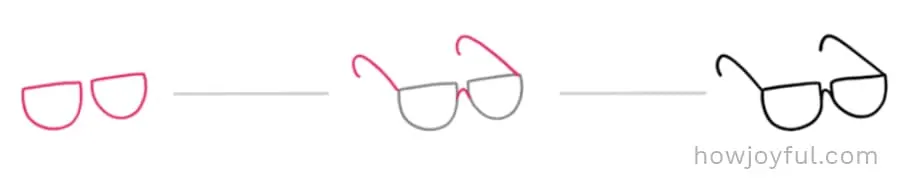
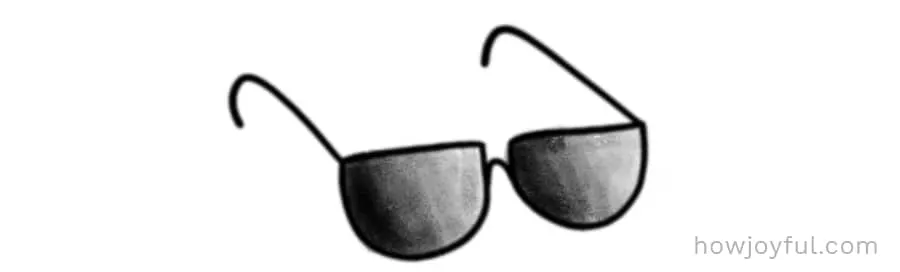
87 – Sunglasses
Draw two half-ovals side by side and join with a nose bridge arch. Extend the temple sticks outward and draw hooks at the end. Shade for texture.


Nature drawing ideas
I could not leave out nature-inspired drawing ideas. From flowers to leaves to animals, going green has never been easier. I have a full post on how to draw leaves here. I plan on going into more detail about flowers in the future with a separate post.
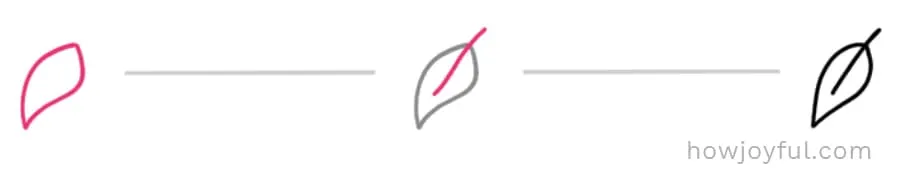
88 – Leaf
Basic teardrop shape. Add a stem going from the middle of the leaf and up. Add texture.


89 – Maple leave
Draw an oval shape that has been split in two vertically and separated. Add a pointed dome shape in the middle and bisect it with a line. Serrate the edges with an outline and add texture.


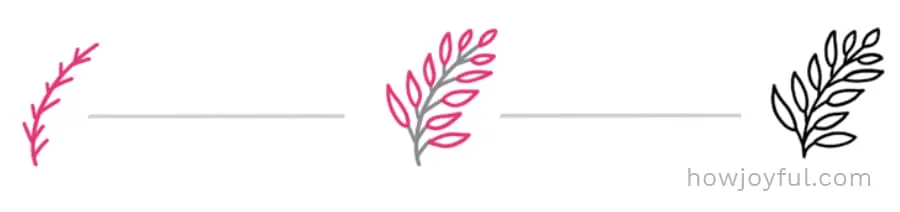
90 – Branch
Draw a gentle curve line. Add spikes on either side. At the end of every spike, add a small teardrop. Add texture to the teardrop leaves with a bisecting line.


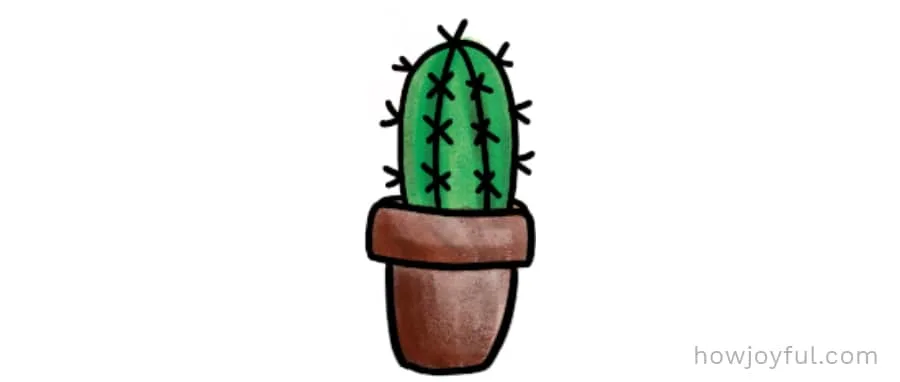
91 – Cactus
Draw a narrow cloche dome. Add a flattened rectangle under it and then a further rounded trapezoid shape under that to make the pot. Add vertical lines to the cactus body and intersect with crosses to form the spikes.


92 – Snake plant
Draw a trapezoid with a flat rectangle on top to make the pot. Draw three vertical lines going upward. Around these vertical lines, fill in the spiky leaf shape of the plant. Add dimension lines and color.


93 – Flower and pot
Draw out the basic pot shape. Add a vertical line, teardrop shape to be the leaf, and an open top dome shape at the top. Close the flower by bisecting it and add a leaf. Add dimension and texture.


94 – Simple flower
Draw a small circle with five lines around the perimeter. Draw arches around the lines. Erase the lines you don’t need and add texture details.


95 – Small rose
Draw a circle and add a teardrop. Add a spiral in the middle of the circle and a line in the teardrop to form a leaf.


96 – Daisy flower
Start off with a small circle and add thin, narrow ovals opposite each other until the perimeter is full. Add texture to the flower face.


97 – Butterfly
Draw a short vertical line and add two oval shapes on either side. Bisect the ovals into one large wing at the top and one smaller wing at the bottom. Add feelers and texture patterns.


98 – Side butterfly
Draw a narrow, tilted rod. Using the top of the rod as an anchor, draw two looping semicircle arches; these are the wings. Add dimension by duplicating another set of wings behind. Add feelers and a tiny circle for the head.


99 – Small butterfly
Draw a B shape extending outwards from a small rod. Double up the B shape. Add feelers and texture to the wings.


100 – Dragonfly
Draw two thin, small ovals, one underneath the other. Extend a line from the bottom oval to create a tail. Draw a tiny circle at the top for the head. Using the top oval as an anchor, draw two teardrop shapes slanting downward, and then add two upward teardrop shape at the top. Add texture to the lower wings and color in the dragonfly body.


101 – Side dragonfly
Draw a teardrop on its side. At the point, add a tiny thin oval shape and extend a line down from this as the tail. Add a dot circle as the head and dots going down the edge to create a body.


102 – Ladybug
Draw a slightly circular oval shape. Add a vertical line down the middle and a small knob at the top. Add the feelers, two tiny circles on either side to make the ladybug pattern, and three legs on either side.


103 – Mouse sketch
Draw a teardrop shape on its side. Add a tiny circle to the pointed end. Add ear, legs, and tail details. Color in the eye and nose to emphasize the features.


104 – Cat face
Draw a circle and add two pointed domes at the top for ears. Add two ovals for eyes, a small rounded triangle for the nose, and an upside down seagull shaped to create the mouth. Add in the dimensional and textural details and fill in the color. Instead of cluttering up your cat’s face with whisker lines, add a few dots to signify them in its place.


105 – Simple bunny face
Draw a circle and place two long narrow oval domes on the top. It’s a sleepy bunny so create two closed eyes with arcs. Make the nose by adding a triangle with rounded corners. Join the mouth to the nose with a vertical line. Add in fur and ear texture details. Don’t forget to add whisker dots!


106 – Birthday candle
Draw an upright rod. Create a small ellipse at the top to add dimension. Extend the top of the rod with a vertical line and then add a teardrop to create the flame. Add diagonal lines on the rod to make the candle.


107 – Pennants and bunting
Draw out a sweeping curved line. Add triangles to the bottom and a few bow ovals at either end.


108 – Pretty bow
Draw a square with rounded corners. Add two pointed oval at the top and two lines going down outwards at the bottom. Join the corner ovals to the lines and add texture lines.


109 – Simple bow
Draw a square with rounded corners. On either side, add a sideways heart shape. Add in the texture details.


110 – Compass
Draw two circles, one inside the other, and add a small circle at the top. Add dashes at the main compass points and draw in the texture details. In the middle, draw two tiny triangles to form the compass arrows.


111 – Campfire
Draw an arc at the bottom with spiked teardrop shapes to create flames. Add four rods at the bottom to become logs. Add texture to the flames and logs.


112 – Badge / First prize rosette
Start with a circle and then draw another one around it. At the bottom, add a rectangle with an indent at the bottom. Add the small arches around the edge, second ribbon at the bottom, and the number one. Check for any unwanted lines before coloring.


113 – Jigsaw puzzle piece
Start with a square. Add one outside knob and two inside ones. Add a tiny heart. Erase unnecessary lines, and then color.


114 – Sock
Start with a horizontal oval shape but extend it upwards with a joining rectangle. Add texture details such as toe and heel markers.


115 – Small jewel
Draw an upside down isosceles triangle with no horizontal line. Add a trapezoid on top. Draw a vertical line from the bottom angle to the middle of the shape and then extend it out into four branching lines to join up the trapezoid angles. Add some illumination dashes and dots.


116 – Jewel
Draw an upside down V and add a trapezoid to the bottom. Erase unwanted lines and then insert a smaller shape into the middle. Match up the corners of the small jewel outline to the larger one. Shade and color.


117 – Diamond
Draw an archetypal diamond shape. Place a smaller one in the middle. Join up the corners of the smaller diamond shape to the larger one. Add sparkle dots.


118 – Arrows
Take one rectangle; add a triangle on top. Customize as to how you want your arrow to look.


119 – Skull
Draw a circle and add a flat rectangle base to the bottom. Add two eyeholes, and turn the flat rectangle base into teeth. Add a nose hole, and four bones on opposite sides. Darken the eye and nose holes and remove the unwanted lines.


120 – Skull and bones
Start with an oval. Add a rectangle base, eyeholes and nose hole. Draw two rods underneath. In the rectangle base, draw in a curve line and cross it to form teeth. Add knobs to the rods to make bone shapes. Color in the eyes and nose and erase unwanted lines.


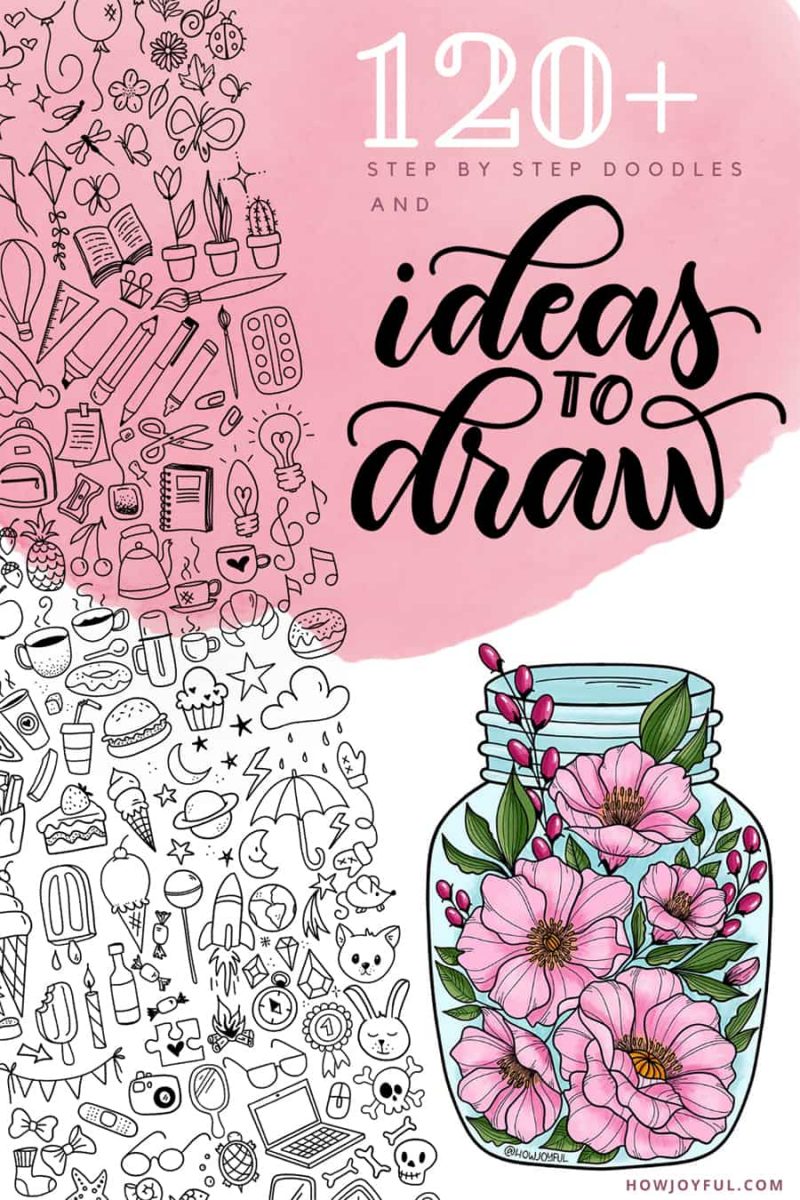
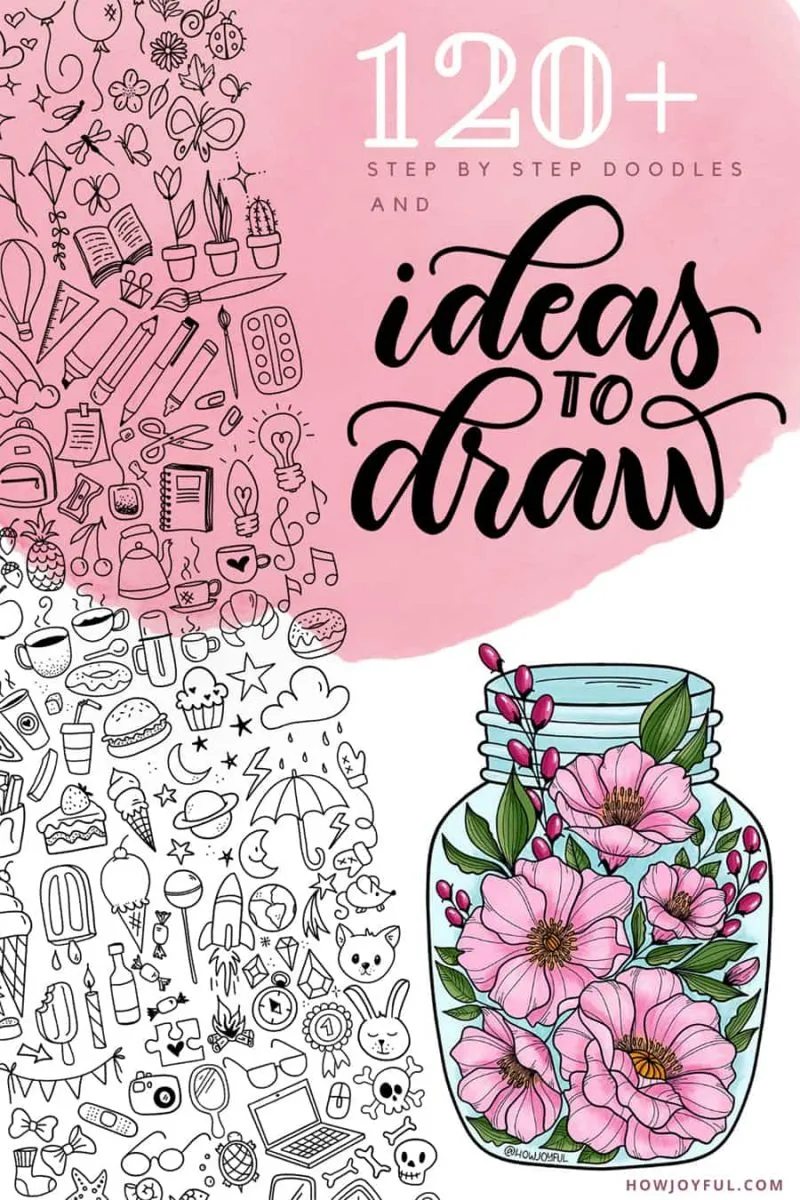
Intermediate monoline drawing ideas
Now that we have gone through some simple drawings, I wanted to share some cute ideas for sketches that are a little more complex and have more than one element on them, and while I will keep them in just back and white without adding color, I want to show how cute simple monoline sketches can be as well.
1 – Peony butterfly
This is an intermediate/advanced drawing because it's a lot more realistic than the doodles we started revising at the beginning of the post. For this one, I drew half of a butterfly, and then on the other half I added two peony flowers, I really enjoyed coloring this and played with soft color for the flowers and a bright yellow/orange mix for the butterfly.


2 – Bottled adventure camping
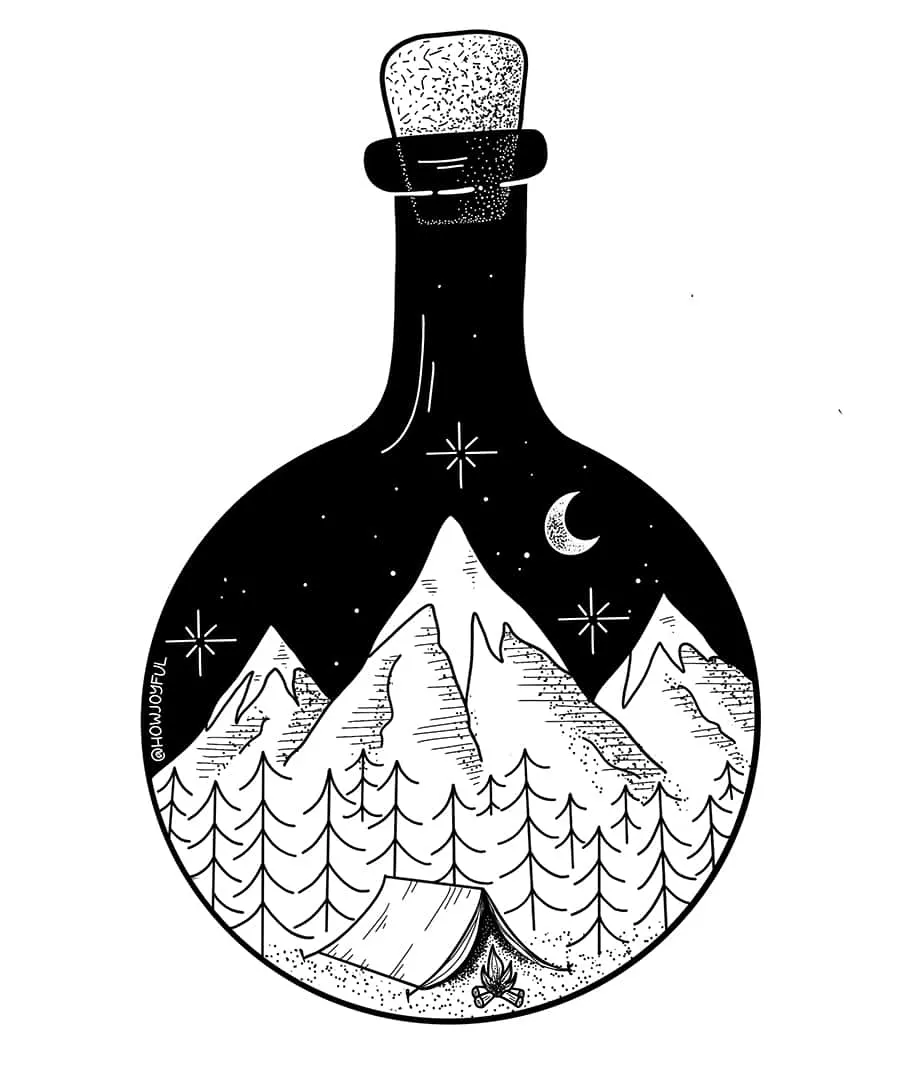
I really wanted to play with the concept of carrying adventure wherever you go for this sketch, I selected a round bottle that resembled more of a planet and set it on a black background to make a night illusion. I added mountains, some super-simplified pines, and a tent, I also added the same campfire doodle we revised in our doodle list (111). For the color version, I played with a marker effect and selected a bright yellow for the tent.


3 – Clouds with hanging potted plants
I love potted hanging plants, so I figure it would be so cute to make them hanging from the clouds that we already revised how to draw. I also added some dots and lines to give it more details. This was such a fun doodle to make =]


4 – Botanicals side planet
I am a little obsessed with florals, so I added them on the side of a simple planet drawing, I also added some sparkle stars and I separated one side to add a few flowers and a bunch of different greenery that I embellished with lines and some dots.


5 – Jar full of flowers
To finalize the section of some more complex ideas that you can draw, I sketched a simple jar and add some more complex flowers inside, all of them in different positions to try and fill out as much of the space as possible. For the color version, I played with contrasting colors and used bold colors with a little bit of texture inside the flowers.


More post about Journals and Doodles
Sketching tool recommendations
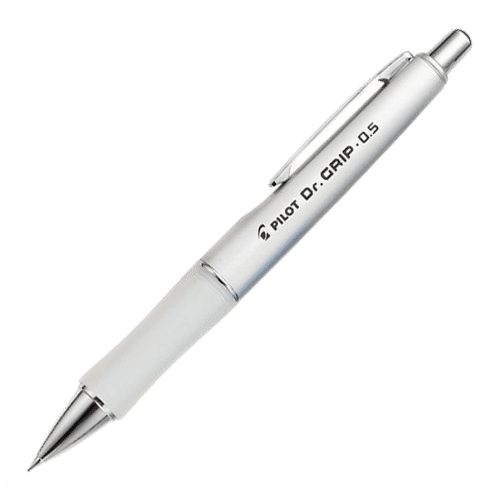
Pilot Dr. Grip Mechanical Pencil
This is one of my favorite mechanical pencils (especially the pink one). I love how thick this mechanical pencil is (0.5 mm). I always have it in my travel pencil case (if my boys don't steal it). The grip is super comfortable, and changing the lead to a softer one will give you so much control and shades.
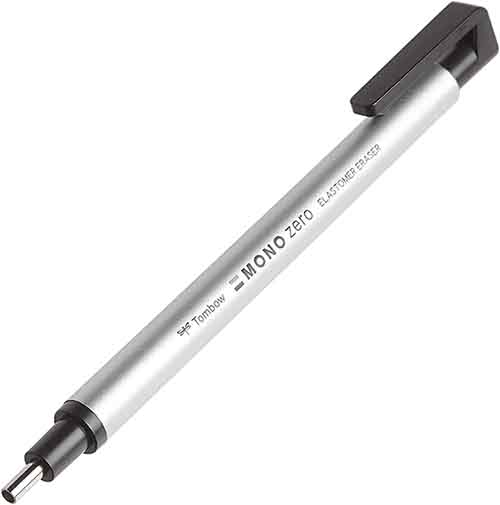
Tombow Eraser
I love using this eraser for detailed lettering and illustration work. The tip is tiny, making it easy to erase tiny areas with precision, whether I’m cleaning up pencil guidelines, sharpening edges, or adding little highlights to my drawings. Because it erases only exactly where you need it, I don’t have to worry about disturbing the rest of my artwork.
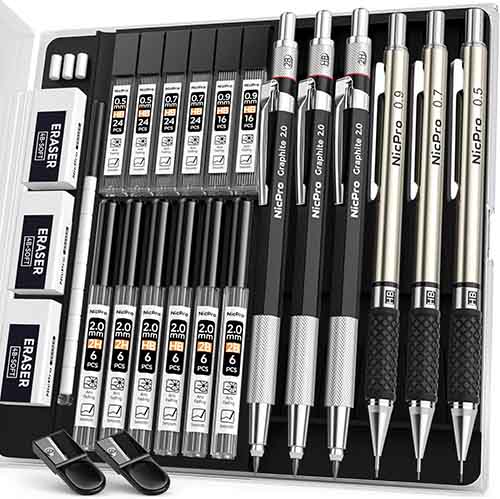
Mechanical Pencil Set
I recently found this pack, and it's so good for beginners, and the 0.7 mm size is my favorite lead thickness; having a 0.9 as well is so wonderful! And while they come with HB leads. While there's different softness for the big lead. For the smaller pens, I like to get something softer, like a 2B. When I add different leads, I like to mark the pens with small labels.


Pentel Triangle Eraser
I first purchased this one while still in college back in Chile; it was the older version but the same concept. I love that the shape of the eraser gives you three points that you can use to be more precise; it's much better than the round ones, in my opinion. It's a great alternative if you don't have an eraser shield.


Staedtler Eraser
There are some things that, once you find the brand that you love, you just stick to it and never look back. For me, the Staedtler erasers are it. I've been using them since my early college years and greatly enjoy them!

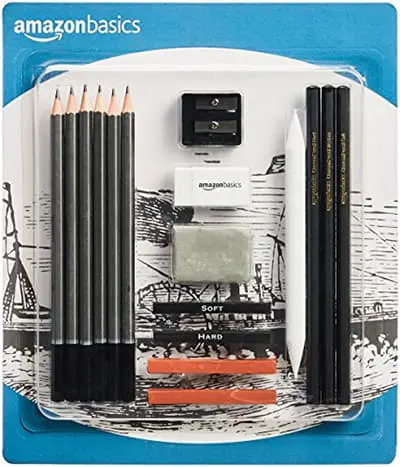
Amazon drawing pack
If you want to experiment with the different softnesses of pencils, this pack offers 6 different softnesses of graphite pencils, 3 charcoal pencils, 1 sketch stick, 4 charcoal sticks, 1 pencil sharpener, 1 charcoal sharpener, 1 kneaded eraser, and 1 white plastic eraser.
Beginner Drafting Set
If you want to experience the different softnesses of leads and also get to use separate mechanical pencils for outlines (red, blue, and yellow), this set is such a good bang for your buck!
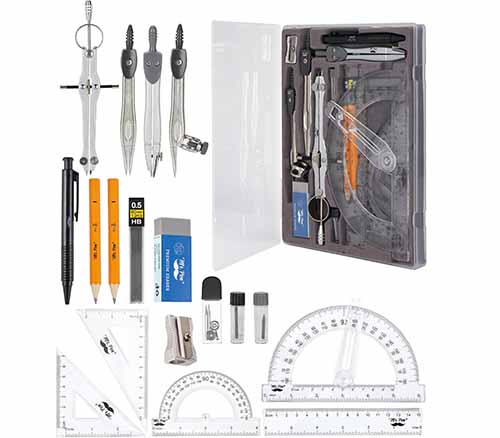
Beginner Drafting Set
This kit is just what you need when you want to make sure that your composition is on point. Making line and circle guides is a must to ensure that your letters are the same size in a word and that if you are making mirrored compositions, things are actually the same widths and angles. Later on, you might not need them as much, but while you train your eye and hand, guides are a must!
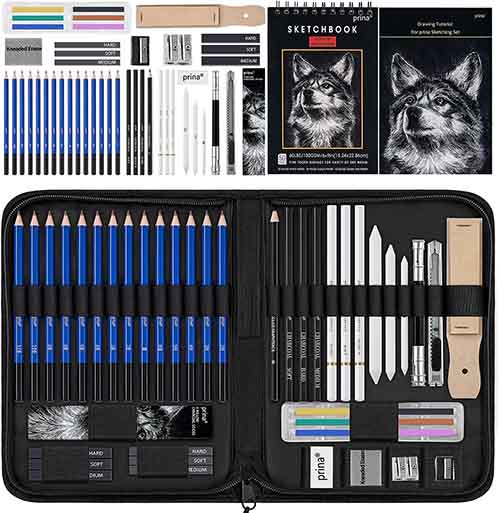
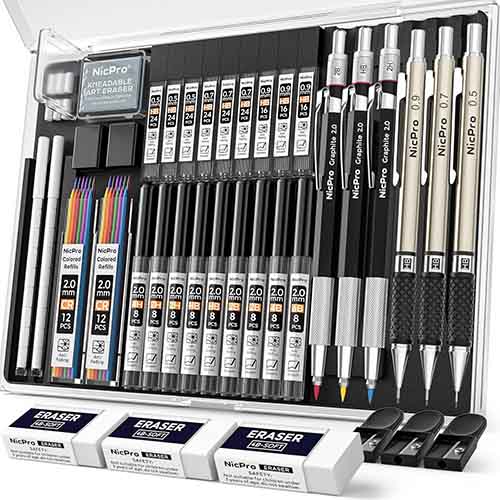
Sketching pack (50 pieces)
If you are looking for an even more complete option that is also very budget-friendly, this pack offers just about everything you would need (paper included). It even comes with a pouch so you can carry all your pencils and tools.
Inking tool recommendations

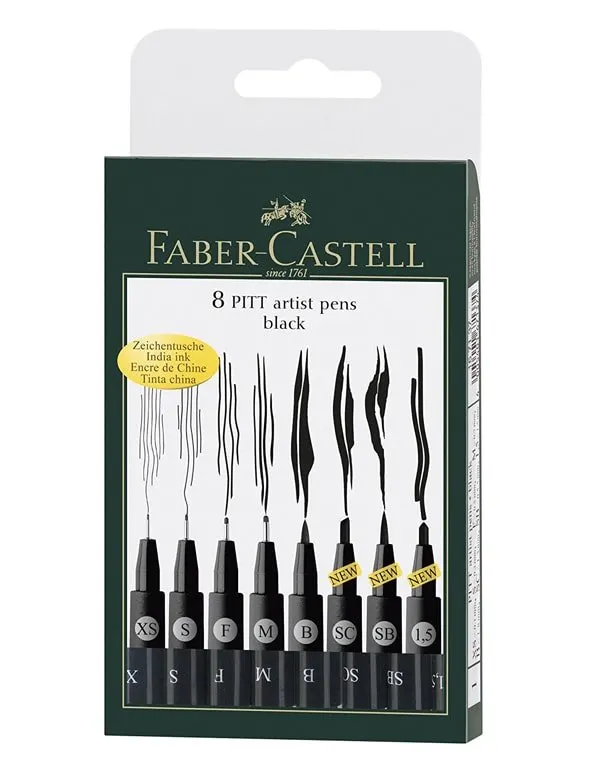
Faber-Castell Pitt Pen set
This pack is wonderful for lettering because you get a wide variety of thicknesses and also one brush pen, so if you want to start lettering but you are not sure if brush calligraphy is for you. You can just get this and start practicing with the one included here. They are a great deal too! (Instead of buying them in singles)

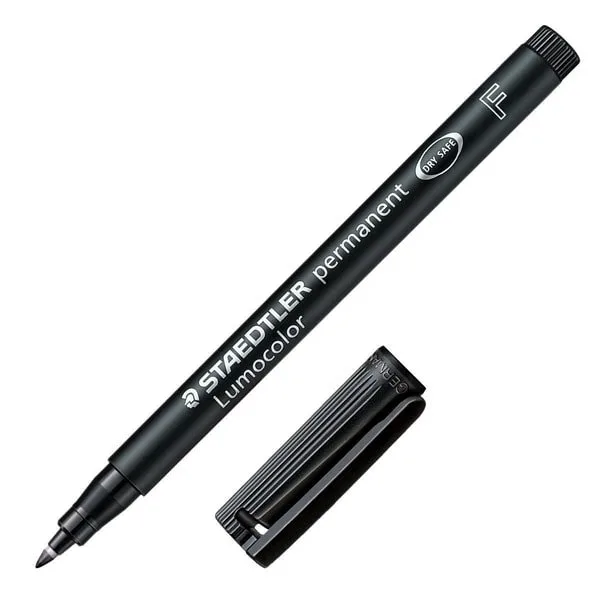
Staedtler Lumocolor Fine Point
I love that this pen can be refilled (the refill station is sold separately), but if you are doing a lot of work, something like this comes in super handy. I was using SO MANY pens until I found this kind of refillable ink pen. They are not as cheap at the beginning but worth every penny eventually.


COPIC Multiliner Pack
I was also introduced to these multi-liners during technical drawing in college, but it took me a while to find them here. I love that these particular ones have a great range of thickness, they are refillable, and you can also replace the nib. These features are wonderful because I can go through one pen in just a couple of days, so this feature really helps my wallet (and can save you a ton too!).

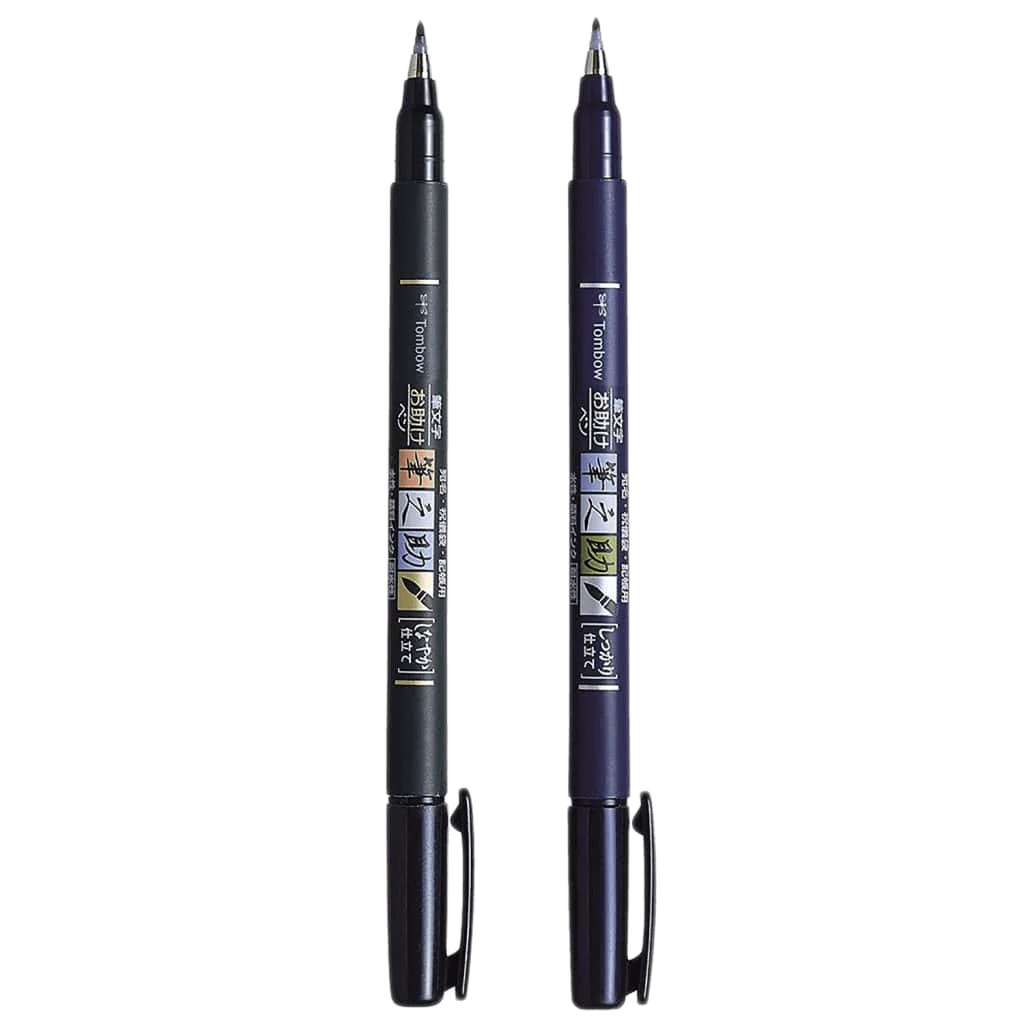
Tombow Fudenosuke Brush Pen
This brush pen set is by far my favorite when it comes to learning; it comes in a soft and hard version. Even though the difference is not huge, you can make a little thicker downstrokes with the soft tip. They handle pressure amazingly well, and if you use them with the correct paper (read my paper recommendations), they can last you a long time. They come in different colors that are bright and so pretty.

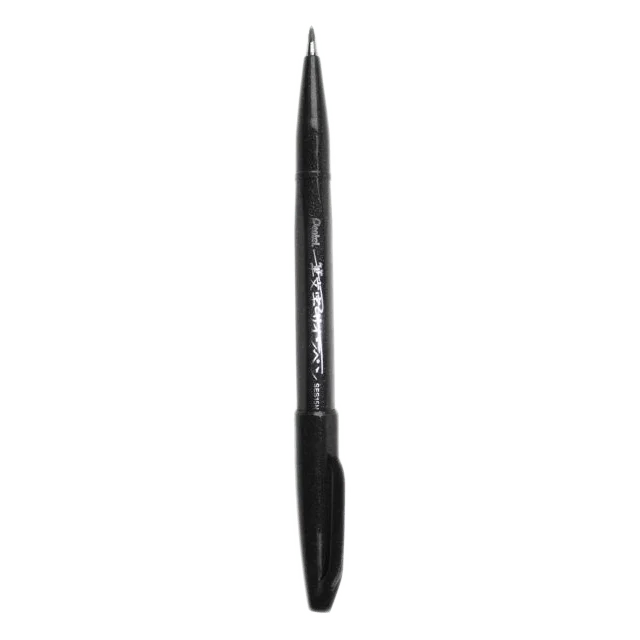
Pentel Fudenosuke Brush Pen
This one is my second favorite fude brush pen; you can also get it in a bunch of awesome colors, and that is always a plus. (You can see them linked below.) I love how durable they are, and they have lasted me way longer than I thought they would.
Paper and notebook recommendation
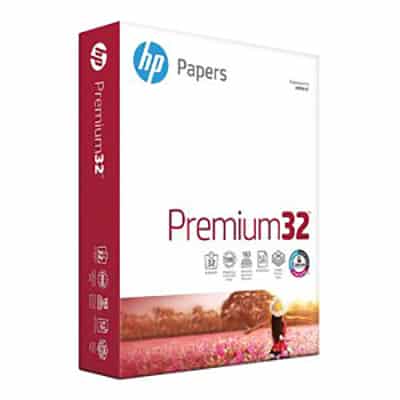

HP 32 lb paper
This is definitely the more economical alternative for paper. I use this exact paper to print all my drill grids. It's a great way to save money while you practice, so you can use your special paper for projects, and your brush pens will not get damaged like they do with regular copy paper.


Strathmore tracing paper
This Strathmore tracing paper has been my favorite since my college years. It's a staple of my studio. It has 50 sheets and measures 9×12 inches.
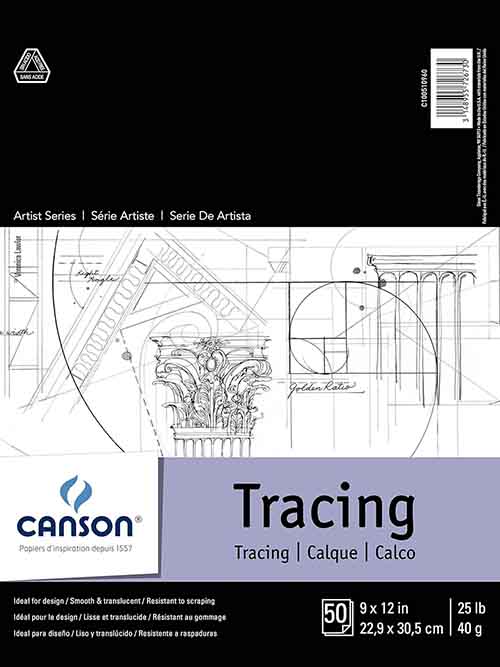
Canson tracing paper
This is my second favorite paper for inking and also for brush calligraphy since it's super smooth and it does not absorb all the ink as some do. But because of this, you need to be careful and wait for the ink to dry, or you will have a mess in your hands and on your paper!
If you want to see more post about doodling and bullet journals, check these post:
Happy drawing!
Kulsum at JourneyKitchen
Wednesday 30th of January 2019
Looks fabulous Joy. Going to try them now!
Gail Gohrick
Sunday 4th of February 2018
Thank you so much!! I love your Peony wraps as well!
Joy
Monday 5th of February 2018
You are welcome Gail =]
Nicole
Saturday 3rd of February 2018
I love these - thanks so much for sharing! I'm making some of my own Valentine's cards to send to friends, these will be the perfect addition to the envelope :)
Joy
Monday 5th of February 2018
You are welcome Nicole! Im very happy they worked for you =]
kellie
Friday 26th of January 2018
Love these and all your work. Thanks so much for sharing. :)
Joy
Friday 26th of January 2018
=] aww thank you Kellie!
Caylee
Thursday 25th of January 2018
Thanks for sharing these. I loved your other doodles, I'm excited to try them out.
Joy
Friday 26th of January 2018
You are welcome Caylee =]