


Learn all the basics to create easy and beautiful cards using the Cricut Joy Machine to send to your loved ones. Because having extra handmade cards for all special occasions is so easy with the Cricut Joy!

This is a sponsored post written by me on behalf of Cricut. All opinions are 100% mine.
In today's post, I wanted to go over the basics of using the Cricut Joy card mat and card insets to make so that we can spread some love and appreciation in these unprecedented times.
Now more than ever, a small gesture can go a long way. This is why I joined Cricut's efforts to spread positivity with this movement.
I know that all of us in either a big or small way have been impacted by what's going on in the world right now.
My husband is a first responder, and while talking to him, he pointed out how isolated and alone the older people they run into at nursing homes are right now, and how families are not allowed to visit most of them.
We are so lucky to be able to see my husband's grandmothers through windows, but this a privilege not many have right now. Many families can't do that, and many people that are at risk can't travel, are not close enough, or don't have a way to have these safe visits.
So I wanted to send some cards to nursing homes and hopefully make them feel better, even for just a little bit =]
After doing some investigating, I gathered the addresses I needed and started to craft some cards.
So if you have a Cricut Joy and some extra card inserts, join me in this project so that we can brighten some inboxes!


How to make a card with Cricut Joy
The thing I love the most about the new way fo making cards with the Cricut Joy is how easy fast and simple it is. Even if you want to make a card with both writing and cut, the whole process will not take more than a few minutes.
Materials
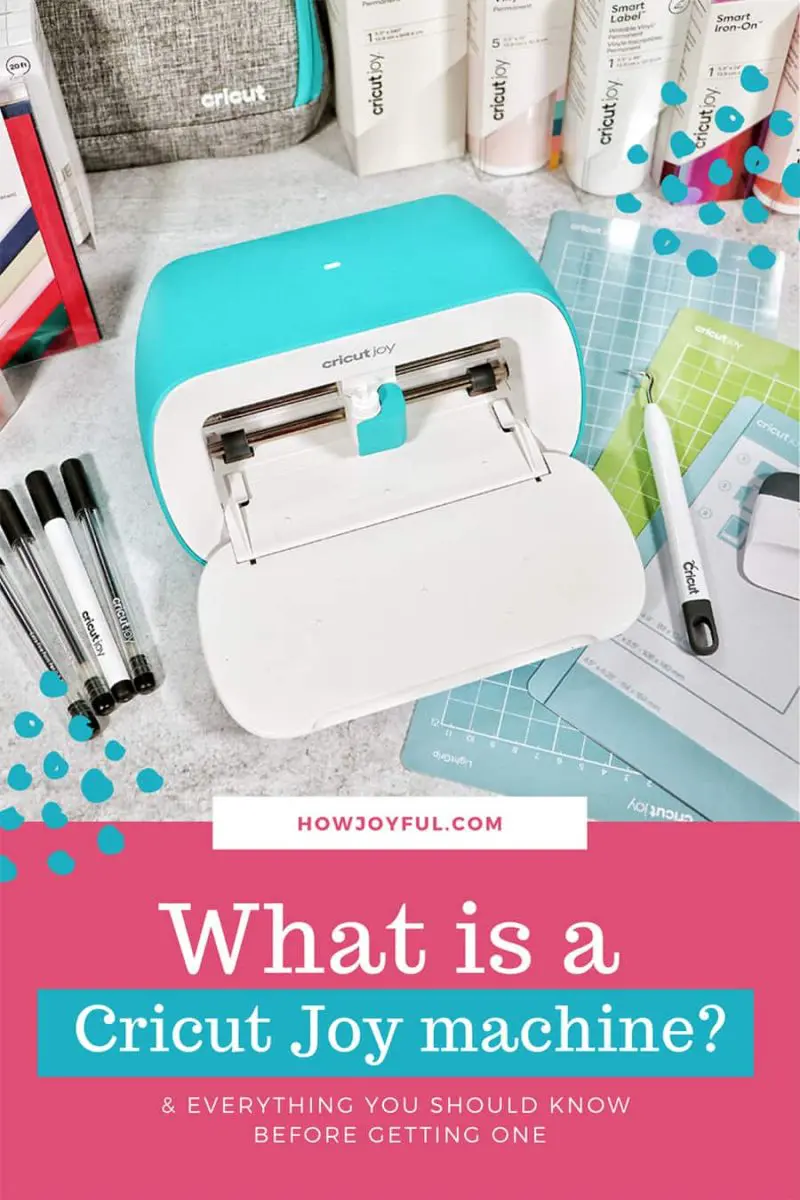
- Cricut Joy Machine
- Cricut Joy Card Mat
- Cricut Joy Insert Card Sets
- Cricut Joy pens (optional)
- Spatula & Scraper (optional)


(Because of the new more simple approach of the Cricut Joy, they release a new Toolset that is just that, a very basic approach to the tools: a spatula, scraper, and weeding tool)
Directions for making a card with Cricut Joy
1If you are using the Cricut Design Space App, you can easily navigate the categories (as shown below in #1). There it's easy to select the “Cricut Joy Insert Cards” so you can see all available designs.


2Once you select the design you want to make, you can click on the “make it” button, that it will take you to the steps to cut the design. It's important to mention that I do have a Cricut Access subscription. So I am able to select all available designs, not just the free ones. If you do not have a subscription, you can either pay per design (most of the card designs are $0.99) or you can check some of the FREE designs.
3After you click on the “Make it” button, you will see the mat, where you can select the material and also the size under “material size” on the left sidebar. I saw only two options, the 4.25″ x 5.5″ (this is the size of the Cricut card inserts) or the full size of the mat.


If you are using the Card inserts, like me. Select the Cardstock “Insert Card – Cardstock”


4 Once you select the material, in the step number two of the machine. You will see a prompt to: load the Fine-Point blade in the clamp AND Load the material into the machine.
If you are using your machine right out of the box, there's no need to do anything, because your Cricut Joy comes with the blade already loaded. If you have been using the pen, you just have to swap it for the blade.
After that, take the protected clear top from your card mat, slide the card as the below picture shows and make sure it's all the way in before folding it over.


One important thing to note is that (as you can see in my mat) the cuts will leave impressions that can be very visible. This is normal and to be expected =]


5 Once your card is loaded, your Cricut Joy machine will make sure that it's aligned, so it will slide the mat inside and out. After that, you can click the “GO” green button on your app to make your machine start to cut.


6 Once the Cricut Joy machine is done cutting, you will be notified in the app. There, click on the “Unload” button, and the machine will unload the mat. (unlike the other machines, there is no load-unload button on the machine)


When using the regular mats, I bed the mat away from the cardstock to remove it from the mat. But the Cricut Joy Card Mat is not like the regular mats, this one is two layers thick, so it’s very difficult to bend. Instead, the spatula comes in really handy for removing your card from the Cricut Joy Card Mat.


7 After you take your card off the mat and peel any extras that could still be attached, make sure you remove all the extras that are still attached to the mat, in order to do this, you can either use the same spatula that you used to remove the card from the mat or you can use the scraper. Once your mat is clean, add the clear protective sheet back.


After your card is off the mat, place the inset for your card in the back, though the corner cuts.


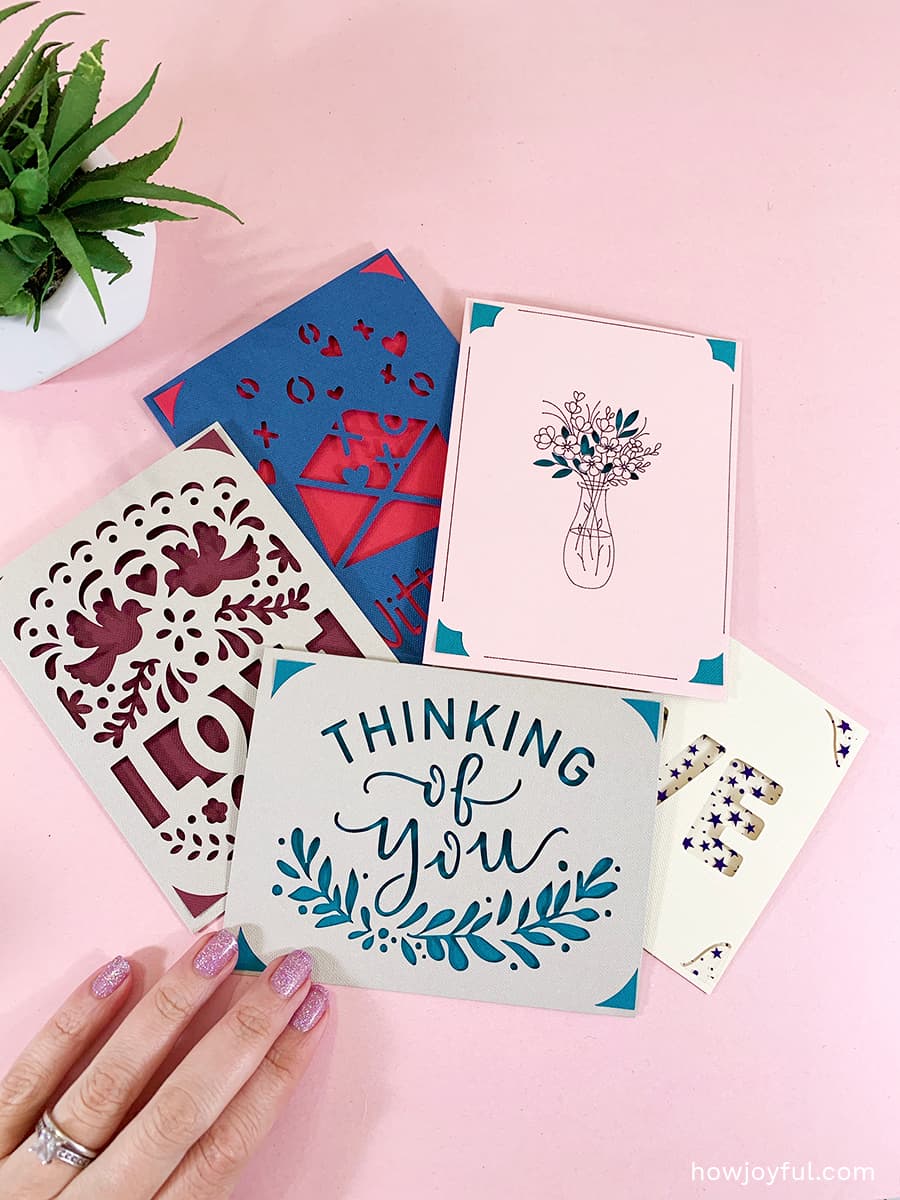
Now your card is ready to add an inside message and send it to your loved ones. Or like in my case, sent to the nursing facilities I selected, to spread a little bit of positivity and Joy.
I decided to make a bunch of them, this “thinking of you” design was one of my favorites as well!


Extra notes
To use your Cricut to write an inside message, just fold your card inside out and repeat the steps above. BUT make sure that your design and the mat are positioned and oriented correctly by double-checking the project preview screen.
Cricut Joy Card Mat will lose stickiness with use and will eventually need to be replaced, just like any other mat. The duration will depend on how often you use it, and how much you care for it. So make sure you place the protective sheet over once you are not using it to prolonge it's life.


If you want to pin this for later feel free to use the images below.


Happy creating!
Deborah
Sunday 28th of February 2021
I think I can begin my journey with my new Cricut Joy. You make it look so easy! Planning to make cards for our nursing home here in Wakita.
Joy Kelley
Monday 1st of March 2021
I am so happy you decided to start =] That sounds like such a nice project to tackle, I'm so happy this post inspired you! Wishing you all the luck! Joy -
Patricia
Monday 20th of April 2020
So lovely, I don't own any cutting machines because they intimidate me a little bit, but you might be changing my mind about this one. Will you make more tutorials for other projects? I am curious about vinyl and iron-on
Joy Kelley
Wednesday 29th of April 2020
Yes, Patricia! I will definitely make a few posts and videos about how to use the other materials (the smart and the regular) so stay tuned! Hopefully, you'll find them helpful and see how easy it is with the Cricut Joy!
Cynthia
Saturday 18th of April 2020
Hi Joy, I wasn't sure I wanted a Cricut Joy as I have an Explore Air 2, but after seeing this post I definitely want one for making cards. This process seems way more streamlined and there is no waste of paper. Thank you for a great post!
Joy Kelley
Saturday 18th of April 2020
Thank you so much, Cynthia! I am so happy that this post helped you decide to get one! I am so obsessed with mine, and the fact that I can easily take it with me adds so much flexibility! I know that you will be as obsessed as I am!
XO, Joy -